Table of Contents
bcnoexceptions' New Player Guide
 Welcome! So you met a Dryad in the woods who swooned, maybe brought you a drink or two, and convinced you to buy this game. And now you might be wondering … "how do I play?"
This guide is intended for new players to Dominions 5. There will be two stages to your Dominions 5 experience:
- Single-player: learning how the game works
- Multiplayer: learning how the game really works 😎
This guide will walk you through your first game of single-player Dominions. After you've picked up some of the mechanics from a few single-player plays, follow Althaea's guide to learn how to join in multiplayer games.
Getting Started in Single-Player
For your first game,
The three Ages
There are three Ages to this game. They're all different from each other, but I would consider Early Age ("EA") and Middle Ages ("MA") more similar to each other than either is to Late Ages ("LA"). As you play you'll decide which age(s) you enjoy more.
- Click "Create World"
- Click "<Random Map>"
- Set it to 20 or 25 provinces per player. This is on the higher side, but will give yourself a little room to play with for your first game.
- Click Ok and pick either Early Ages or Middle Ages (see sidebox)
- Click Ok.
- Stick with just one AI nation, but click on the "Random" on the AI line, and change it to "Random Land Nation" (at the bottom of the list).
- For yourself, choose a nation that sounds interesting!
- Click Ok.
You've got a lot of nation choices, and they all play differently, but here's what I'd recommend. Some easier nations to learn with might be:
- Early Age: Caelum or Fomoria
- Middle Age: Ulm or Caelum.
Someone on the Internet is probably rushing to tell me these are terrible recommendations, but I don't care.
Each nation will have a national overview, similar to the screen pictured to the right. You can right-click on any of the units to get more information. However, for now, skip those details - we'll get into what the stats mean later.

Avoid these at first
Probably stay away from the following for your first game:
- Underwater nations (these are the last few in the list)
- Blood nations (anything that mentions "Blood" in the description)
- EA Ubar or Yomi
- MA Ermor, Asphodel, or Ind
Astral nations
Nations that have Astral have an additional mechanic, "Communions", which can be kinda tricky. No need to avoid them, but do know these may be a little trickier.
Pretender Design
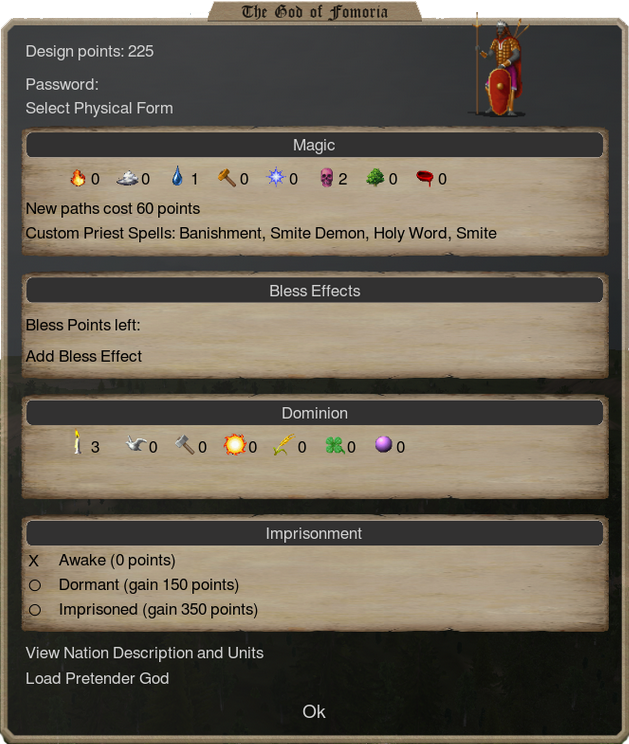
You will now be taken to a Pretender Design screen, which looks similar to this:
This screen lets you define your God, which is full of all sorts of meaningful decisions and tricky interplay with your nation. I'm gonna try to break it down, but I'm intentionally gonna skip some parts that will become more clear later as you play.
At the top-left, you can see your Design Points. You're probably not gonna get this down all the way to zero, but you'll want to be efficient. Left-click on things that are adjacent to icons to "add" them; right-click to remove them. Play around with this and see what some things cost. Many things (such as +attack, +defense, +strength) can be added more than once.
Let's dig into the pieces of this screen.
Click on the avatar in the top-right corner. This is the physical form your God will take on the world map. You'll see some options broken out into four sections:

At the top are the "immobiles" - stationary structures with high intrinsic magic ability, but lacking the ability to move around. As you can see by hovering over the various options, these tend to be cheaper than the next couple of categories, because you are accepting the weakness of immobility.
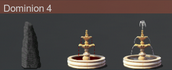
At Dominion 3 are "Titans" - giant humanoids with high intrinsic magic ability. These tend to be considered not as good as most of the other options, but they are still serviceable choices. The Demilich is not like the others, as it can't move and is the size of a thumbtack.
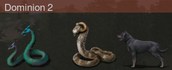
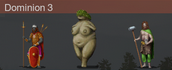
At Dominion 2 are "Monsters" - creatures so big people decided to start worshipping them. Many of these creatures can take on whole provinces single-handedly, so they are popular choices for nations or players wishing to get a boost in the early game. Later on, they tend to be less useful as they don't have torsos or arms. Bucking the trend here are Ghosts and Liches, which are more similar to the next category.
At Dominion 1 are "Humans" - spellcasting humans who were arrogant enough to decide they can hang with the big boys. As you can see from hovering, these tend to be cheaper than the other options, because humans don't have the thicc bodies of the other choices. Don't get me wrong though - they are powerful enablers for many strategies.
For your first game, pick whatever seems fun. If you want me to push you in a direction, I'd say pick an immobile, but I don't want to be too prescriptive here.
Next, let's talk about the Magic section:

There are eight paths - from left to right, you have Fire (F), Air (A), Water (W), Earth (E), Astral (S), Death (D), Nature (N), and Blood (B).
The specific God chassis you just picked has some built-in magic. This is important, because:
- Adding magic from a new path costs more (40 for immobiles, 60 for most Titans, 80 for most Monsters, and 10 for Humans). This penalty doesn't really matter for Humans, but for other God chasses, it's noteworthy.
- The more points you add to a specific path of magic, the more it costs. These costs accelerate - notice that your second click on one of the paths costs more than the first. So, if you want to reach a high number, you want to start at a high number to save points. No chassis starts with more than 3 in any single path.
The choices you make on your God's magic paths have significant impacts:
- Your God may be able to make gear or cast magic rituals that help the rest of your nation.
- Your God may be able to summon creatures that complement the strengths of your nation or mitigate its weaknesses.
- Your God's magic determines your available Bless (next section).
Let's talk about your Bless. For some nations, such as MA Ulm or MA Shinuyama, this doesn't matter as much, but it's a fundamental concept to Dominions so I'm gonna talk about it.
Knock one of the magic paths up to 4, and you'll see you have some Bless Points:

If you click "Add Bless Effect", you'll see that you have a "menu" of how to spend your points. The different paths unlock different effects, and as you might expect, if you get more skill in a certain path, you also get more bless points to spend.
You need at least 4 points in a path to buy blesses. An alternative - if you get at least 3 in all of the "elemental" paths (the left four: Fire, Air, Water, and Earth) or all of the "sorcery" paths (the right four: Astral, Death, Nature, and Blood) you also get bless points.

You might be asking, "what do these do?" and "what should I pick?". The second question is worth a full guide in its own right, so I'm not gonna attempt to answer it here, but the first is more straightforward. Every nation has some "Sacred" mages and/or troops: these are the ones that have this candelabra icon on their type line.
Every nation also has "Priests" which can cast the "Bless" spell. That spell will apply the Bless Effects you select here, to several Sacred troops. If you have a Level 3 Priest, you can cast Divine Blessing, which blesses all of your Sacred troops. Blesses can be quite powerful, because they can be a way to get powerful abilities added to your troops from the beginning of the game, as opposed to having to wait to research magic that confers those abilities.
As I said, I'm not gonna tell you what Bless(es) to take. After you've played a couple of games, feel free to read this link for some generic advice. Some guidelines:
- You can't really go wrong with stat boosts: +attack, +defense, +strength
- Avoid the ultra-expensive ones, which tend not to be worth it, except for Regeneration
Let's move on to the next section: your Dominion Score and Scales.

The left-most number (the one next to the candle) is different from the other 6. That number is your Dominion Score (Dom), which starts higher for Immobiles and Titans, and lower for Humans and Monsters. It has two primary effects:
- A cap on the number of Sacred units you can get from a specific place per turn.
- Higher numbers will spread your dominion faster. This represents more people worshipping your God rather than other peoples' Gods.
You'll generally want this score to be somewhere between 5 and 7. There are reasons to go as low as 4-ish, or as high as 10 (!), but 5-7 is typical.
The other six numbers are your Scales. They will start generally neutral, but you can move them up or down. If your scales confer benefits, you don't actually get those benefits in a given area unless the people there worship you - part of the reason why you want a decent dominion score.
Let's take the Scales one at a time. You'll notice that each scale costs/refunds 40 points, depending on whether you move it in the "good" direction or the "bad" direction.
Order (O) gives you money and "recruitment points". Its opposite, Turmoil (T), takes both away.
Production (P) gives you money and resources. Its opposite, Sloth (S), takes both away.
Temperature (C/H) gives you design points for moving in either direction; it is unique in this way. If you make it colder/warmer than people like it, then you get income penalties. However, there's a seasonal thing, which is tricky to understand, but basically the income penalty is overstated. The UI will say "-5%" for each click, but it's actually less. If you pick a nation that likes Cold 1 or 2, you should take it to Cold 3; same for Heat. If you pick a nation that starts in the middle, feel free to leave it there or to take it all the way to one side.
Growth (G) gives you money and future money, because it gives a direct income boost and also grows your population, which determines a province's base income. Growth 3 is extremely popular and unless you have a good reason not to, you will want to take as much growth as you can afford. Don't take Death (D) unless your nation mitigates the penalty.
Luck (L) gives more "random events" and better "random events". The new game screen (you haven't gotten there yet) will default their frequency to "rare", but most people play on "common". With "common" events, Luck gives more money / goodies than Order or Production. However, Misfortune (M) hurts less than Turmoil, Sloth, or Death. As a result, High Luck or high Misfortune are both valid, but don't leave it in the middle.
Finally, Magic (M) gives you extra research. It is also a popular scale, as the extra research gets you powerful new spells sooner. Its opposite, Drain (D), can be quite painful as your magic comes online later, though some nations will notice more than others.
As you may have noticed when playing around with blesses, some of the blesses require specific scales to be selected.
The last section is your Pretender's availability:

As you might expect, this is a tradeoff between getting your powerful pretender unit from the beginning of the game, vs. getting more points for magic + scales. You may have noticed some of the blesses say "incarnate only" - these blesses only function while your Pretender is awake and alive, so if you take such a bless, you should select Awake.
Monsters are often taken Awake so that they can help you expand; others are often taken Imprisoned. Dormant is more of an "advanced" option, since you would be targeting having your pretender make an impact in the midgame but doing initial expansion without it. Dormant is not selected nearly as often as the other two options.
When you're done with all that, you'll have the most important decision to make in all of Dominions:

Summary of the Pretender Screen
- Your chassis (avatar in the top-right) has different stats/abilities, and different starting magic paths.
- Your magic paths (top numbers) determine your bless options (and other stuff that will become apparent later).
- Your bless (bless effects) determines cool effects that apply to your Pretender and sacred units (ones with the candelabra icon).
- Your candles and scales (bottom numbers) determine spread of your dominion, and income for your nation. Take at least 5 candles.
- The Imprisonment section determines when your God shows up on the map. Don't take Dormant. If you took an (incarnate only) bless, take awake.
Game Setup
Make sure that "Random events are common", but otherwise you can leave most of these as defaults (which might not match this screenshot exactly).
The next screen will give you settings for configuring your new game:
Some settings I want to call out:
- Random events - as covered above, most multiplayer games will set this to "common". Does what it says.
- Story events - causing some interesting and swingy chains of events to happen. For single-player, this can add variety and fun, but for multiplayer, people will typically leave this "off" or "minor only".
- "Random start research" - there are 7 categories of research (we'll get to this later) … this setting controls whether you start with a mix of all of them, vs. some higher than others.
- "Renaming allowed" - lets you rename your commanders! This is typically turned on for two reasons: 1) Renaming dudes to set reminders for yourself. 2) Renaming dudes to taunt other players in the game 😎
- Thrones of Ascension - this is how you win! Let's drill into this some more:

Your screen might not look exactly the same
The vast majority of games are "Victory by thrones of ascension". For such games, the bottom section tells how many of each level of throne are present, and how many someone needs to win! A common selection is 1 throne per player, with about half of them needed to win. However, there's considerable variation on this point.
For your first game, let's have one of each level of throne, and 3 points to win. So, you'll be able to win by getting either the 3-pointer, or both of the lesser ones.

Your First Turn
Start the game. It'll take a bit to generate the map, after which you'll see the first messages of every game:

You can click on each of them, to see the backstory for the game … basically, some old Pantokrator (God) locked up all the competitors (you) and ruled for a while, until disappearing. So now, you guys are fighting to take his place (civilian population be damned!).
After closing this popup, you'll see your capital. You'll have either two or three commanders, depending on whether your Pretender was Awake or not. Here's how it might look for someone with an awake Pretender (in my case, a dragon named "TWO DWARVES IN A DRAGON SUIT"):
 The first one is my starting troop-leader commander, the second one is my starting scout, and the third one is my Pretender God. As mentioned above, you may not have the third one if your God is not Awake. You can identify the troop leader because of the little sword at the right, which means that it is commanding troops.
 Click on the troop leader and hit <space> to give him an order. You'll see a list of all the things this guy can do as his action. Your first order will be to make him your prophet, by clicking "Become Prophet".
We'll talk about many of these orders later, but let's talk about your Prophet. You can only have one Prophet at a time, but if this Prophet dies, you'll be able to appoint a new one after a few turns. Your Prophet will automatically get 3 levels of Holy Magic, which means he'll be able to claim thrones, bless your troops, and smite your enemies (more on this next turn).
Click on your scout, and then click on a neighboring non-water province. You'll see a gray arrow, showing that your scout is sneaking to that province. You'll see that the different provinces have different terrain types - farms, forests, mountains, etc. Early, you'll typically want to prioritize farms, for the money … but we'll want to see who's occupying them first!
If you selected an awake Pretender, have it Research (click on it, press space to choose an order, and select Research).
Recruitment
Next, let's recruit some troops! Click on your capital, then click Recruit Units on the right side of the screen. You will see troops you can recruit in your capital. Your screen will be different depending on the nation you chose:

The top section is commanders you can recruit, and the bottom section is units. Usually, your mages are towards the end of the top list, and your nation's sacred troops (if applicable) are usually towards the end of the bottom list. Pick a mage commander on the top to recruit, and some units on the bottom to recruit (likely your sacreds). You can right-click on a guy to get a screen with more stats for him.
Each unit you can recruit has individual stats, and a full explanation of these stats will come later. But generally, pick troops with high protection or defense, and/or your sacreds, and recruit a bunch of them! Click "repeat recruitment" to repeat these orders from turn to turn.
As you recruit, you might notice your troop recruitment turn gray, indicating that you've hit some type of limit:
- You can't recruit more sacred units than your Holy Point unit (the number of candles from your Pretender screen).
- You have a limited amount of gold. Whatever you don't spend will carry over from turn to turn.
- You have a limited number of resources and recruitment points. These do not carry over from turn to turn, so use them or lose them. Early on, you'll want to make efficient use of your resources in particular, as they will likely be the limiting factor in recruitment. Later in the game, you won't worry about these as much.
Buy some units so as to max your recruitment, focusing on sacreds / high protection/defense troops as mentioned earlier. There are more intricacies to your troop selection … but that's a topic for another guide.
Research
Like in many 4X games, you can research. Let's queue that up now. Click Research from the right side of the screen. You'll see the various fields you can research. Unlike my screen, you'll likely have some research already done.

You can see the seven fields of magic:
- Conjuration - summoning spooky monsters to cause trouble.
- Alteration - turn jawnz into other jawnz, such as turning your soldiers skin into iron, or turning the ground into a crater.
- Evocation - calling down fire and lightning and shit like that.
- Construction - building stuff … this includes constructs and golems, but mostly forging magical items.
- Enchantment - a mixed bag of various battlefield and world effects, such as making all your archers shoot fire, or making the whole battlefield full of poison gas.
- Thaumaturgy - various (often mental) effects, such as making people enraged or permanently enslaved. Typically affects a smaller number of targets, but with more powerful effects.
- Blood Magic - sacrificing virgins to summon demons. If you followed my earlier advice, you won't deal with Blood Magic for your first game - but it is quite powerful and you'll want to try it out in a future game!
Each school has 10 levels: 0 through 9. You'll start with a pretty low value in most schools (0-2 depending on your Magic scale and game settings), but as the game goes on, you'll research more.
 You can right-click a school to see the spells in that school. For example, here are some of the spells in Evocation:
The spells that have a pentagram are "rituals", which you spend a whole turn to cast; the others are combat spells that you'll cast in battle. On the far left are the paths needed to cast that spell - for example, Burning Hands requires 1 Fire to cast, whereas Rust Mist requires 2 Earth and 1 Water. A mage intending to cast a spell needs to have all of the paths … so now you see one of the impacts of your pretender's magic (guaranteeing you can cast some advanced rituals).
Any spells shown in blue are uniquely specific to your nation! They tend to play into your nation's strengths/goals.
What to research varies significantly by your nation, and a full list is beyond this guide, but here are some common research targets:
- Conjuration 3 & 5 lets you cast Summon [Lesser] X Elemental.
- Alteration lets you cast powerful buffs like Body Ethereal and Iron Warriors, Swarm (which makes a crapton of bugs), and Earth Meld/Maws of the Earth (which disable a bunch of enemy troops).
- Evocation lets you summon Sleep Clouds, cast Lightning Bolt / Thunder Strike, and drop Gifts from Heaven. It also has Earthquake, a spell which affects the entire battlefield (including your own troops!), and the classic Fireball.
- Construction lets you forge items: every even number of levels unlocks a new set of items you can make! A list of items is beyond this guide, but suffice it to say, that there are very strong items at each tier.
- Construction 3 also unlocks Legions of Steel, a strong army buff.
- Enchantment 4 gives you Flaming Arrows, which enchants all your archers, and at Enchantment 5 you get Horde of Skeletons (which does what it sounds like) and Foul Vapors (a powerful battlefield-wide poison effect).
- Thaumaturgy is most useful for nations with Astral, which can form Communions (more on them later). Thaumaturgy lets you cast Paralyze, Soul Slay, and Enslave Mind to kill or steal single targets.
- Blood Magic … is a topic for another guide. 😈
The costs for each level of research ramp up as you research more, so Evocation 3 costs more research points than Evocation 1 (for example). Go and pick some research that seems interesting, and a match for your nation's mages. You can queue up many levels of research, and switch research at will without losing any progress.
 Example: EA Fomoria
Fomoria has mages with Air and Death magic, so when playing as them you might consider researching Enchantment for Horde of Skeletons. Or maybe Evocation for Storm and Thunder Strike. Or maybe Conjuration for Summon Air Elemental. As you'll see, this game is full of choices!
Exploring the spellbook and coming up with creative uses for available spells is a big part of the fun of Dominions, so I'm intentionally avoiding being too prescriptive here. As you play more, you'll get a better feel for spell combos and research goals.
When you've picked some research, close the Research screen and click End Turn.
Turn 2 - First Look at the World
You've now gotten a new message, declaring your prophet to the world! Go and take a look at your prophet (right-click on him) - you'll see some new icons:
![]() The first one indicates that he now has holy magic, level 3. The second indicates that he is permanently blessed, and the third indicates that he's your prophet (permanently blessed and can never be enslaved).
The first one indicates that he now has holy magic, level 3. The second indicates that he is permanently blessed, and the third indicates that he's your prophet (permanently blessed and can never be enslaved).
Let's see what that gives you! Close that popup and click on Army Setup (on the right side of the screen):

Let's add your new troops (your's will be different) to your starting army. Click on the first of your troops in your garrison at the top, then hold shift and click on the last one. Add them to one of your squads by clicking on the dark area in that row. You'll see your troops add to that group of other troops.
Click on the green area on the right to control where those troops will start. As you might expect, you'll want melee units to hold the line, while archer units shoot behind them.
Then, click the <set battle orders> for the squad (on the right) to control that squad's order. For melee squads, you might consider "Hold and attack"; for archer squads, you might consider "Hold and fire". We'll see in a second why we want them to hold!


Click on the "<set battle orders> for your prophet. You'll see a different screen for this guy:
As a commander, you have a lot more control over what this guy is doing. You get to specify exactly what he will do for five turns, followed by a "general" order for what he's gonna do afterwards. Let's take a look at this guy's cool spells! Click "Cast a specific spell" and you'll see his available spells:
Click Divine Blessing, to bless all your troops in the first round of combat.
Then click "Cast a specific spell" again, to add your Smite spell to the script. It might be called Heavenly Fire or Word of Power or some such, but it will always be a 3-candle spell. This spell damages one target in range (unless they resist).
Then type "x" three times to repeat your Smite spell three more times. "X" copies the last script line. Finally, click "Cast Spells" to tell your prophet to cast more spells (likely more Smites).
Side note: On most screens (including the main one), you can hit "?" to see a list of hotkeys available to you. Later on, when you're controlling many commanders to prepare for epic battles, these will come in very handy!
In a typical game, we'd attack a neighboring province right away. Your expansion compounds, so you want to strike the balance between "invade early to get more resources" and "don't recklessly get your whole crew killed". This is something you'll get more of a feel for as you play more.
However, for your first game, we'll take another turn to build up. Make sure you're recruiting a full turn's worth of units, any new mages you recruited on your first turn are set to Research, and end your turn. Again, in a typical game you'd want to make sure to expand on turn 2, but we're taking it a little slow for now!
Turn 3 - Beginning Combat
Alright - let's do this! Add your newest set of recruits to your commander's squad. Then, let's invade a neighboring province. Exit the army popup, and right-click on neighboring provinces to see what's there.
Pick a province that seems like a good target! Here's what you're looking for:
- Not Barbarians, Heavy Cavalry, or Bone Tribe … these guys tend to be tougher.
- A relatively small (no more than 40 or so) number of defenders in it.
- Ideally, a Farm (for good money) or Forest (for decent money and good resources).
Militia+Archers, Wolf Tribe, Deer Tribe, Jaguar Tribe, etc. would all make good targets. To attack, go back to your prophet, and after selecting him (and therefore his troops), left-click on the province to attack. You should see a red arrow emerge, indicating his aggressive movement.
Side note: you'll recall that when moving your scout, you got a gray arrow instead of a red one, because he's sneaking rather than fighting. Stealthy units like scouts have the option of fighting instead - you can control-click to have them attack. However, your scout would just get murdered if he tried to take on a province by himself, so let's just have him continue sneaking around!
If you took an Awake Monster Pretender, most of these can also solo-expand to get you a few extra provinces. Right-click your pretender, and confirm two things about him:
- His Protection is at least 20
- He has one of the following: Fear, Awe, or Regeneration
If so, move him into another province matching the criteria above. The number of defenders doesn't actually matter for this part, but most pretenders still cannot solo the "tough defenders" I mentioned (Barbarians, Heavy Cavalry, or Bone Tribe).
Make sure you're continuing to recruit more troops and researchers, and end your turn.
Turn 4 - Watching your first battles
Look at your messages. You should see notifications for the battle(s) you fought. Did you win? Click "View Battle" to watch a replay.

Inside the battle viewer, hit space to pause the replay. You can also speed it up, slow it down, and see individual units by right-clicking on them.
Advanced note (feel free to skip this section and come back to it!)
The whole battlefield is a big grid, which you can see explicitly by pressing "g" (hit "g" to toggle it off again if you don't like it). The grid is important because the "range" and "area of effect" on spells is calculated in grid squares. As you can also see, units can share a square. Each square supports up to 6 "size points" of dudes - add the Size stat of units to see how many of them fit together. Humans have a size of 2, cavalry have a size of 3, and giant dragons and such have a size of 6.
Some consequences of the size system:
- Depending on the number of units fighting on both sides, bigger (and thus more loosely-packed) units may not be on the front line, if their buddies are in the way. This can result in humans being more efficient in damage output, because they don't have as many dudes in the back waiting for their friends to die.
- Humans and other small units are easier to buff, because buffing an "Area of Effect 1" spell like Body Ethereal will help three of them, as opposed to two or one giants.
- However, humans are more vulnerable to damaging spells - a Fireball that hits "Area of Effect 1" will hurt three humans for the exact same reason.
Early on, people tend to consider human-sized troops to have an advantage for the first reason I mentioned (more damage output), but both giants and human-sized creatures can easily be successful.
In the top-left corner, the game will list spells as they are cast. This will fly by somewhat, but you can pause and view the battle log - the "+" and "-" keys will scroll through the messages. You can also list an individual unit's actions by right-clicking it and hitting "v":
 You probably won't be looking at this level of detail now, but as you play more, you might want to take a closer look at unit actions. It's also good to keep an eye on what spells your opponents are casting!
Watch through the rest of the battle. Were the independent units able to flank you? Were you able to flank them? How effective were your ranged attacks / melee units?
After the battle, you can use the report to inform future battle plans. If you got flanked, consider having some guys "Guard Commander" or have them set to Attack Cavalry. Consider putting horses, if you have them, on the top or bottom (which will be the flank in the actual battle) set to "Attack Rear". There's a high skill cap in setting up your army positioning / deployments to minimize losses.
You can also see how many of your dudes died in the battle. If you lost a lot of your force, send this group back to the capital to restock. Otherwise, march on into new territory!
Regardless, continue recruiting new units in your capital. These will be forming your next expansion force. If you won the battle, you'll notice that your capital has more resources than it did before. This is because forts (such as the one in your capital) gather resources not only from their own provinces, but also adjacent unforted provinces you control. As you conquer more provinces adjacent to your capital, you'll continue to accrue more resources for building your nation's units.
You can also recruit units from the territory you just took, which will typically be more of the same units you just beat. These units tend not to be very good, but some of them are quite powerful. Take a look and see if you want to recruit some of them.
Turn 5 - Mercenaries and prepping your next expansion
Continue expanding, but let's also look at Mercenaries available for hire. Click the "Mercenaries" tab on the right. These are highly variable between games, so you may not have any available to bid on right now, but here's how they work.

Mercenaries vary in a few ways:
- Some are just individuals, and some lead small armies. In the latter case, as the number of soldiers in the mercenary band dwindles, the minimum bid decreases as well.
- Some are quite tough, and others are rather weak.
- Some are amphibious, and others are restricted to land.
Mercenaries are most useful early for aiding your initial expansion, but they can also help later on. Standard bidding mind games apply: you want the lowest bid you can get away with.
Let's also look at your capital. First, make sure all those mages you've been recruiting are actually Researching; if not, set them to do so!
Second, let's prep our next expansion party! You'll want to wait to send this party out until you've got 30-40 units in it (or about half that for giants), but you'll also need someone to lead them! Recruit a commander with a Leadership of at least 40, which is the minimum to be an effective leader. If the commander has 80 or higher, you get access to more formations (lines, double lines, sparse lines).
Turns 6-9 - Starting to ramp up
When you've got your commander and sufficient units to form another expansion party, send them out.
 You'll want to start developing another fort to recruit from. To do this, either recruit an indie commander from the area, or send one from your capital, and set its order to build a Palisade.
There are multiple levels of forts, with Palisades being the most expensive and the most basic. Once you finish this Palisade (which takes four turns), you'll be able to upgrade it to a Fortress, and, depending on the era and the nation, further to a Castle and possibly even a Citadel.
Additional forts let you do the following:
- They are a prerequisite to recruiting your national units (generally). Some units are cap-only, but your nation is typically defined by what your forts can recruit.
- They produce far more resources than unforted provinces, as they get resources from neighboring provinces, as well as increased resources in the fort province itself.
- They give you a nominal income bonus.
- They protect the province, as the fort must be besieged before it can be conquered.
A fort is not the only prerequisite for recruiting new units:
- To recruit mages, you need a lab (which is built by another mage)
- To recruit sacred units, including sacred mages, you need a temple (which is built by another sacred commander)
Send a priest and a mage (or a single unit that meets both categories!) to the province where you're building a Palisade, so you can also build this infrastructure.
As you might have noticed, these buildings are expensive! The Palisade is (typically) 600 gold, plus 250 or more per upgrade. A temple is typically 400 and a lab is typically 500. Striking a balance between investing in infrastructure, mages, and regular units is another skill decision that varies significantly from game to game.
Turns 10+ - Gathering Magical Power
As you continue exploring and conquering, you have also (hopefully) been accumulating mages too. Mages do several things for you: Researching new spells Casting new spells you've researched Discovering new magical sites Forging powerful magical items
We've already touched on research; let's talk about the others.
Casting new spells
Spells fall into two broad classifications: combat spells and rituals. You can tell which ones are rituals because they have pentagrams on them on the research screen.

Combat spells are added to a mage's script. For example, here's an Earth mage casting a lot of Earth Meld, a spell learned from researching Alteration:
Some combat spells have a gem cost. To cast such spells, you need to transfer gems from your nation's stockpile to the mage that will be casting them. This transfer can only be done at a friendly province with a lab; otherwise, you can only transfer gems between commanders in the same province. To give gems to a commander, click on him, then click the area above his items (shown below).

You can give gems to a commander that can't use them, or even one that's not a mage at all. This is a common strategy to avoid spending all your gems at once, because mages have a nasty habit of spending all the gems you give them. You can also check the "conservative gem usage" checkbox on a mage's script, to tell him to avoid using any gems he doesn't need to.
So those are combat spells. Let's talk about Rituals. You cast rituals at a friendly lab as a mage's whole turn. Their effects vary considerably, from simply moving around more quickly or healing individual units to casting powerful global enchantments.
To cast a ritual, select that as the order for a capable mage. For example, here's a mage casting Pack of Wolves, a simple Conjuration ritual that summons some doggos.

As the game goes on, you'll likely make heavy use of rituals, for summoning new troops if nothing else. Summoned troops typically do not have gold upkeep, in addition to often being more capable combatants than your regular recruits. That said, some of the summons are definitely more powerful than others, and more likely to fit in with your overall plan. Experiment with the rituals, but make sure to keep researching too!
Discovering magical sites

Presently, you're only earning gems from your capital, which is pretty mediocre. Fortunately, you can discover sources of gems in other provinces! The way to do this is by sending mages out and giving them the "Search for magic sites" order:
Yes, you do want to check every province. The way site-searching works is that the magic sites are actually already out there … but you can't see them. Each site has a path needed to find it - so some sites can be found with Air 1, some require Air 2, and a few require Air 3 (repeat for all the schools of magic).
For a given path, roughly 60% of sites are found with a level-1 search, roughly 80% at level 2, and nearly all at level 3. The takeaway here is that a low-level search is typically "good enough", so you'll want to search with mages that cover the "widest" set of paths without much regard for how "tall" you're searching. For example, this guy is really good at site-searching, since he's got a lot of low paths:

Regardless, you'll want to start searching for sites around turn 10 or so. Discovering sites can give you the following: Additional sources of gems (the primary purpose for doing this) Sites where mages can summon troops for free (generally not very impactful, but sometimes handy) Sites that discount a specific field of rituals, e.g. discounting Enchantment rituals by 20%. These are extremely powerful! Sites that let you recruit new units: often pretty powerful as well, especially if they open up a new path of magic Sites that mess with the scales in a province
 Here's what sites look like after you've discovered them (you can right-click a site to get more information about it):
The game will tell you what paths you've already searched in a given province, so you don't need to bother with redundant searches. For example, this site has already been searched with Fire 1, Earth 2, and Holy 1:

(You can hover over these boxes, if the color-coding is not clear)
If you conquer someone else's land, you will be able to see (and use) any sites they found, but you will not know what they searched with. Usually, I'd recommend searching for sites in your original provinces before searching conquered ones, as:
- Your site-searchers are more vulnerable near the front line
- You might just be duplicating a search someone else already did
As hovering on a province's terrain icons indicates, some terrains generally have more sites than others. Swamps and Forests (and especially Thrones!) tend to have more sites, while Farms have fewer, though it's still worthwhile to search them all.
I typically start searching for sites around turn 10, though you could certainly start earlier provided it doesn't impact your fort-building or early research necessities.
Forging new items

Badass magical conquerors need badass magical gear to go along with them. Besides using your gems to power spells and rituals, you'll also be using them to craft magical items. The way this works is your mages can issue a Forge Magic Item order to craft items you've unlocked that match their magical paths:

In the screenshot above, we see some of the Trinkets (unlocked from the beginning of the game) and Lesser Magical Items (unlocked at Construction level 2). At even levels of Construction research, you get a new "wave" of magical items. Unfortunately, to know exactly what will become available, you need to either consult the manual, or use a tool like the Mod Inspector (this site is extremely useful regardless). Nonetheless, there are some items you'll find yourself making more than others:
- Weapons that hit an area of effect, thus ignoring the Defense score of units they're hitting
- Items that give you a boost in a particular path, letting you cast more powerful spells
- Items that improve the wearer's research score, letting you invest in more rapid research
- Items like the Vine Shield that keep enemies from being able to attack you
Each commander has some "slots" for holding items. For example, this regular human has the "standard" slots - two arms, a head, a torso, feet, and two "miscellaneous" items:

This guy has four arms, so he gets extra arm slots to match. Despite the labels, the left-most slots can hold either weapons or shields.

This giant snake has neither arms nor legs, nor a torso that would support traditional armor, so his slots are rather limited.

Items will size to match the wearer (it's magic!) so size 6 giants can generally wear the same gear as size 2 humans.
Dominions players use the term "thugs" to refer to units with specialized gear that enable them to take provinces solo. Efficiently gearing out your commanders and exploiting gear synergies is a topic worthy of an entire guide. For your first game, play around with forging cool items, and see what effect it has on the wielder's performance in battle!
A word on magical paths
One topic that came up a lot in the last few sections is the paths of your mages. To recap, a mage's paths determine:
- What spells he can cast in combat (and how much fatigue he incurs from casting them)
- What rituals he can cast
- What items he can forge
- What sites he finds when searching
Naturally, there will be some spells/items that are just out of reach. Fortunately, a mage's paths are not set in stone. There are three ways to cast higher-level spells:
- Boosting
- Summoning
- Empowering
Boosting refers to forging items, termed "boosters", that can increase a mage's effective magic level for as long as they're wearing the item. For example, these Earth Boots boost the wearer's Earth magic by one, and are relatively easy to get, requiring only Construction 4 and a mage with Earth 2 capability:

Boosters, like most items, can be freely transferred amongst mages in labs, letting you project that extra bit of power where you need it. Some boosters are more difficult to craft than others - for example, while the Earth Boots above cost 10 gems and required Earth 2, the Flame Helmet below has twice the cost and path requirements. In multiplayer games, such boosters are valuable commodities for trading!

Summoning can be a way to climb magical paths as well, particularly when combined with boosting. For example, this Troll King was summoned by a mage with Earth 3 - which might have actually been a mage who was natively Earth 2, but was wearing some of those boots from before.

If the Troll King then steals those boots, now I've gone from having Earth 2 to having Earth 4. To recap the sequence of steps:
- Start with a dude with Earth 2
- Forge Earth boots and wear them - now he's Earth 3
- Use the fact that he's Earth 3 to summon a Troll King, also Earth 3
- Give the boots to the Troll King (or make another pair) - now the Troll King is Earth 4
The Troll King is kinda expensive, but the fundamental point is: summons can be a great way to get access to higher paths. Most paths can be "climbed" with the assistance of summons.
Empowering is an order you can give to any commander in a lab to boost a path by 1. You can even empower a commander from 0 to level 1 - breaking into a new path or even teaching a former non-mage how to cast spells - but it's costly:

The exact cost is 15 gems per new level, or 50 for a brand new path. As I said, costly - boosters are more efficient if you can make them - but sometimes empowerment is what you've gotta do!
For more information on climbing paths, check out this guide.
Turn 12+ - Claiming Thrones of Ascension
As you expand, you'll encounter Thrones of Ascension, typically guarded by larger-than-normal independent armies.

As we discussed earlier, thrones have different levels (1, 2, or 3). The level controls:
- The number of Victory Points you get as long as you control and have claimed the Throne
- The size of the army initially defending the Throne
- The magnitude of the effect (typically beneficial) when you claim the Throne
When you have conquered a throne, you need to actually claim it. To do so, send your Pretender, your Prophet, or another unit with Holy 3 magic to the throne province. You will then get a special order available, Claim Throne of Ascension. From then on, as long as you control that province, you are that much closer to winning!
Since Throne provinces are so valuable, make sure to build forts on them, so that your enemies have to siege down the fort before claiming the Throne for themselves. As mentioned earlier, they also tend to have more magic sites, so make sure to search them.
Turn 13+ - Become God
Continue to grow your nation:
- Conquering new provinces and building forts/labs/temples in some of them
- Researching more powerful spells and rituals
- Recruiting new mages
- Summoning new and more powerful troops
- Forging mighty equipment
- Conquering Thrones and enemy nations
Overall, explore what the game has to offer! Try new games with different nations - each nation in each era plays differently, opening up lots of replayability.
You can also try out some of the more advanced mechanics I glossed over or omitted earlier:
- Using Astral Communions (or Blood Sabbaths) to cast more powerful spells in combat
- Gathering Blood Slaves and sacrificing them to summon powerful demons
- Using stealthy commanders to sneak around and cause trouble
- Thugging out commanders to be able to take on larger armies by themselves or with minimal help
- Playing as an underwater nation - these tend to have strong control over the seas, but have a tougher time claiming a foothold on land
After a few single-player games, if you decide to jump into multiplayer (which I highly recommend!), check out Althaea's guide for how to find and join games using the Dominions Nexus discord server.
Send any feedback on this guide to @bcnoexceptions on Discord. Cheers!