Table of Contents
Rovsea's Big Fat Jomon Guide
 First and foremost, I'd like to thank everyone who's been kind enough to give help and feedback in the making of this guide: Many thanks to JohnnyJohnny for Build advice, and Infact, Negate, Cleveland, Joste, Darkwolf, Naaira, HPMunchcraft, Wigglefig, and Kalkyrie for feedback. Extra-special mention to Naaira and Joste for their help porting the guide to the Illwiki.
WIP
Author: Rovsea
So I’ve actually been struggling quite a bit on how to structure this guide. On the one hand, Pretender Design is actually the first interaction most people will have with a nation, while on the other hand, Pretender Design is a complex topic that requires a holistic view of a nation to do well. You have to know what you’ll expand with, what you’ll scale into the game with, and the scales and blesses you’ll need to make your mages and troops function.
With that being said, let's briefly go over the initial troops you'll make as you begin, what mages are most important, and the overall strategy to start expanding and prepare for the rest of the game.
Pretenders, Builds, Expansion, and Design Philosophy
Basic Troop Strategies, Expansion, and Scales
To keep things brief, the full overview of Jomon's various land troops is in the corresponding section of the Appendix below, although as each troop comes up a link to it's entry will also be included.
The basic strategy for Jomon to use with its recruitable troops is to place them on hold and attack, allow mages (mainly Master Shugenja) to buff them, then go into a melee where their superior attack skill and plentiful two-handed weapons allows them to out-brawl the opponent. As we’ll see, their mages are actually well suited to complimenting this style, and because they have so many different buffing paths, especially earth, this type of strategy is scalable into the middle and late-game phases. Ashigaru carry out this strategy the most efficiently, while Jomon also has a slew of more elite infantry who hit harder and more often, but the basic stratagem doesn’t change, and because Jomon’s troops lack shields and all move slowly, it’s hard to implement more advanced concepts very easily. The main exception to this rule, among Jomon’s recruits, are Samurai Cavalry, which dovetails nicely into expansion.
Overview

Ashigaru
- Excellent cheap chaff unit.
- The Yari is an excellent weapon that can repel and deal high damage.
Detailed Analysis
Ashigaru are a militia-type unit available to Jomon, similar to the bandits available to the earlier-iteration factions of Yomi and Shinuyama. Unlike the bandit unit, Ashigaru lack stealth and a pillaging bonus, but are also slightly cheaper. Ashigaru are actually very solid for an 8 gold human infantry. They are cheap, and while their hp, morale, and armor are all subpar, they’re still good enough to fulfill their chaff role pretty well. Best of all is that the unit is armed with the Yari, a length 4 two-handed spear. The weapon is useful for several reasons:
- It’s length 4 with an attack skill bonus, meaning it’s both difficult to repel and easier than a regular spear to repel with, even repelling normal length 3 spears.
- Since the weapon is 2-handed, it benefits more from the Ashigaru’s strength stat, meaning that the overall damage, particularly after earth-buffs, is much higher than a typical 1-handed spear, or even the long-spears that hoplite nations like Erytheia or Arcoscephale can field;
- The weapon is piercing 100% of the time, which makes it about almost as effective as the other, higher-base damage weapons at actually penetrating enemy armor; and
- Like other spears, the resource cost of the weapon is very low (compared to 6 for no-dachi and 7 for katanas), meaning that the overall resource cost for ashigaru is low.
The essential uses for an ashigaru then, are primarily as a cheap, easy-to-mass chaff unit that still has capacity to scale into the game because of its solid weapon. They’ll always attrition in fights, but they’re also easy to replace. Ashigaru might lose 1v1 in a lot of matchups to main-line troops from other factions, but almost nobody else can mass as many troops of the same quality. Within the 8 gold price range, about the only other comparably strong troop in the Late Age is the Limitane, which has much better protection and defense, in exchange for much higher resource cost and slightly worse weapon. For this reason, ashigaru are actually one of Jomon’s national strengths.
Overview

Samurai Cavalry
- Jomon's only mounted unit.
- Much higher mapmove than Jomon's other troops.
- No hoof attack and only a light lance, but wields Katana.
- High recruitment point costs. Take Order if you plan on using Samurai Cavalry.
Detailed Analysis
Samurai Cavalry are the sole mounted troop that Jomon has access to (which is ironic since Samurai were originally largely proficient in mounted archery in real life), and unlike most of the heavy cavalry in the game, they lack a hoof attack and only use a light lance. They’re also by far the most expensive of Jomon’s land recruits, and basically in every way mark a pretty radical shift away from Jomon’s other recruitable options. Basically, all of Jomon’s recruitable troops aside from Samurai Cavalry excel in melee mosh pits where they can swing two handed weapons to their heart’s content. They’re slow, high-encumbrance, but make up for that with good weapons and by being relatively efficient elite-troops.
Samurai Cavalry have more than 8 map move (what a revolutionary concept), relatively low encumbrance, are the only Jomon recruitable that excels at flanking with 24 combat speed, and generally wants to avoid straight up fights due to low attack density and lack of a shield (another oddity compared to most cavalry). Oddly enough, in almost every other way they’re similar to an O-ban. They still have a Katana, and 15 attack skill, and all-in-all they’d be respectable enough in melee were it not for the high price tag of 35 gold. In addition, Samurai Cavalry are the only troop that Jomon can field which costs far more in recruitment points than it does resources. For this reason, and because they fulfill a useful role in the expansion phase, whether or not you plan to use Samurai Cavalry will be one of the key considerations when setting up the scales of a Jomon build.
In expansion there are two main schools of thought for how to expand with troops (there are other complexities but those will be explained later):
- Expand using masses of Ashigaru, preferably in line formations to maximize use of their weapons and minimize attrition to ranged weapons. Ashigaru will attrition out, but they’re cheap, easy to mass, and perfectly capable of taking independents of any pop-type.
- Expand using a bait/infantry squad backed up by Samurai Cavalry. Samurai Cavalry will either be on Hold/Attack Rear if using a bait squad such as archers, or on Hold/Attack Closest if using infantry. The archer bait would be on fire and keep distance, and risks attritioning out the Samurai Cav if they get caught out, while the combined infantry/cavalry method wants the infantry squad and Samurai Cav to hit the enemy frontline at the same time, using both squads along with the lance charge to quickly snowball the melee, which typically results in larger infantry attrition.
The first plan using Ashigaru has a very simple plan regarding build/scales: Take Productivity scales, save any points you would have spent on order for other things. If in need of points, even tanking Turmoil is possible, although this’ll probably limit the numbers of Go-Hatamoto or O-ban you’d be able to make later. Creating Aka-Oni Samurai or Samurai Cavalry in more than small numbers is pretty discouraged with this build.
If you plan to use Samurai Cavalry in expansion, the build can get a bit more complicated. In order to maximize production during expansion Order scales are most likely needed, and this can often result in a bottleneck where it’s difficult to determine how much Productivity to take, as this can impact other scales such as Luck/Misfortune, Growth/Death, or Magic/Drain balance, making it difficult to fit everything you want or need. Aka-Oni Samurai become a bit easier to afford, but things like Ashigaru, Samurai Archers, and sometimes even Go-Hatamoto start to be capped unusually early because of a lack of Productivity scales if those are sacrificed. The precise scales will depend on other factors in the build as well, so it’s still possible to expand with Samurai Cav and have other options open later on, just not with every build.
Jomon's sacreds, the Sohei and Yamabushi are rarely if ever used in expansion, due to being somewhat fragile, Jomon not having great priests, and constraints in Pretender design limiting blesses, all of which we'll be going over later on in more detail.
Troop Weaknesses
Let’s discuss the elephant in the room: Jomon’s troops don’t have shields. Half the map’s provinces contain crossbows in Late Age. Combine these things together and you realize pretty rapidly that making crossbows is a good way to attrition down Jomon’s troops. By the mid-game, Jomon can easily layer Mist with Arrow Fend with Storm, at which point projectile damage is knocked down to something like a tenth or twentieth of its earlier strength, so the main concern for Jomon is how to deal with it early. There are a couple tactics Jomon can use to deal with this, depending on things like timing and the like:
- In general, lines and troops with protection buffs can pretty radically reduce attrition to crossbows, while mages can cast important self-buffs like Air Shield or Ironskin.
- Mist is also available fairly early, and because you’re liable to go up Enchantment school relatively early, even Haste becomes a potential option.
Unfortunately, these are all mitigation, and you can’t totally ignore the disadvantage to ranged units (especially in expansion) until Arrowfend comes out.
Another downside to a lack of shields is that Jomon’s infantry end up with less effective defense skill than a lot of other infantry in the age. While they are still pretty likely to hit around enemy shields, they’re also not unlikely to be hit themselves, despite their defense being relatively high for unshielded troops (compared to Abysians or Ulmers).
Now that we’ve done a light overview of the troops available to Jomon, how they fit into the overall strategy, and discussed what might be necessary to access them all, we can move on to discussing what Build/Pretender you might want to take to tie all this information together. While we will be talking about Pretender options a bit, we’ll be discussing the most “viable” Pretenders together with the build I think works the best for them.
Jomon’s pretender design is tricky in that it attempts to balance 2 primary needs: 1.) The need to expand underwater to gain access to Ryujin and Shark Warriors, and 2.) Scales to help with production of troops, mages, and infrastructure.
Basic Mage Strategy, Research Goals, and Scaling
Early research goals:
Conjuration
3 Small Fire/Air/Earth/Water Elementals • Summon Earthpower • Phoenix Power
Alteration
2 Earth Meld • Mirror Image • Stoneskin • Enlarge • Quicken Self
3 Protection • Mistform • Mossbody • Luck • Ironskin
4 Quickness • Body Ethereal • Liquid Body • Temper Flesh • Swarm • Wind Guide
Construction
2 Magic Items forging
3 Legions of Steel
Enchantment
2 Personal Regeneration • Breath of Winter
3 Strength of Giants • Regeneration • Fire Shield
4 Poison Ward • Antimagic • Flaming Arrows
Jomon’s basic mage strategy is fairly reliable in the early game, but it will diversify rapidly based on what’s necessary into particular matchups. Early game, your research will be driven by the most reliable Master Shugenja paths, Nature and Earth. As such, early-game focus is on paths such as
- Conjuration 3
- Alteration 3-4
- Construction 3
- Enchantment 3-4
Jomon has a lot of utility in a lot of the different Magic Schools (basically everything besides Blood), so it’s important to judge which opponents you think you’ll fight, what random paths you’ve gotten on your mages, and continuously revise your Research to fit your needs.
To be clear, Jomon has excellent overall magic availability. They have ![]() 3 reliably,
3 reliably, ![]() 3 and
3 and ![]() 3 semi-reliably with
3 semi-reliably with ![]() 2 and
2 and ![]() 2 reliably, as well as
2 reliably, as well as ![]() 2 and
2 and ![]() 2 once they’ve made it uw. In addition, they have reliable
2 once they’ve made it uw. In addition, they have reliable ![]() 2 with the ability to boost all of their other paths as high as necessary in combat (easily up to X5 with a small communion, Power of the Spheres, and whichever other boosting spell is necessary). By the mid-game, Jomon can easily cast strong spells in Conjuration, Alteration, Evocation, Construction, Enchantment, and Thaumaturgy. This wide range is extended even more by their national summons (which we’ll discuss later) and excellent forging options, which make Conjuration and Construction more attractive than perhaps they would be on other nations.
2 with the ability to boost all of their other paths as high as necessary in combat (easily up to X5 with a small communion, Power of the Spheres, and whichever other boosting spell is necessary). By the mid-game, Jomon can easily cast strong spells in Conjuration, Alteration, Evocation, Construction, Enchantment, and Thaumaturgy. This wide range is extended even more by their national summons (which we’ll discuss later) and excellent forging options, which make Conjuration and Construction more attractive than perhaps they would be on other nations.
Overview
Master Shugenja

- This
 1
1 1
1 13
13 2100%
2100%


100%
10% mage can be recruited in all forts as well as highlands and mountains. - The 2 CP cost makes Master Shugenja Jomon's most turn efficient combat mage.
- The double random makes for a large spread in magic access, but all have their uses and provide Jomon with a broad range of magical paths.
Detailed Analysis
The Master Shugenja is, in many ways, the bread-and-butter mage of Jomon, and as such is vitally important in almost any Jomon strategy. They have one of the higher variations on random spreads among mages, which means that what exact variation you’ll get changes a lot. For this reason, they’re often seen as unreliable or somewhat bad mages, but I’d contend that they actually give Jomon solid access to Earth and Nature Magic, as well as having other good uses. To help convey this a bit and show visually the uses Master Shugenja have, we come to a chart:
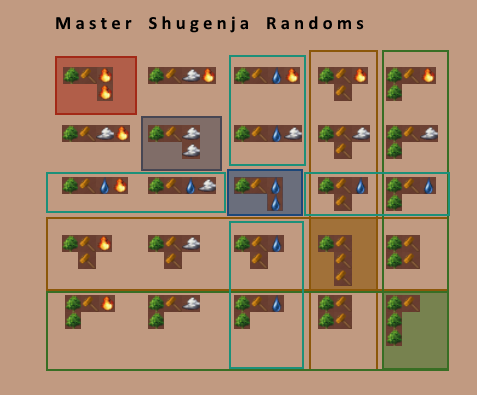
These are loosely organized based on perceived usefulness into the following:
- The shaded areas represent high-value repeat randoms which each end up being a 1/25 chance, with 5 variants giving an overall chance of ⅕ of running into one. These include strong3 or 3 mages, as well as weaker but still very useful X2 randoms in the other Elemental paths.
- All2 or 2 variants are boxed into green or brown boxes, and with each box encompassing 9/25 variants, with overlap 16/25 will be either 2 or 2. Both of these outcomes represent useful combat magic, and you’ll always be able to find uses for either.
- In addition, teal boxes outline all the N/W randoms, which can either natively or via Thistle Mace cast Foul Vapors, a strong battlefield wipe spell, while also being able to add Mossbody into Jomon’s buff-blob, a particularly strong defensive spell when combined with other defensive spells. For these reasons, all the N/W crosspaths are also considered to be fairly useful.
- Once all of these variants are taken out, only 2 “low value”
 1
1 111 variants are left, and even these have a couple good uses. All Fire variants can use gems to make fire elementals, 11 variants can summon Tengu (one of Jomon’s more useful summons, more on them later), and they also serve as good site-searchers and forgers.
Master Shugenjas can serve a huge variety of functions from Protection/Mossbody point-buffing to large AoE earthbuffs to size 6 Elemental spam to battlefield Nature magic like Mass Protection/Howl/Foul Vapors to evocations like Poison Cloud/Sulphur Haze/Earthquake. They’re a remarkably flexible mage with many uses available from a wide variety of schools. Outside of combat magic they are one of your primary forgers, making bulk Nature gear like Thistle Mace, Messenger Boots, and Endless Bag of Wine, as well as Earth Boots, Lightless Lantern or Owl Quill, Frost Brand, Fire Brand, etc.
Master Shugenja are more expensive than normal Shugenjas, but they also offer a much broader access to magic (especially combat magic) than them, which means that they will almost always be prioritized in recruitment. Since Jomon’s only other land mage, the Onmyoji (which will be talked about more next) is slow-to-recruit, Master Shugenjas are by far the most turn-efficient researchers Jomon has access to, and like Shugenjas are even available outside of forts in Mountains and Highlands. Combining these traits means that they’re somewhat easy to spam, keeping Jomon competitive on research speed with most of the other nations in Late Age.
Jomon has one serious problem when it comes to their magic access and magi, however: scaling. Because 2 of their 3 primary mages (Ryujin and Onmyo-ji) are slow to recruit, and Ryujin are only available underwater, Jomon has serious issues in expanding their roster of Magi quickly, and largely have to invest more into infrastructure than many other nations in LA. This is only exacerbated by the difficulty in getting underwater in the first place, which often requires pretender intervention and sinking valuable design points into a pretender option capable of getting underwater.
Overview
Onmyo-ji

- This
 2132100%
100%
10% mage can be recruited in all forts. - The2 gives Onmyo-ji a lot of flexibility with Power of the Spheres
- Their ownly drawback is the 4 CP cost which makes it inefficient to recruit in the early game compared to Master Shugenja.
Detailed Analysis
Onmyo-ji are the other core land mage available to Jomon. Every Onmyo-ji starts as an ![]() 2 mage, with similar random paths available as what a Master Shugenja can roll. They have an easy ability to slot into communion, and can cast Power of the Spheres, the astral omni-path boosting spell, for half fatigue (it’s a 100 fatigue spell that takes
2 mage, with similar random paths available as what a Master Shugenja can roll. They have an easy ability to slot into communion, and can cast Power of the Spheres, the astral omni-path boosting spell, for half fatigue (it’s a 100 fatigue spell that takes ![]() 1 to cast, being one level over halves the fatigue and better allows you to move through an entire script without fatiguing out), which means that while Onmyo-ji may have less initial access to the Elemental and Nature paths, they can easily boost up to a powerful level in combat. Functionally, they are able to cast spells of any crosspath besides Death or Blood in combat, which is the majority of spells in the game. Important spells like Storm, Mass Flight, Thunder Fend, or Fire Storm, which otherwise might be challenging for Jomon to cast, can be put up using these mages. In addition, they’re all solid Astral mages in their own right, with ability to cast Light of the Northern Star (battlefield wide Astral boosting spell) and Power of the Spheres to hit
1 to cast, being one level over halves the fatigue and better allows you to move through an entire script without fatiguing out), which means that while Onmyo-ji may have less initial access to the Elemental and Nature paths, they can easily boost up to a powerful level in combat. Functionally, they are able to cast spells of any crosspath besides Death or Blood in combat, which is the majority of spells in the game. Important spells like Storm, Mass Flight, Thunder Fend, or Fire Storm, which otherwise might be challenging for Jomon to cast, can be put up using these mages. In addition, they’re all solid Astral mages in their own right, with ability to cast Light of the Northern Star (battlefield wide Astral boosting spell) and Power of the Spheres to hit ![]() 4, enough for Master Enslave, Soul Slay, or Mind Burn with +1 penetration. In communion other vital spells like Will of the Fates (battlefield wide friendly luck) are easily cast as well.
4, enough for Master Enslave, Soul Slay, or Mind Burn with +1 penetration. In communion other vital spells like Will of the Fates (battlefield wide friendly luck) are easily cast as well.
Besides their magic access, Onmyo-ji also all start the battle with a sacred bird, called a Shikigami, at their side. This bird will immediately jump into the enemy formation, which has minor use as a distraction and interrupt. Onmyo-ji are also fortune tellers, and relatively cheap at just 145 gold, making them in theory more gold-efficient researchers than the Master Shugenja. Given the wide range of magic access and excellent combat use, there’s just one drawback to use of the Onmyo-ji. Unfortunately, they are slow-to-recruit, meaning that with Jomon’s forts and castles you can only recruit one every other turn. This drastically slows down the speed at which you can mass them, making them impractical researchers in the early game, and requiring quite a bit of make-up on infrastructure to remain competitive when spamming. Everything else aside, this is the single biggest weakness for the mage, keeping you reliant on Master Shugenja, at least for the earliest stages of the game.
All of this can be more or less sorted by the mid-game, and Master Shugenja have enough versatility and use to carry the nation through the very early stages of the game, but you run into another issue as the game goes longer, again in terms of scaling. In short, Master Shugenja and Onmyo-ji fall off, largely due to increasing ease of targeting them in battle as the game goes on. While Jomon is not the only nation with vulnerable human mages in LA, they still have some of the worst, especially with their low morale, and this is compounded by the fact that Jomon’s mages are gem hungry. In an age with generally low gem availability and numerous nations that scale through blood hunting, Jomon tends to rely on Ryujin as a potent raiding and casting tool in the late-game.
Overview
Ryujin


- This
 3152200%
10% sacred mage can only be recruited underwater. - Ryujin can shapeshift into a Ryujin dragon form gaining size and stats at the expense of equipment slots.
- The Ryujin is Jomon's nation defining mage.
- High mapmove and both normal and underwater flight gives Ryujin unprecedented mobility.
- The guaranteed X2 in Fire, Air, Earth or Nature means that Ryujin are your most reliable two-path mages, and each type of Ryujin brings something useful to any fight.
- The high mapmove, chassis and path access means that Ryujin make excellent thugs.
Detailed Analysis
Last, but definitely not least we have the Ryujin, in many ways Jomon’s most defining mage, and what sets it apart from everything else in the Late Age. Anybody familiar with Jomon was probably waiting for me to get to this one, so here we go.
Ryujin are the only mage recruit that Jomon has underwater, but they have a pile of traits that makes them powerful and well worth their 285 gold cost. Ryujin have 34 map-move, with the ability to fly both underwater and on land meaning they have essentially no barriers to their movement. Practically, this makes them amongst the most mobile of any recruit in the game. The 47 hp of the dragon form, in conjunction to built-in resistances to fire (5), shock (5), cold (5), and poison (15), make them difficult to kill with remote spells like Fires From Afar or Seeking Arrow (Mind Hunt can still be dangerous).
Ryujin are also universally strong Water mages, with every Ryujin possessing ![]() 2 with a built in Dragon Pearl item that grants +
2 with a built in Dragon Pearl item that grants +![]() 1 for a total of
1 for a total of ![]() 3 as well as 1
3 as well as 1 temporary water gem for in-combat use. In addition, their random paths guarantee another
 ![]() 2200%
2200%![]()
![]()
![]()
![]() , which makes them the most reliable Elemental mages on the nation. Ryujin have strong stats, decent attack and defense, good hp and strength, solid morale and mr, with 10 natural protection making them high-prot as soon as they put on armor. Combine that with innate weapons like Venomous Fangs (which scales with strength and applies 35 damage Death Poison) and an area of effect damage Tail Sweep, and Ryujin are a very solid thug chassis. All Ryujin can use Liquid Body, Quicken Self, and Breath of Winter in their thug scripts as well, although these should be balanced around fatigue at end of script.
, which makes them the most reliable Elemental mages on the nation. Ryujin have strong stats, decent attack and defense, good hp and strength, solid morale and mr, with 10 natural protection making them high-prot as soon as they put on armor. Combine that with innate weapons like Venomous Fangs (which scales with strength and applies 35 damage Death Poison) and an area of effect damage Tail Sweep, and Ryujin are a very solid thug chassis. All Ryujin can use Liquid Body, Quicken Self, and Breath of Winter in their thug scripts as well, although these should be balanced around fatigue at end of script.
While the chassis itself is very strong, it’s also sacred, which allows it to take whatever bless your pretender also has. Ryujin don’t need a strong bless to be powerful and functional within a Jomon build, but it is an extra consideration that whatever you take will also effect them, and any bless that is settled on is usually taken for Ryujin as opposed to any of Jomon’s other sacred troops or summons. In addition, the temporary water gem and high Water magic in general allow Ryujin to be fearsome magi underwater, where they can summon a Water Elemental for free in any combat they’re a part of. This can help give Jomon an edge over their strong competitors once you’ve massed enough Ryujin.
Ryujin are important as well for forging and casting. With their insane map move they can often switch from research to front-line combat or raiding instantly, meaning that they can surprise an enemy force by jumping 3 or 4 provinces to drop, for example, Foul Vapors. As well, Ryujin can easily solo province defense or, with support buffs, become difficult-to-dislodge army thugs seeded in with your other troops. In terms of combat casting Ryujin are by far your most durable option, and they can spam out all the Elementals, big nature magic like Howl, Foul Vapors, or Mass Protection, important buffs like Arrow Fend, Quickening/Quickness, or just cast strong damage spells like Liquify, Bone Melter, Acid Storm, or Freezing Mists. They’re very versatile, very mobile, and in general just incredibly strong.
Ryujin do come with 2 major downsides, however. First is the Dragon Pearl itself, which while useful to aid in Water magic, also blocks one of your miscellaneous slots (the item is cursed), and can be picked up by friendly commanders in the case of a Ryujin dying, in theory blocking the slots of other mages. Second is their classification as magic being, because of which Ryujin are particularly vulnerable to counter-thugs wielding Moon Blades.
It’s difficult to describe in detail just how impactful Ryujin are to Jomon. At practically every stage of the game after gaining access to them, you’ll be able to find a good use to put them to, although here’s the general thought-process behind how to use each variation:
Fire

![]() 2
2![]() 3 Fire Ryujin are in many ways the least straight-forward to use. They don’t have the same kind of self-buffing utility as the other 3 variants, so they end up being largely the worst raiders outside of specific circumstances (think Regen bless with Phoenix Pyre active). Despite this, they’re largely the best forgers since they’re able to make Rune Smashers and, eventually, a Staff of Elemental Mastery which can be used to boost up to high-level Elemental globals. Fire-randoms are also some of Jomon’s most reliable Fire mages in general, able to spam out Elementals, put up important battlefield spells like Fire Fend, and spam out fire damage spells like Incinerate. In addition, the
3 Fire Ryujin are in many ways the least straight-forward to use. They don’t have the same kind of self-buffing utility as the other 3 variants, so they end up being largely the worst raiders outside of specific circumstances (think Regen bless with Phoenix Pyre active). Despite this, they’re largely the best forgers since they’re able to make Rune Smashers and, eventually, a Staff of Elemental Mastery which can be used to boost up to high-level Elemental globals. Fire-randoms are also some of Jomon’s most reliable Fire mages in general, able to spam out Elementals, put up important battlefield spells like Fire Fend, and spam out fire damage spells like Incinerate. In addition, the ![]() 2
2![]() 3 crosspath opens them up to the Acid spells like Acid Rain and Acid Storm, the latter of which can be effective at cutting down low-protection enemies like Swarm bugs or Longdead.
3 crosspath opens them up to the Acid spells like Acid Rain and Acid Storm, the latter of which can be effective at cutting down low-protection enemies like Swarm bugs or Longdead.
Air

![]() 2
2![]() 3 Air variant Ryujin are vitally important as a mobile form of Air magic in the early mid-game. They’ll be crucial for spells like Arrow Fend, Wind Guide and Thunder Ward, although they’re not high-level enough to cast Storm, Fog Warriors, or Mass Flight. Despite this, they’re still useful as Air Elemental casters, and like all Ryujin are strong Water casters. Air Ryujin aren’t as strong of solo-thugs as the Earth or Nature variants, although with some form of sustain they can do ok by relying on Mirror Image and Mistform buffs. Those same buffs make them fearsome with external buff help, as they can take on the same buffs Earth and Nature Ryujin do (Mossbody, Regeneration, Ironskin, Enlarge, etc.) while still having Mistform, which can be difficult to deal with if counter-thugs are absent.
3 Air variant Ryujin are vitally important as a mobile form of Air magic in the early mid-game. They’ll be crucial for spells like Arrow Fend, Wind Guide and Thunder Ward, although they’re not high-level enough to cast Storm, Fog Warriors, or Mass Flight. Despite this, they’re still useful as Air Elemental casters, and like all Ryujin are strong Water casters. Air Ryujin aren’t as strong of solo-thugs as the Earth or Nature variants, although with some form of sustain they can do ok by relying on Mirror Image and Mistform buffs. Those same buffs make them fearsome with external buff help, as they can take on the same buffs Earth and Nature Ryujin do (Mossbody, Regeneration, Ironskin, Enlarge, etc.) while still having Mistform, which can be difficult to deal with if counter-thugs are absent.
Earth

![]() 3
3![]() 2 Earth Ryujin variants are in many ways the most straightforward of the Ryujin to use. They use prot-buffs and Summon Earthpower to be fairly reliable solo-raiders, and are a useful Earth mage to apply more in-combat buffs. As more complex counters come out, they tend to fall off as solo-thugs, but they’re useful in that role throughout the game. Unlike the Fire/Air versions, the only thing they really bring to combat magic that you don’t already have is their Water magic, as Master Shugenja are rather likely to end up as
2 Earth Ryujin variants are in many ways the most straightforward of the Ryujin to use. They use prot-buffs and Summon Earthpower to be fairly reliable solo-raiders, and are a useful Earth mage to apply more in-combat buffs. As more complex counters come out, they tend to fall off as solo-thugs, but they’re useful in that role throughout the game. Unlike the Fire/Air versions, the only thing they really bring to combat magic that you don’t already have is their Water magic, as Master Shugenja are rather likely to end up as ![]() 2 mages as well. Still, an overconfident or under-prepared enemy can be pretty easily rocked by an Earthquake or two, something Ryujin with their general tankiness and flying ability can pull off with much less risk than Jomon’s other mages.
2 mages as well. Still, an overconfident or under-prepared enemy can be pretty easily rocked by an Earthquake or two, something Ryujin with their general tankiness and flying ability can pull off with much less risk than Jomon’s other mages.
Nature

![]() 3
3![]() 2 Nature Ryujin are similar to Earth Ryujin in that they’re fairly competent raiders early via Mossbody, Personal Regeneration, and Enlarge, while their in-combat role is also somewhat taken up by Jomon’s other mages. Still, they’re more or less innately immune to Foul Vapors, and with their excellent mobility can surprise the enemy with it in unexpected places. As well, they’re more durable Howl casters (Howl is a 300 fatigue spell, it can be a bit dangerous for Master Shugenja to cast it), and their crosspath also allows them to cast Bone Melter. Unlike Master Shugenja, they can’t cast Strength of Gaia, so they’re actually not as strong of Nature mages themselves, but they still have plentiful uses.
2 Nature Ryujin are similar to Earth Ryujin in that they’re fairly competent raiders early via Mossbody, Personal Regeneration, and Enlarge, while their in-combat role is also somewhat taken up by Jomon’s other mages. Still, they’re more or less innately immune to Foul Vapors, and with their excellent mobility can surprise the enemy with it in unexpected places. As well, they’re more durable Howl casters (Howl is a 300 fatigue spell, it can be a bit dangerous for Master Shugenja to cast it), and their crosspath also allows them to cast Bone Melter. Unlike Master Shugenja, they can’t cast Strength of Gaia, so they’re actually not as strong of Nature mages themselves, but they still have plentiful uses.
Mage Weaknesses
Jomon’s land mages all share a few characteristics that make them weaker than a lot of other mages in Dominions. They’re all poor in melee, they all have sub-par hit points, all lack any armor whatsoever, and they all have low morale (technically, Monks have ok morale, but this is still generally true). Taken altogether, these characteristics mean that Jomon’s mage corps, at least the human portion, are quite vulnerable to everything from flankers to archers to combat spells like Earthquake and morale spells like Wailing Winds.
Protecting and positioning your mages well enough to get maximum value out of them is important, although it can also mean that their use is more limited than you’d like. Remote spells like Flames from the Sky (a powerful late-game fire spell that deals fire damage to half the enemies in a province) are devastating to Jomon’s mages, so it’s important to keep this weakness in mind whenever you plan an engagement.
Jomon's Holy crosspath spells
These spells all require a crosspath between Holy and one of the paths that Monks of the Fivefold Path have access to. Jomon doesn’t have any other mage-priests in its lineup, so Monks are almost the only mages in the nation (and therefore the game) who can make use of these spells. All of these spells are available from the start of the game as holy spells, a couple among them being particularly useful.
Meditation Sign

Meditation Sign removes 15 fatigue from the caster, and as the spell doesn’t cost any fatigue to cast, this is net positive basically always (someone with very high spellcasting encumbrance might disagree). Because it’s only ever really used on w1 mages, there doesn’t seem to be much use, however this is not the case. All spells which target only the caster have their effects spread from a Communion Master to Communion Slaves within a communion, so one or more H1W1 Monks can restore 15xMonk fatigue on Communion Slaves per combat round. In theory, this allows Jomon to sustain some of the largest communions in the game, although it’s rarely utilized for such, and requires a good deal of setup to prepare.
Earth-Touching Sign

Earth-touching Sign has very niche applications for 4 reasons: first, it is only available on one in five Monks, which limits its availability; second, it can only target demons, and so is only ever useful against demons; third, it’s a short range spell, so whichever demon it targets has to be nearby on the battlefield; and lastly, its effect is easy to negate with MR (meaning it’s 8 vs MR on the roll, basically), particularly bad against demons who tend to have above-average MR to begin with. All this being said, when it hits and goes through, it will obliterate any demon in the game. This can be particularly funny if it lands on something valuable and difficult to access like a Mandeha or Onaqui.
Welcome Sign

Welcome Sign is another niche spell, in this case it’s not limited to demons, but the range is even lower. Basically, you have to be directly on top of whoever you’re casting it at, and it’s still relatively easy to resist, but the effect is a charm, which is even stronger than insta-death in that it steals the unit directly. If whoever is afflicted is a commander, they retain their commander status and whatever gear they had on them (contrary to an enslave). This is particularly funny if, say, a kitted-out flying hero with additional heroic trait lands directly next to your mage and is stolen gear and all.
Fear-Not Sign

Fear-not Sign is one of the more useful holy signs early on, as it’s a scaling AOE airshield + courage (+1 morale) effect. This helps mitigate some of Jomon’s fear of ranged damage, although it’s hard to gather enough ![]() 1
1![]() 1 mages to make good use of it without sacrificing your other combat magic. One potential tactic, however, particularly when layered with a research rush that can convey other juicy buffs, is to make a Master Shugenja with
1 mages to make good use of it without sacrificing your other combat magic. One potential tactic, however, particularly when layered with a research rush that can convey other juicy buffs, is to make a Master Shugenja with ![]() 1 or
1 or ![]() 2 a prophet, forcing them into the H/A crosspath, and with additional scaling of 2 squares per extra level just 1 or 2 extra levels of air gives considerably more use.
2 a prophet, forcing them into the H/A crosspath, and with additional scaling of 2 squares per extra level just 1 or 2 extra levels of air gives considerably more use.
Teaching Sign

Teaching Sign is by far the strongest of the holy sign spells when considered in a vacuum, as it acts the same as Power of the Spheres (but with no gem cost or fatigue) by conveying a +1 path boost to all non-holy paths. This boost stacks with other spells like Summon Earthpower or Strength of Gaia, allowing you to double-boost in certain paths if you have the necessary crosspath. As one of the strongest and most versatile national combat spells in the game, it’s a shame that Jomon is restricted to using it basically only with H1N1 Monks (which effectively become ![]() 2, a path Jomon doesn’t lack) and potentially 1 propheted Master Shugenja.
2, a path Jomon doesn’t lack) and potentially 1 propheted Master Shugenja.
Earth Serpent
Build
 Chassis: Awake Earth Serpent
Paths: ![]() 6
6
Bless: Hardskin
Scales: ![]() 6
6![]() 0
0![]() 3
3![]() 3
3![]() 0
0![]() 3
3![]() 3
3
Starting with the most “meta” build, we have the humble Earth Snake. From being ubiquitous in Dominions 4 and despite being nerfed into the ground in Dominions 5 via general utility decrease (the bless system rework hurt it hard) and a hefty price nerf, the Earth Snake is still the best pretender option that Jomon has available. In short, this build gives Jomon all the tools it needs to succeed in the early game, gain access to all its tools, shore up expansion, and leave you in a pretty good spot to take on most foes. First, the Earth Serpent is a very solid Awake Expander, with Hardskin allowing it to easily expand into almost any Independent province within friendly dominion. It’s also able to smoothly travel underwater and fight there, and it does so more quickly, easily, and with less investment than any of Jomon’s other pretender options.
The bless is relatively low utility, but Jomon doesn’t need a strong bless, and Ryujin will rarely be blessed outside of large fights anyways. Later, the Earth Snake will be able to put up Earth magic global enchantments like Earthblood Deepwell (+20 ) and Riches From Beneath (small gold boost, big resources boost), both of which are quite useful for Jomon. It’ll also be useful as a durable, high-level Earth caster able to lead troops well and spam out the large aoe earth buffs for a first war.
Scales-wise, the build is focused around Production and Magic scales, tanking Heat and Misfortune to afford them as well as a moderately strong dominion. If desired, you can drop 2 points of Dominion for an additional scale (probably Growth or Luck), but this isn’t necessary for the build. As an aside, many players like to avoid Misfortune scales, and technically the build doesn’t require Magic scales to function so those can also be evened out at preference. Extra gold is provided by simply having better, quicker expansion through the use of the Earth Snake.
Overall the goal is to be able to spam out Ashigaru (if necessary transitioning into O-Ban or Go-Hatamoto), expand rapidly into both land and water provinces, and put up infrastructure rapidly to scale your research ahead of opponents with Magic scales. By the end of initial development you should have good mage numbers, ability to recruit Ryujin from one or more UW forts, and a mass of Ashigaru or more elite infantry ready to fight in a first war.
At this point as well it’s worth pointing out that Jomon will generally desire a greater infrastructure investment than other nations in LA because both Onmyo-ji and Ryujin are slow to recruit and will be needed in large numbers. Given solid expansion and the gold-efficiency of Onmyo-ji, it’s quite easy to afford near-constant mage production out of more forts than you might expect. In addition, most of Jomon’s infantry is rather slow, so having many forts allows you to focus troop recruitment in whichever area it’s most needed.
Weaknesses
The Earth Snake is largely considered the strongest Pretender option for Jomon, and it’s been taken numerous times by different players, myself included, but it does run into a few serious issues, particularly against a few specific matchups.
One of the hardest matchups for Jomon in the age is against Lemuria, the undead ghost nation. Without magic weapons, Jomon can struggle to handle Lemuria’s ethereal ghosts, particularly their strong thug options in Lemur Centurions, and the Earthsnake offers little recourse for this issue. In addition, Lemuria is quite likely to take Cold scales, which the Earth Snake will struggle to fight in, and has the ability to expand rapidly, including into the underwater provinces, and contest Jomon there. All-in-all, Jomon is one of the weakest matchups against Lemuria in the age, and the Earth Snake doesn’t really help in this matchup.
Additionally, Atlantis is another big issue for Jomon early (some might even call them the arch-nemesis of Jomon). Like Lemuria, they’re able to expand rapidly underwater, and are guaranteed to take Cold scales. In addition, Atlantis has access to a soldiers with powerful magic weapons which can allow them to directly deal with the Earth Snake in melee, at least during expansion, and this can allow them to fully block Jomon from water access. Jomon can fight Atlantis with a different build that emphasizes troop production and research, but the Earth Snake build itself isn’t particularly suited to it.
In general, strong sacred nations will be able to deal with the Earth Snake as well. Nations like Gath, Utgard, and Ragha all have sacreds who simply hit hard enough that they can usually kill the Earth Snake in melee, which again poses an issue for Jomon, as it makes the Pretender much less useful for an early war than it would be in other matchups. This isn’t to say that you don’t have any counterplay, but the Earth Snake is a large investment in the build, and the fact that some nations can deal with it relatively straightforwardly is a weakness of the build design.
Expansion
For each of the primary builds today, we’ll also be discussing how to do expansion, starting with the Earth Snake build. For the example, I’ll be randomly generating the map using the in-game generator, which is often about the worst-case scenario for expansion ability. The goal is to hit more than 20 provinces by turn 12, including at least 1 UW and land province with fort either done or under construction.
Generally for the initial expansion party you’ll be making 3-4 Samurai Cavalry to aid the initial 15 Ashigaru and 10 Samurai Archers, and set them up to engage the enemy simultaneously. Begin Master Shugenja recruitment immediately, to start scaling your research. At the same time, Prophet the starting Ninja to help in expansion via assassination. Most of the time it is also safe to blind expand with your Earth Snake, if you have an adjacent province with friendly dominion to expand into. The Earth Snake doesn’t need to do much for expansion, but avoid having it on Cast Spells to prevent it from fatiguing out too fast.
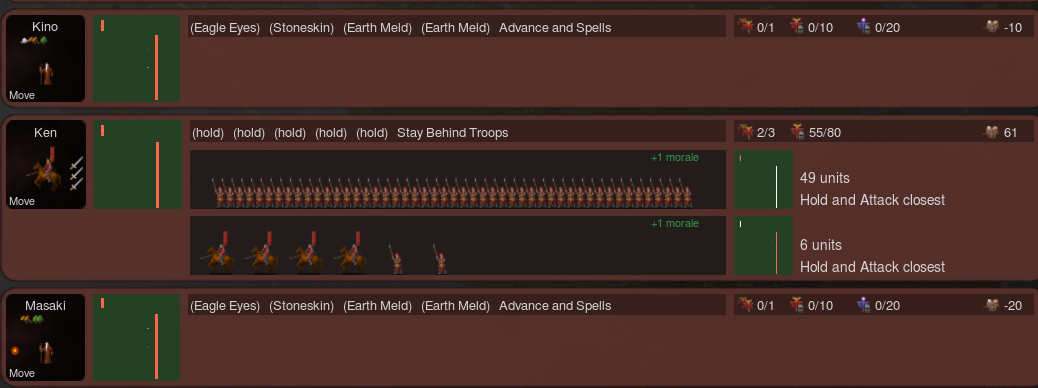
 Initial expansion scripting should be almost precisely this
The initial Ashigaru and Samurai Archers are mostly grouped together on Hold and Attack Closest, with enough split off to bring the Cavalry squad above 6 members (this is for morale purposes, squads of 5 or less get additional morale checks in combat when units take damage), the Cavalry squad is also on Hold and Attack Closest. The Infantry squad should be positioned just down from center to make it less likely for them to end up blocking the engagement by the cavalry. With positioning like this, against most types of Independent infantry the Samurai Cavalry and Infantry squads should engage the enemy at about the same time. With your first researcher you should be going up Alteration, usually to level 3 in order to get Ironskin for your Earth Snake, and to unlock the early buffs of Protection and Mossbody for Master Shugenja to cast.
Back to top of Earth Serpent section.
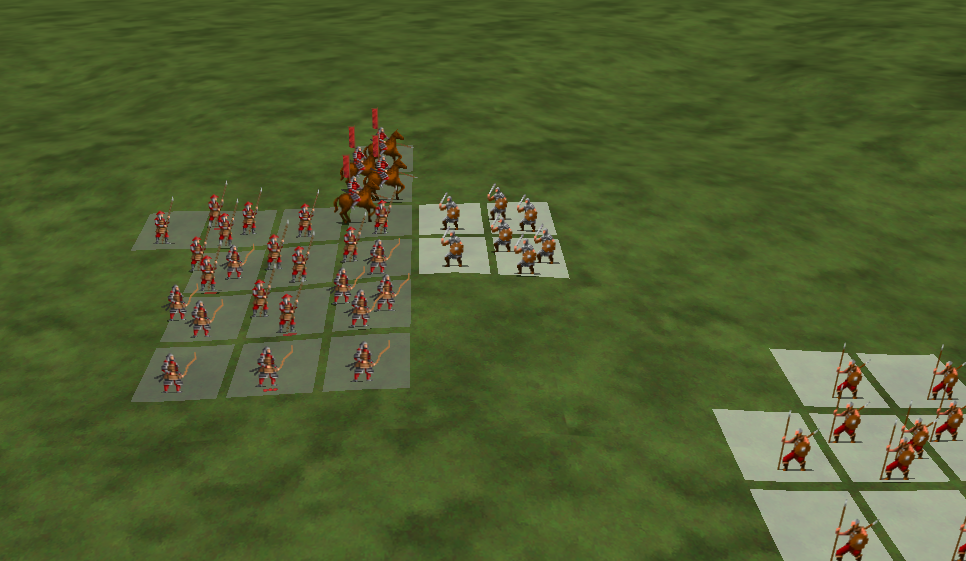 With given scripting, initial contact looks like this
With good positioning and the given script, your initial contact should look as much like the above as possible, the Samurai Cavalry coming in on a flank and engaging the enemy at the same moment as the Infantry. With the lance charge one squad can be isolated and killed quickly, allowing you to snowball the fight with minimal losses. Note that this is pretty ideal contact, and it won’t always go this well.
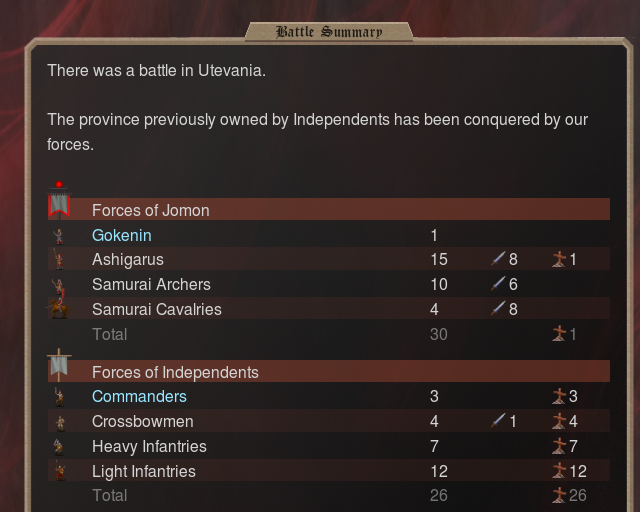
For the first expansion I chose a relatively easy province (according for my scouting information), avoiding Heavy Cavalry or Barbarians. Barbarians will often lose to simple lines of Ashigaru, and Heavy Cav can be handled by either the Earth Snake or more substantial expansion parties. After the first expansion turn you should switch into Ashigaru production, those will be your primary force for expansion going forward. In addition, after your 3rd Master Shugenja you should take a turn to create 2 Hatamoto to lead your Ashigaru, as they do much better in lines than boxes. It’s ok to make expansion parties relatively slowly, as your Pretender will help you set borders and secure land. While this is happening, your Prophet Ninja should also be assassinating a nearby province. He can handle Cavalry Commanders and Barbarians, but these are higher risk than normal commanders, so judge which you should go for appropriately. As a prophet, he has access to your smite spell, and this should take up his entire script for you.
The initial expansion party will often peter out around province 3-4, it’s ok to keep going until they die, you can recruit masses of replacements relatively easily. Often it can be a bit more turn/gold efficient to use your starting commander to start infrastructure development if they are still alive, instead of heading back to the Capital to lead another party.
For a secondary expansion party, it’s often fine to move out with Master Shugenja assistance (once you have Earth Meld) if you’re moving into provinces you think may be difficult, let’s show the setup I took with my second expansion party, which actually only moved out turn 7.
Back to top of Earth Serpent section.
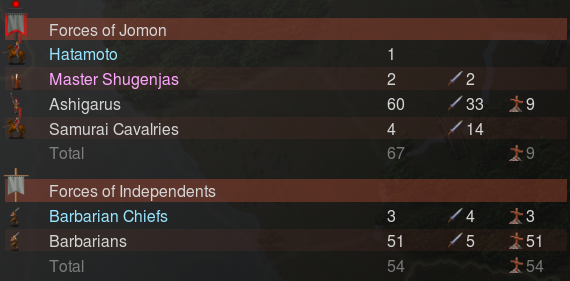
It may be a little hard to see, but the spacing is actually similar to the initial expansion party. There was an accidental additional turn of Samurai Cavalry production, but they don’t really take away from your later expansion parties, so it’s not too much of an issue. If you don’t have enough E2 Master shugenja for this, you can always cut down to just 1, or even use gems, which is still fine so long as you’re preserving the integrity of your expansion. In this case this is a party which went up against about 50 Barbarians, which they smoothly defeated.
After Alteration 3, you’re going to want to continue into Construction 2, which will get you a few helpful counter-thug items, but more importantly, it gets you a Ring of Waterbreathing, which you’ll need to set up infrastructure UW. Once you have a Water magic random Master Shugenja, you should also make a Monk, who will set up your temples and labs UW. On turn 8 (after expanding into the aforementioned Barbarians), expansion looks like this:
Back to top of Earth Serpent section.
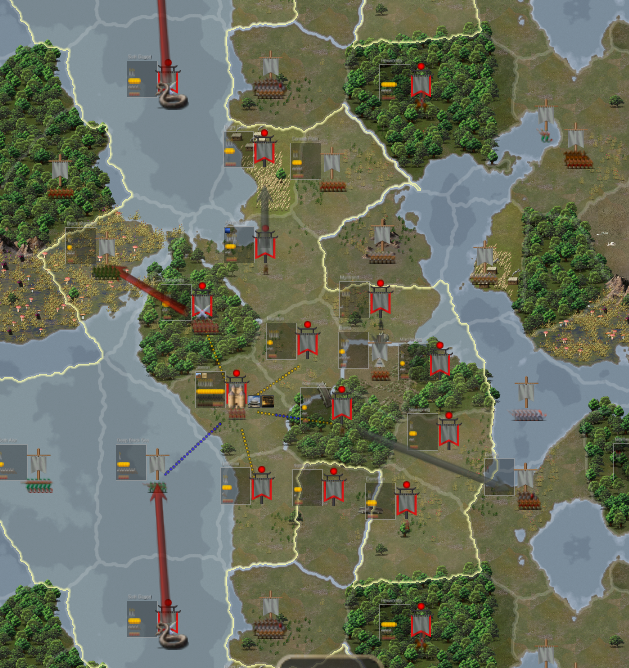
The initial expansion party ended up taking 4 provinces before running out of steam, with the Gokenin now setting up a fort at the bottom forest (which is the same as the top forest, this map is a full wrap around map), a scout has been made to set up another fort in the province directly north of that, and the second expansion party has just moved out with mage support. Simultaneously, the Ninja Prophet is slowly helping to fill in some of the provinces in-between by assassinating out the Independent commanders, which allows the province to be taken by a single scout (this was done to take 1 province, and will probably result in grabbing one more). At least 2 more forts should start construction by the end of expansion.
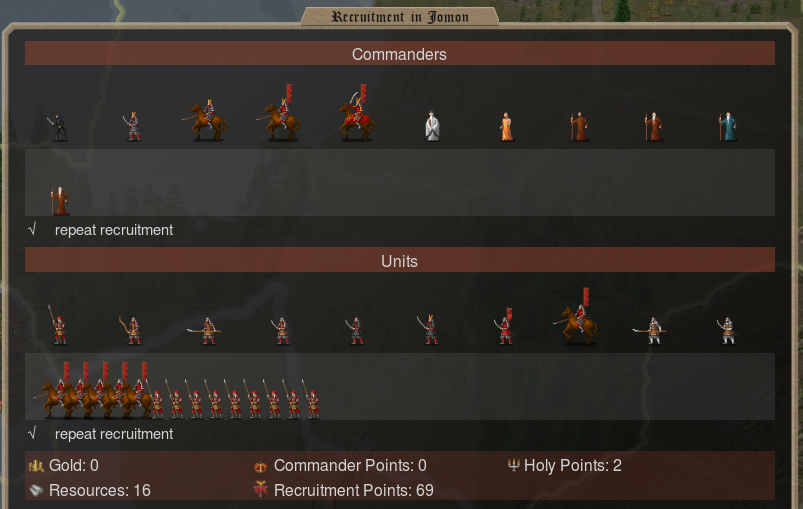
Expansion should continue in that vein, with Construction 3, Conjuration 3, and Enchantment 3 all being common research goals once Construction 2 is finished. It’s ok to alchemize gems to make your Ring of Water Breathing, as getting UW infrastructure up is a priority for Jomon.
In this case, with the Pretender, second expansion party, and Prophet working in conjunction (the 3rd expansion party got only 1 province), the turn 12 province count ended at 23 provinces, including the Capital. This is with 3 forts going up on Land, 2 of which already have the palisades completed, and 3 also going up underwater. While this is going on, the Capital will continue to make mages and troops, as you start to delab some mages (and your Monk) to complete infrastructure. If someone is being rushed, or you need to defend yourself, you may consider de-labbing mages and focusing more gold on combat ability, but without that pressure I’d advise completing development before going to fight someone.
Onmyo Hakase/Great Sage
Build


Chassis: Awake Onmyo Hakase
or Great Sage
Paths: ![]() 1
1![]() 3
3![]() 1
1![]() 1
1![]() 4
4![]() 2
2![]() 2
2![]() 1
1
Bless: Magic Weapons
Scales: ![]() 2
2![]() 3
3![]() 3
3![]() 3
3![]() 0
0![]() 3
3![]() 3
3
While the next build is also awake, the way that it plays out is radically different from the Earth Snake, for a variety of reasons. First, to clear up any confusion, the build is perfectly viable using either the Great Sage (as pictured), or the Onmyo-Hasake, a cheaper version of the Great Sage without the research boost or inspiring researcher. A lot of these numbers can be messed with, I’ll briefly explain why I selected the paths I did in a bit, but know that they’re flexible.
The main focus of this build is researching as much as possible as quickly as possible while simultaneously producing as many troops as possible. This is what’s known as an “Awake Researcher” build, which uses a Dominion 1 rank pretender for it’s cheap newpath cost to spread out magic as widely as possible and increase the research ability of the Pretender. In this example picture, the Great Sage shown above has 52 rp a turn, 55 within the Magic 3 scales that are selected. Jomon’s mages aren’t super-efficient researchers, but they do have fairly solid research ability, which means that you can still output a lot of research quickly with this kind of build.
The paths chosen for a build like this should usually include ![]() 2
2![]() 1, which will break you into your important Oni summons relatively easily (more on those guys in the Summons section), while the rest is largely flexible. Here I took
1, which will break you into your important Oni summons relatively easily (more on those guys in the Summons section), while the rest is largely flexible. Here I took ![]() 4 for Magic Weapons bless, something which will allow Sohei to be at least somewhat useful as the game goes on, although the very low dominion score makes this somewhat moot unless you have 15 or more temples up.
4 for Magic Weapons bless, something which will allow Sohei to be at least somewhat useful as the game goes on, although the very low dominion score makes this somewhat moot unless you have 15 or more temples up. ![]() 3 helps supplement your Air magic, which will often be the path you want the most help in (long experience has taught me this much). Astral is also still useful for boosting fairly high into the path later, at least able to go up to
3 helps supplement your Air magic, which will often be the path you want the most help in (long experience has taught me this much). Astral is also still useful for boosting fairly high into the path later, at least able to go up to ![]() 7 which will be useful for Global support a bit later into the game, and for forging otherwise inaccessible boosters. The rest of the low-level paths simply help boost research output, with
7 which will be useful for Global support a bit later into the game, and for forging otherwise inaccessible boosters. The rest of the low-level paths simply help boost research output, with ![]() 2 chosen to help access Moonvine Bracelet later, in case contending Mother Oak is an option.
2 chosen to help access Moonvine Bracelet later, in case contending Mother Oak is an option.
In this build, Order scales were taken to allow for Samurai Cavalry expansion, but if you’ve tried both and you’re more interested in doing Ashigaru expansion, you can trade the Order for neutralizing Misfortune, Neutralizing the temperature dump, Adding growth, expanding Pretender magic paths, or increasing dominion score. Basically, do whatever you want, the build is flexible enough to handle it. So long as you have some way to mass troops for expansion, an awake Pretender, and enough magic paths to research with it quickly, you’re going to be fine with the core of the build preserved.
Weaknesses
Despite the strong points for the Awake Researcher build, we should point out the major disadvantages it has as well: Low utility of bless for sacreds, which on Jomon isn’t a big deal but it does limit what you can do with Sohei compared to some other builds, as well as Ryujin. As well, there’s no big scary Snek to prevent another scales nation from rushing you, instead you have to rely on competent mage usage, which can be tricky to do in the very early stages of the game. Additionally, Jomon can struggle to deal with other Pretenders, particularly Titans, as they lack the mobility to force engagements until after Ryujin become available, which is delayed with this build.
Speaking of delayed Ryujin, probably the biggest weakness of this build is how difficult it makes it getting underwater. In testing, Ninja assassination is a reliable way to get underwater, but in practice it becomes an issue of balancing how quickly you can secure at least 1 uw fort with how quickly your neighbors can infiltrate the water. Nations like Atlantis or Erytheia can exploit this gap to quickly snatch your water provinces, with little recourse for taking it back until later. My suggestion is to simply rush them down on land, if possible. Atlantis especially lacks strong early magic, and needs to wait until they’ve gotten underwater to have high-value mages early. Erytheia is a bit trickier, although Jomon has less issue actually engaging them in melee normally.
Another weakness, which may have been a bit noticeable earlier, is that the build only ran dominion 2, which is weak and will be pushed in around mid-game by neighbors with a higher score. For that reason, you should temple early and temple often, which will increase your candle checks and increase your dominion score over time. In the very early stages, low dominion score can actually help spread scales a bit, as provinces will be capped at 2 candles while the awake Pretender generates extra checks to push Dominion outwards.
Expansion
Like the last build we looked at, we’ll be starting with Samurai Cavalry production here, although we won’t stop producing Samurai Cavalry until after we’re complete with expansion (for this example, we’ll be making them the entire time). We’ll prophet the Ninja again, and immediately focus our Pretender on research, aiming for the same low-level research goals as we did on the Earth Snake build, only this time we should hit them much earlier. Again, I’ll be running the test on the in-game random map generation, which should give me about the worst case scenario to expand on (it did, there’s lots of rivers).
Positioning wise, nothing changes with the initial expansion army, and we’ll be looking for easy targets to expand into, usually focusing on basic archer + militia provinces, weak tribes if able (rare in Late Age), and generally save tougher provinces for later. This build is weaker during expansion than the Earth Snake build, and we’ll almost certainly end up with poorer expansion than the prior build. With a recruitment focus on Samurai Cavalry, you’ll usually find that you’re gold constrained during the first few turns of expansion, this is fine, and when possible you should switch some recruitment away from Samurai Cavalry for Ashigaru (at least in this build) to fully use resources. Shown below:
Back to top of Onmyo Hakase/Great Sage section.
As we can see, gold is entirely used up here. Once you have a turn or two of recruitment built up, you’re going to want to have a Commander recruited as well. The independent Commanders are perfectly usable for this, and cheap, so if possible make those, if not use Hatamotos (you can afford to skip a turn of mage production). In this case, my secondary expansion party is going to end up being over-sized, because I intend to run it into a Heavy Cavalry province. It’s important to note that this build struggles more than an awake expander build with difficult start positions, such as those with mostly Barbarian or Heavy Cavalry provinces in the Cap circle.
Positioning for subsequent expansion parties is going to end up being more or less identical to the initial expanding army, although you shouldn’t be making Samurai Archers for this build. When you do expand into Heavy Cavalry provinces, you will need to change your scripting slightly to ensure that you properly engage the Cavalry, which will be moving faster than the infantry you’d normally be fighting, and destroy your own infantry squad if you leave yourself on Hold and Attack. You will attrition versus Heavy Cavalry, even with perfect positioning, so ensure that your party is sufficiently sized to deal with what you’re fighting.
Back to top of Onmyo Hakase/Great Sage section.
To deal with Heavy Cavalry I’ve shifted the Infantry squad forward a couple squares, and set both squads on Attack Closest. You might be tempted to script attack Cavalry, but this is actually a mistake, as there are usually several Mounted Commanders in Heavy Cav provinces which can be targeted by this script instead, causing your squads to engage separately and allowing them to be defeated in detail.
Another thing you may notice is that it takes a bit longer to get the gold needed for tertiary forts. This is normal, as your expansion should be only slightly faster than the Earth Snake build if it didn’t have the Earth Snake. That is to say, much slower than the prior build. Continue expanding and put up forts as you’re able, it’s ok if these are a little delayed.
At around the Turn 9-10 mark, you should take a water mage you have, using the Pretender if you haven’t found a Water magic random Master Shugenja yet, and forge a Ring of Water Breathing for your Prophet Ninja. If the Ninja has died already, you can use a normal Ninja for this task, although he’s going to need a weapon such as Greatsword of Sharpness or retinue item such as Handful of Acorns forged. This Ninja will be going underwater to assassin expand there for you. This method is slow, and if you have any amphibious neighbors they can often screen you off from this, but it is a fairly reliable method to get underwater. If possible, you should seek to isolate any small ponds on a map so that you can claim them for yourself.
Additionally, in preparation for your first war, you should be switching into Aka-Oni Samurai after your last expansion party (should be about the 5th, perhaps even 6th) heads out. Aka-Oni are a decent choice, as they have very high stats, and become pretty killy with adequate buff support, although the other elite Samurai or even Samurai Cavalry also work in this role. Samurai Cavalry are harder to support with mages, and much less gold efficient, but their high combat speed and additional lance charge allow them to engage an enemy differently from the rest of Jomon’s lineup, and are a solid choice if you expect to run into a lot of ranged units.
Back to top of Onmyo Hakase/Great Sage section.
Using the expansion strategy outlined above, I ended up getting to 20 provinces in this example game, but was only just starting to expand underwater this turn. As well, only 2 forts were under construction, with none yet complete, although I could easily afford starting construction on 2 more (and could do so if I tasked some of my expansion army commanders), which means that I’m also behind the Earth Snake build in terms of infrastructure. This should highlight that this build is weak for gaining water access, and also underperforms in terms of total expansion, but there is an advantage nonetheless.
The main advantage is research:
Back to top of Onmyo Hakase/Great Sage section.
As we can see, on turn 12 I’ve already hit all of my early research goals, and am moving rapidly up towards Alteration 5, much faster than the same point in the Earth Snake build, with a full 123 rp per turn more. This means that your mages at turn 12 are more effective, and what’s more you can de-lab more of them at the same time while maintaining the same rp as a different build. You can maintain the research lead while using more mages, in other words. At the same time, with spells like Summon Earthpower available, you can conserve more gems instead of using them to cast in-combat, which will be useful for forging and further spellcasting later. Income should be around the same, if not slightly higher, as well, although it’s hard to tell how much is population rng, and how much is due to the better scales.
Using Mercenaries to go UW
If possible, bid on amphibious Mercenaries to help you expand underwater. This test is going to focus on the “worst case” scenario, and I’ll be intentionally avoiding Mercenaries since there isn’t real competition in this test. In-game, Mercs can be a strong tool for breaking into the water early, which helps a ton. This isn’t as necessary on the Earth Snake build, although it’s still useful to help gain extra expansion on land. If Shipwreckers are ever available, bid all your money on them.
Imprisoned Monolith
Build
 Chassis: Imprisoned Monolith
Paths: ![]() 4
4![]() 4
4![]() 4
4![]() 4
4
Bless: Minor Shock Resistance x2 Larger Magic Weapons Low Light Vision
Scales: ![]() 7
7![]() 3
3![]() 3
3![]() 3
3![]() 3
3![]() 2
2![]() 3?
3?
This will be the last of the 3 “primary” builds I’ll be showcasing, and the only one not taken awake. Unlike the other 2 builds, this build’s primarily focused on emphasizing mid-game power. As an Imprisoned pretender, the Monolith cannot help with either early expansion or research, but instead it allows you to take a moderate bless, good dominion, and strong income scales. You would use a similar expansion strategy to the Awake Researcher, only this time your research will be somewhat delayed. Instead, with Growth 3 scales you’ll quickly have more income per province than either prior build, and you should focus on getting infrastructure up as soon as possible.
The bless this time actually scales to some degree with the game. 15 Shock resistance, Larger, Magic Weapons, and 50 Darkvision all help Sohei stay somewhat relevant once spells like Fog Warriors, Darkness, and Wrathful Skies come out, and the Larger and Shock Resistance also help make Ryujin functionally immune to Air Elementals when in Dragon form. Larger also helps them move faster and be a bit tankier, which helps passively to improve raiding as well. This build was actually designed specifically to help Ryujin counter Air Elementals, but the overall bless suits Jomon well even outside of this specific use-case.
Opening moves are essentially identical to any other Jomon build, and because you have Order scales, you should expand using a mix of Samurai Cavalry and Ashigaru, as detailed in previous builds. Going underwater is also essentially the same as with the Great Sage build, and if you set Master Shugenja that you recruit immediately to research, you should hit Construction 2 early enough to have basically the same timing as with the other build. Obviously, you will still be behind on research, but overall the progression is quite similar. The main difference, then, is that you’ll be trading your early magic advantage for more income throughout the game because of the Growth scales.
While undeniably weaker in the early game, in the mid-game and beyond, the build is arguably stronger than either of the earlier 2 builds I’ve shown. For one, you have an answer to nations like Lemuria, or those who might rush Alteration 7 (for Fog Warriors) through the form of your Sohei sacreds. In addition, Ryujin don’t need to be blessed to benefit from Larger, making it one of the few blesses which they can actually utilize while raiding. Your Growth scales will also have significantly boosted your income compared to a Growth neutral build by then, and you’ll be able to afford greater mage production and scale your research into the late-game more easily because of it.
Weaknesses
If you aren’t confident in your ability to expand with Jomon, or are unsure how you would defend in an early war, this build may not be the build for you. Jomon is often seen as a quite weak nation without Ryujin, and even though I’d maintain that it can hold its own even just with Master Shugenja and the national infantry, it’s true that nations which get into lots of early wars, or who “invite pressure” can end up easily falling behind or even losing early on. The Monolith doesn’t help prevent either of these things, it in fact doesn’t even wake up until turn 36, at which point it can actually impact the strategic map.
In addition, by being weaker early, it’s arguable that the Monolith build actually scales weaker, as if you’re able to invade somebody with one of the other builds, you can start to snowball that advantage and grow enough in size to make up for any income weaknesses. Dominions 5 is a game of snowballing, as once you’ve taken somebody’s land, you immediately have access to their income, their forts, and therefore can directly scale up your ability to research and the number of troops you can field. A research and army advantage can then be used against another unfortunate neighbor to even more easily win the next war, and so on. What’s more, because of how research works in Dominions, 1 nation the same size as 2 smaller nations put together isn’t even at a disadvantage fighting them at the same time, as the larger nation probably has more research than either of the smaller. With this Monolith build, there’s potential for you to miss out on the ability to start this snowball early, instead you’re going to focus more on putting up infrastructure at a slightly slower pace, and more completely, and emerge ready to fight around turn 18-20 with more research than your neighbor, and the ability to sustain production more easily with your good scales.
Extra Builds
Despite there being "meta" builds for Jomon, there's still plenty of room for experimentation, difference of opinion, or just plain fun builds, that don't necessarily take themselves too seriously. To check some of these out, check the Appendix below.
Archer Bait Expansion
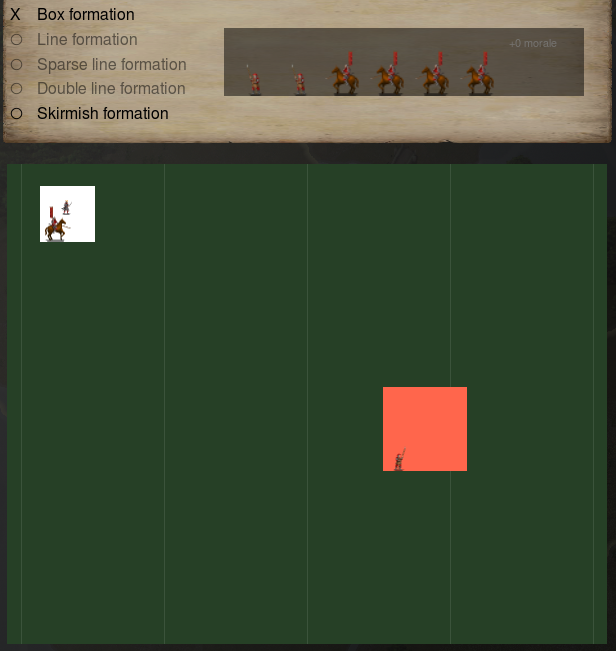
An additional expansion tactic, “Archer Bait” expansion refers to a specific setup in which someone uses a larger squad of Archers to distract independent squads while a smaller squad of Cavalry on Attack Rear orders snipes enemy commanders. The Archer squad is on the seldom used Fire and Keep Distance command to kite any independent infantry squads. In theory, Jomon can use this to effectively expand, and I mentioned it as a viable expansion tactic previously. I still believe that this is the case, but I also think it’s flat out a worse technic then simply running a Cavalry + Infantry squad, as described in the previous expansion example. In general, the Cavalry + Infantry squad seems to be the most reliable from the tests that I’ve done, albeit it’s easiest to get such expansion parties out while taking order, which makes it harder to use such technique on builds without that scale. In addition, Jomon’s Samurai Cavalry lack full lances, only have 1 attack after their lance is used up, and don’t wear shields, all of which makes them more vulnerable to use with the Attack Rear strategy.
This is approximately the positioning you should use for an Archer Bait strategy. In theory, the archers should be positioned further down on the Army Setup screen, but in practice this doesn’t reliably grab all the infantry squads, and sometimes one will intercept the Samurai Cavalry before they can hit the rear.
-- Mid-Game --
Mid-Game Strategy and Tactics
After the early game comes the mid game (I'll put something witty here later).
Offensive and Defensive Strategy
Dominions is often not a game where prescriptive tactical advice is strong enough to carry you to victory. Why? Because “It Depends” is the go to answer to almost every open-ended question having to deal with tactics. “How do I deal with this pretender?” It Depends; “How should I fight MA Ermor?” It Depends; “What do I make to kill these sacred knights?” It Depends. What tactics you use are going to be heavily dependent on the game-state, what you have actual access to, comparative research of the two parties fighting, the diplomacy between you and your other neighbors, and on and on. Instead, it’s often helpful to look at matchups from a strategic perspective, to ask what type of things you should be doing, and keep in mind this wider toolbox when moving to address particular solutions. We will get to tactics later, but for now, what strategy should Jomon be going for?
To start off with, we’ll be going into the end-of-expansion phase, and discuss how you should lead into your first war. Jomon has good matchups and bad matchups, so we’ll first discuss the absolute worst-case scenario that you could be fighting into: Lemuria.

If possible, you should avoid Lemuria with all your might. As we’ve previously discussed, Jomon’s priests are somewhat lacking and it’s sacreds are uninspiring. Even if you take Cold Resistance and the Magic Weapons Bless for your sacreds, they’ll still struggle to deal with just large quantities of ghosts that you have few other ways to kill. Low-level research in conjunction with Nature and Earth magic, primarily, does not lend itself to a strong matchup into Undead, particularly Ethereal Floating undead. Fire magic will likely not be prevalent enough to carry through such a matchup, and potentially useful Astral mages who could cast spells like Solar Rays are slow to recruit and therefore difficult to mass enough to matter. In this case, you should address the possibility of fighting Lemuria before the game even starts. Take a dormant or awake Titan you don’t think Lemuria can kill, make sure Dominion score is high and you can make plentiful sacreds, who have Cold Resistance and Magic Weapons at minimum, additionally Poison Resistance and Reinvigoration if possible, possibly even extra Morale to deal with Fear. Lemuria’s thugs will come with Ethereal, a Chill Aura, and a Fear Aura innately, not even mentioning their ability to bring a pretender who can cast Foul Vapors to synergize with the universal Poison Resistance their ghosts have.
Never fight Lemuria alone, and use diplomacy like a bludgeon to reduce the impact of fighting them as much as possible. Make a coalition to fight them, warn your other neighbors that you need to deal with Lemuria and get them to leave you alone so that they don’t have a 2 Capital Lemuria to deal with later, or make a deal with Lemuria itself in exchange for not joining a coalition against them. In whatever way possible, avoid fighting them as much as you can. It’s not incorrect to say that fighting a Lemuria in a 1 on 1 situation is the worst possible early-game matchup for Jomon.
Moving away from that particular scenario, everything else is a bit more generalizable. You want to be able to ensure a strong infrastructure build-up, and while everyone else will also be doing this, taking a couple extra turns to make sure you have plenty of forts and mages can also help you identify a particular war target for your first war. Outside of Lemuria, nobody is a particularly bad matchup for Jomon per-se, although strong sacred builds should probably be avoided in a first war. You should be at a position where you’re comfortable being able to support your infantry with mages, preferably somewhere up Alteration, with spells such as Earth Meld, Protection, Mossbody, Quickness, etc. all available. Your primary mages at this point are Master Shugenja, although around turns 12-15 if you have forts coming up, you can begin to switch into Onmyo-ji as well.
At this point, intelligent mage use and having troops in the right places should be able to deal with most opponents. Depending on who you’re fighting and what they’re going to be using, your research goals might change, so it’s important to scout out the opponent and figure out a battle plan ahead of time if possible. Strategically speaking, Jomon does best when it has a clear idea of what it’ll be fighting and can spend a turn or two gearing for that particular threat
Early-Mid Game Offensive Strategy
Between turns 15-20 is approximately when you’ll be at the Early-Mid game transition, and Jomon’s breadth of options forces you to make a research decision. It’s important to note that a research decision is also a strategy decision! It will impact which of your mages is most useful and therefore which you’ll be wanting to make most, and it’ll impact how well you’ll be able to fight different opponents. Jomon’s ideal offensive scenario begins 2-3 turns before the war. Jomon’s troops aren’t very mobile, so they need to be properly positioned for whatever war they’ll be engaging in. This is actually one of the larger weaknesses of the nation, as their immobility makes them particularly vulnerable to a 2-fronted war. For that reason, proper scouting of not just the primary war target, but also other neighbors is quite important, and if you have any questions about one of your other neighbors, it’s better to keep something in reserve than to be sorry later, particularly against more mobile opponents like Vaettiheim and Caelum.
Jomon’s strategy will be slightly different if you have Ryujin or if you do not. If you do have Ryujin available, then there are 2 main considerations for their use: Do they bring a unique threat to an army battle, and Can you use proper logistics to maximize their use. If you think your Ryujin will end up being important casters in an army battle, keeping one or more crucial randoms in reserve to reinforce an army can be useful. If they’ll need spells to cast an important spell (such as Mist, Foul Vapors, Marble Warriors, Elementals, etc.) then bring extra gems of those types with the army to use later. Ryujin are also incredibly mobile, able to cast any of the Elementals depending on Magic random, and always able to deploy Water Elementals, so they make excellent raiders. Using minimal gear, such as Kithaironic Lion Pelt and Frost Brand, a Ryujin can clear 6-10 pd without issue, and effectively be where the enemy is not. An enemy caught off-guard can lose a lot of land in just 1 turn to Ryujin raids. A more advanced tactic is to have scouts forward-deployed with gems to restock a Ryujin who raids into the province the scout is located in, if for example the Ryujin is making Air or Fire Elementals.
A Foul Vapors role Ryujin can even be used to wipe certain armies entirely, by taking enough Point-Buffs to be largely immune to mundane damage sources. If an enemy is telegraphing an army movement, and they haven’t seen a heavily geared/buffed Ryujin yet, this tactic can be particularly effective. Ryujin shouldn’t be used recklessly, but they should be used as much as possible to gain either an edge in combat or to take control of momentum by forcing the enemy to react to raids on the strategic map.
Another tool in the belt is the use of Ninjas. Ninjas are very basic Assassins, with a couple small quirks: They can see in the dark, and they can scale walls. These make them particularly effective for going inside of sieged forts to deal with mages or commanders, particularly those who will be taking Darkness penalties during night-combats. Many people don’t consider Ninjas very carefully because they’re not mage-assassins, but with cheap gear like a Handful of Acorns (summons Vinemen) they can be reasonably effective, particularly against unprepared mages. This is another way for Jomon to alpha-strike the opposition, it gives an option to snipe out site-searching or isolated mages, and to put a strain on someone’s mage resources to deal with Ryujin by acting in conjunction on the first turn of a war.
More mundane raiding techniques include the use of Master Shugenja with squads of 15-20 infantry (Ashigaru are cheap but attrition and are less reliable than the more expensive infantry), usually casting spells like Wooden Warriors, or Legions of Steel in conjunction with Strength of giants. This is a relatively cheap but effective raiding group, only really vulnerable to sizeable PD dumps. Even simpler is a larger squad of 30-40 simply being led by a commander, either with or without formation ability. Jomon can also use magic phase movement through Cloud Trapezing or Teleporting (with item support) mages to catch an opponent out with Elementals, or more rarely an MR Check or Die spell like Soul Slay (when dealing with thugs).
All of these contribute to the overall strategy of controlling the pace of the war and securing land as quickly as possible. This helps make room for Jomon’s armies, usually slower and more ponderous, to get on top of forts, and take advantageous fights. If you can isolate forts and take them 1 by 1, you’ll quickly gain a large enough resource advantage to make winning more or less inevitable.
Army composition and Strategy is also important. The core of any Jomon army will usually be infantry supported by buffing mages. At the first-war stage you’ll usually only have 1 or 2 Level 5 Magic Schools unlocked, and which schools those are will be based on who you’re fighting. A brief rundown of what each of those schools actually offer:
- Conjuration 5: Full size Elementals, the path-boosting spells, including Power of the Spheres and Strength of Gaia, and Howl. Additionally, access to summons such as Tengu, up to and including Dai Tengu, and thug chassis such as Shuras and Ujigami.
- Alteration 5: Protection buffs like Wooden Warriors, Mossbody, and Iron Warriors. Chaff generation through Swarm, and a wide variety of disabling spells for Water, Earth, and Air mages. Plenty of self-buffs for thugs as well. Resistance buffs at Level 5, Wind Guide to make all your mages more accurate, and Maws of the Earth to significantly increase Earth mage combat capability.
- Evocation 5: Battlefield effects like Mist, Rain, Storm, and (more rarely) Earthquake. Ryujin can also contribute with spells like Freezing Mists or Acid Rain. Disabling spells like Web, Slime, or Sleep Cloud. In conjunction with Conjuration 3-5 Evocation is particularly powerful. Sulphur Haze, Poison Cloud, Lightning Bolt (in conjunction with Storm), Healing Mist, Falling Fires (or Fireball) become available much more readily with the path-boosting spells in Conjuration, or through help from summons in that same school. This can also be true of spells in other schools, but given that many Evocation spells need a sufficient mass of casts to be effective, it’s particularly true here.
- Enchantment 5: Haste, Flaming Arrows, Strength of Giants, Antimagic, and Foul Vapors are all strong options here. Also includes strong thug spells like Personal Regeneration, Breath of Winter, and Fire Shield. Another source of Resistance buffs aside from Alteration. Foul Vapors is one of the strongest spells in the game against armies without Poison Resistance, so this is a particularly useful school in that scenario.
Defensive Strategy
We’ve already discussed that Jomon struggles with mobility for its troops, and that this makes it difficult for them to defend multiple fronts easily. Keeping this in mind, what’s the optimal Defensive strategy for Jomon? In a word: stall.
Jomon’s main plan is to force favorable fights in a defensive position. If troops are out of position, use raiding, Assassination, Foul-Vapor traps, and any other tricks possible to slow and divert the enemy until you can get something in position to counter with. This could be aided by keeping one or more reserves of troops (this doesn’t have to be a lot initially, but enough that a couple turns of build-up would make it substantial) that you can use to more rapidly respond to an enemy threat. Being somewhat experienced playing as Jomon, this kind of back-stab where you have to ponderously respond to a sudden threat is perhaps the single biggest obstacle to winning a war.
The primary advantage you’ll get in fighting a defensive war is the information advantage. This should be used to tailor Thugs or Assassins if possible for maximum effectiveness. If you find yourself needing troops fast, things like Mechanical Men make good buffers for many of the previously discussed Evocation Spells, and chaff generating spells like Howl and Swarm are other ways to help stall out a battle. While too expensive to be used in offensive situations, where information is often incomplete, many of Jomon’s stealthy mage summons are actually more viable defensively, where they have more functional mobility due to being able to largely walk through enemy raids.
A major point to remember here as well is that the initial suggestion for development was to make as many forts as was affordable, and in a defensive situation this is again useful, particularly if forts are adjacent. Adjacent forts are so useful for defensive purposes because they allow you to gather mages and troops safely to support a friendly fort under siege, and also offer an adjacent location to refuel on gems or important items, all while avoiding direct enemy attack. This should be incorporated into the larger stalling strategy if possible.
Given knowledge of how an enemy is attacking, Ryujin make excellent counter-raiders, and can either be geared to tackle potential thugs they might run into, or cast damaging spells or summon elementals to deal with raiding forces. Air random Ryujin are particularly useful at this because of their ability to Cloud Trapeze, which allows them to catch out a lot of non-stealthy raiders. Once a sufficient force is ready, you should seek to force an engagement with an enemy army, crush them, then try essentially use the same strategy as you would if you were the attacker to start raiding their land and controlling as much as possible.
Mid-Game Offensive Strategy
By the time the Mid Game period enters its more serious phase, roughly around turns 30-40, you should hopefully be in a strong position. By this point, you should have multiple schools at Level 5, and be working towards–or at–your first Level 7 school. Almost always, the first Level 7 school should be Alteration, although Construction 7 is also fairly potent. Important Level 6 goals include Alteration 6, Construction 6, and Enchantment 6, with Conjuration 6 and Evocation 6 being useful for Wailing Winds if you can summon Oni. At this point, Jomon has access to such a wide variety of spells that what you actually need for any given fight will be the primary determinant of what gets cast, although there are some spells that don’t really come with downsides.
As an example, the reason one should head straight for Alteration 7 is because of the incredibly strong combination of access to Fog Warriors and either Marble Warriors or Mass Protection (or both) depending on if someone has a way to punish Fire or Cold vulnerability. Construction 7, on the other hand, would mostly be taken to maximize damage output using Weapons of Sharpness. Both Schools have quite useful pickups at their Level 6 as well, with Lightless Lanterns, Starshine Skullcaps, and Armor of Knights in Construction, as well as Frozen Heart, Wave Warriors, and Battle Fortune available in Alteration.
It is at this stage of the game, before it becomes easy to mass remotes, summons, and thugs to deal with Ryujin or Jomon’s weak mages efficiently, that Jomon truly shines as a nation. Given the initiative, Jomon is capable of rapidly locking a nation down, sniping out its commanders, while moving unstoppable armies onto forts and winning any fights necessary to conquer the opponent.
Real Game Examples
Example 1; Best Case
To help show how you should be transitioning from development to fighting, and also to back up what I’ve said so far with a real game, we’ll show a couple of games. First, what could be considered as a “Best Case” scenario where development is smooth, none of your neighbors are overtly aggressive, and you get to pick your first war target at an opportunity of your choosing.
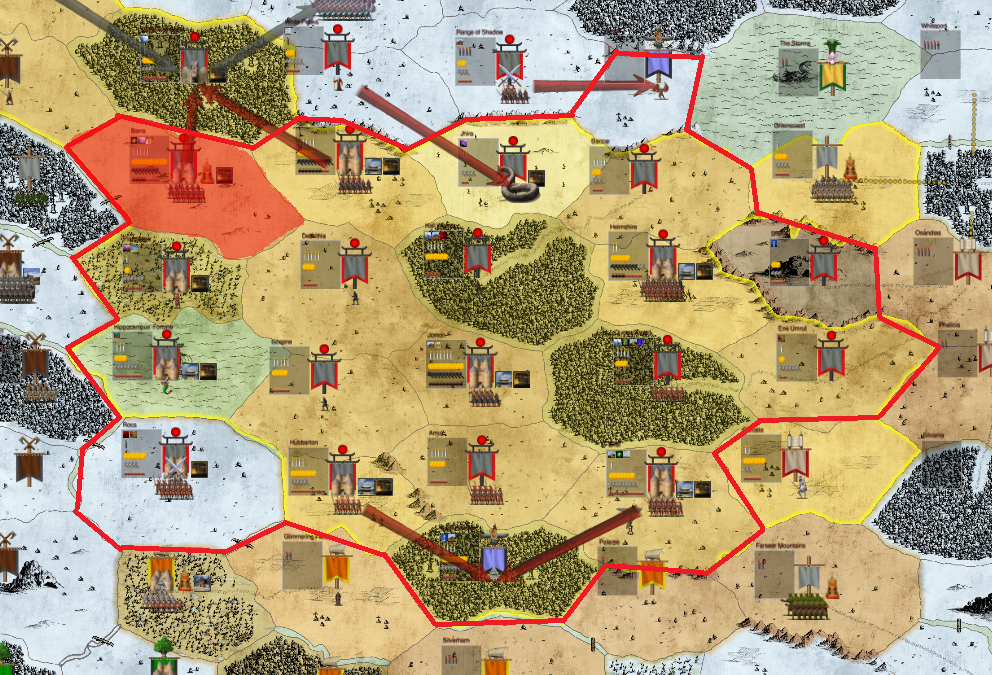 Turn 35 in what ended up being an aborted multiplayer game.
This image gives us a lot to take in, so let’s go over what it’s actually showing and what the overall position looks like. Firstly, the outline in red shows the land that was expanded to without any contesting, including the Throne province shaded in red, which was taken later after the end of “normal” expansion. Expansion in this game ended at 19 provinces, a pretty respectable opening in a multiplayer game where there’s about 15 provinces per player. This was achieved through the use of the Earth Snake for expansion, essentially following the setup outlined earlier in this guide, including the use of a Prophet Ninja. While some of this can be attributed to good fortune (the Caelum, for example, had a bit of difficulty expanding well, and the Utgard chose to rush a Xibalba instead of focusing on expanding well elsewhere), it’s also due to the extra speed and reliability the Earth Snake provides, which allowed me to capitalize on the opportunity.
Sadly, this map was limited in the number of UW available provinces it had, which on the one hand basically ensured that nations like Erytheia and Atlantis especially wouldn’t show up. On the other hand, this also meant that we only got a single UW fort up for Ryujin. It also severely limited the number of coastal provinces on the map, and took out any coastal starts, which we took advantage of to screw Marignon over (sorry Zan).
After such solid expansion, development was also thorough and uninterrupted. In this case after initial expansion we made 8 forts in addition to the Capital, for a total of 9. That’s just under 50% of provinces with a fort in them, with consistent mage production out of most of those forts for much of the game thus far. In addition, there’s even an additional lab in the Wasteland/Mountain province currently occupied by our Earth Snake Pretender, which has been used to pump out Master Shugenja in addition to the forts we have. This saturation of mage-producing provinces allows us to switch into Onmyo-ji earlier and more smoothly than a build without so much infrastructure would be able to. In order to afford this infrastructure while maintaining mage production, sometimes normal Shugenja or Monks of the Fivefold Path were recruited instead. At the stage shown, you can see that there’s ample troops available for counter-raiding, or held in reserve in case the Utgard decides to invade, and there’s also plenty of mages able to support those troops on any of the fronts they would be needed in. Another advantage to this setup is the research I was able to pump out.
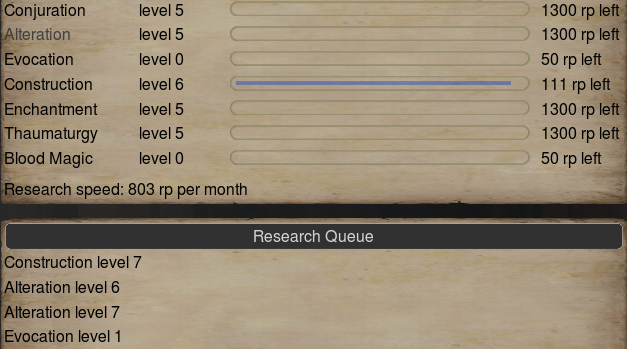
This is honestly perhaps the smoothest research I’ve ever put out as Jomon, and for turn 35 I’d argue this is more than ample. In this case, rushing Construction 6-7 made sense since there wasn’t any early pressure, and I wanted to use Lightless Lanterns to bolster research even more. However, because of the initiation of war with Caelum, only 3 Lanterns were ever made (Fire Gem income was low in this game). Keep in mind that 800 RP per turn here is also excluding a large number of mages who are out in the field either directly fighting with Caelum or patrolling around to catch the squads of Raven Guard that were brought out by Caelum to raid. In addition, Thaumaturgy 5 isn’t usually a priority research goal for Jomon, but in this game the neighboring Utgard was running an Awe + Fear bless, so it was made a priority to help deal with them easier should a conflict arise.
What this shows is that good development from an awake expander can easily make up for not taking an awake researcher or similar build. Even in the event of an early conflict, research came in quickly enough that mages would have still been effective in combat, and even though some forts might have been delayed or never built in the first place, this just means that you would have that gold to spend more directly on fighting power early in the game. So despite being a huge investment of Pretender design points on early game power, an Awake expander gives you enough extra resources that you can still play flexibly, by either investing that extra gold in additional infrastructure to build up research, or by investing it into mages or troops earlier to have greater early fighting capability.
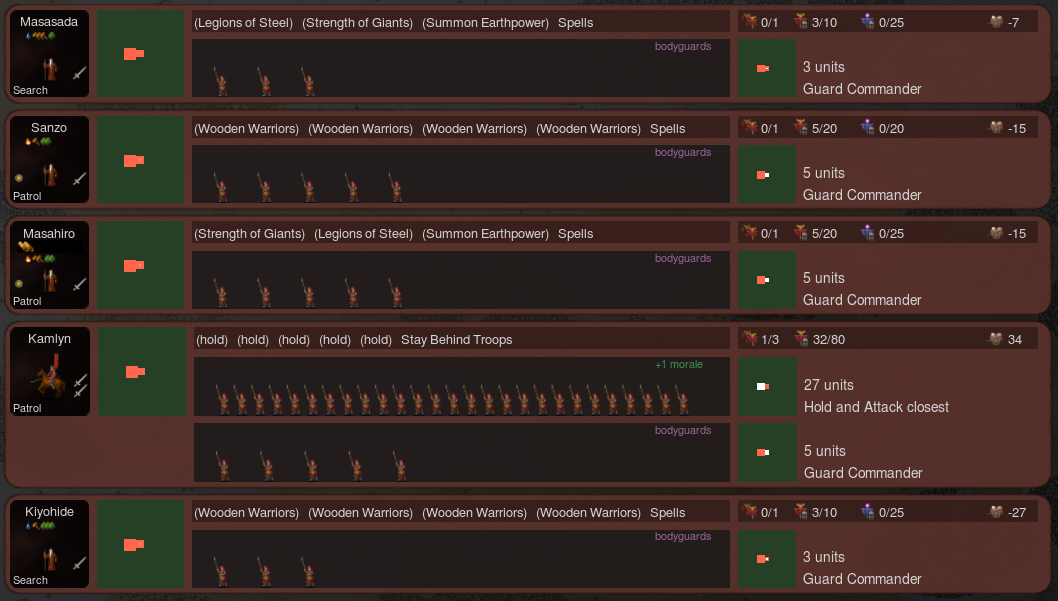
Here is an example of the kind of fighting force being used to intercept enemy raiding squads. Important to note that this party is somewhat beefed up to support the site-searching being done by the N3 and E3 Master Shugenjas (also, I just realized that there were 3 lucky 10% random Master Shugenjas in this group). A “real” patrol group would probably only have 1 Master Shugenja, casting either Earth or Nature buffs on the Ashigaru. Ashigaru are used here because they’re cheap, easy to mass, and they do just fine against most opponents given that one side has buff magic and the other does not. In this case, Caelum doesn’t actually have stealthy mages, so if they were bringing any mage support I’d be able to see them before I ended up fighting. It’s ok to invest a bit more than someone else in a counter-raid if you’re able to cleanly deal with what they’re investing. Of course, you shouldn’t be only focused on defense but also send something out to attack the enemy as well.
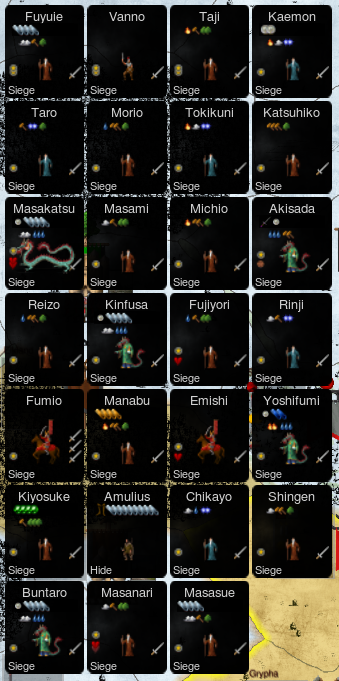
And so we have an example of an army sent out to siege down the enemy. In this case the army is split primarily between Elemental summoning and troop buffing roles. There are also 2 Battlefield casters, one for Howl and one for Antimagic, but most of the magic support is sunk into the prior 2 roles. This is an army assembled to fight a Caelum, and it actually comes with a couple weaknesses to LA Caelum in particular, although some things are much harder to directly combat than others. Caelum can cast Earthquake without hurting itself at all, meaning that it can bring an army with Earthquake support much earlier in the game than other nations, since it doesn’t need a measure like Mass Flight to insulate itself. Evocation also gives access to spells like Thunderstrike, which are particularly useful when an enemy masses it’s mages together to avoid flying troops, which Caelum can also bring. In addition to this, Air Elementals are pros at jumping onto weak mages and sniping them, even through bodyguards through the simple expediency of trampling.
While the army composition above isn’t actually well suited to dealing with Earthquake or Thunderstrike, it is adequate at dealing with Air Elementals and excellent at dealing with flying troops. The Air Elementals from the Enemy will potentially run into size 6 Elementals from my side, which will hold them in place so they can be deal with. In addition, the more elite Jomon infantry are all being held as bodyguards, meaning that they’ll be reserved to soak up extra buffs and deal with any flying enemies. Ashigaru are cheap and efficient as a screening frontline as well, but also good enough to walk forward and snipe enemy mages if they’re left lightly defended.
This army is also a good example of using research power spikes at Conjuration 5 and Alteration 5, as well as the more baseline research at Construction 3, and Enchantment 3-4. Construction 7 isn’t actually a huge deal for the matchup vs Caelum for Jomon, but once you do hit it, you can easily deal with nations who rely on their own high-protection infantry like Ulm or Marignon by simply chopping right through them using Weapons of Sharpness. This army would be much scarier once it does hit Construction 7, then Alteration 7 (as the research image shows is the next goal).
Hopefully this example shows a good idea overall of how Jomon can develop infrastructure, build a strong research base, then deploy its mages and troops effectively, in a real-game scenario.
Example 2; Alpha Strike
I have a confession to make: I am a filthy NAP breaker. Not even on purpose, but because I misidentified who was playing the nation I attacked. It was a pretty embarrassing, easily rectified mistake, but nonetheless one I made.
Regardless of why it happened, this is the result. In total, the first turn saw 10 out of Phlegra’s 27 provinces change hands, drastically cutting their gold and gem income, and distracting much of Phlegra’s forces while they retook land they used to hold. It also helped isolate forts for sieges, and allowed for extra information by forcing Phlegra to walk into contested provinces in order to fight back properly. Despite what this kind of Alpha-Strike can do for you, there were actually several ways it could have been improved, several tricks and tactics you can use to give an even bigger advantage, and more inherent weaknesses into this kind of tactic, all of which we’ll be going over when we discuss this game.
First, it’s important to remember how advantageous the information advantage can be. In this case, I blatantly broke a Non-Aggression Pact, not something I’m known for, so I had a large element of surprise. What’s more, I had a large scouting network in the neighbor I planned to invade, with forces along the border ready to move in as soon as I knew what I’d be fighting. In the initial turn, I successfully avoided any large force that could have given my raiders any issues. In doing so, I also lost much of my information advantage.
Part of the reason I decided on invading Phlegra was because of my belief that Phlegra in particular would struggle to deal with highly mobile raiders like Ryujin. Nominally, Phlegra has no real ability to exceed a Ryujin’s mobility, as they don’t naturally have Magic Phase movement, flying, or stealth. Nations with any of these, particularly Magic Phase movement, can disrupt your ability to raid by moving onto your raiders with counters to what they know you have. In this example, Phlegra actually had 3 chassis capable of Magic Phasing. His Pretender, a Laestrygonian Tyrant (which was empowered), and a Cyclops Hero, all of which have the potential to kill a lone Ryujin raider. This allowed him to partially intercept my raiders the next turn and maintain enough mobility to strongly contest the raiding game.
It’s important to note that there are ways to deal with the enemy Magic Phasing onto Ryujin, several potentially useful methods, in fact. The first is to simply Magic Phase your own Ryujin or other Mage in to counteract whatever the enemy is doing. Another way is to forward deploy gem-mule scouts where you anticipate you’ll raid, then transfer gems onto your Ryujin once it’s there, outside of the expectation of your opponent. Potentially, you can also interdict an enemy mage via assassination, although it’s important to note that many of the the things which can Cloud Trapeze onto a Ryujin with the expectation of victory won’t care overmuch for a humble Ninja assassin. Still, you could potentially burn gems and turn the latter fight by doing this. All of these methods involve anticipation that the enemy will, in fact, intercept your raiders with their own Magic Phase combatants, something which can be hard to accurately predict and plan for, although when you do succeed it can be especially demoralizing for an enemy.
In addition, one of the key mistakes I make in my initial aggression is not locking down the enemy forts. Targeting forts is actually much stronger if successful than targeting non-fort provinces, for a couple reasons. First, Magic Phase movement onto a friendly fort, even one under siege, places a Mage within that fort, meaning that Ryujin on top of a fort aren’t vulnerable to Cloud Trapeze or Teleport shenanigans. It also is just as effective if not more so at cutting down gold and gem income, and if you organize it properly, you can cripple someone’s income almost entirely. Hitting forts also cuts mage and troop recruitment, as well as ends special commands like Capture Slaves, Blood Hunt, or Reanimation (none are relevant here, but something to keep in mind). You can also use a fort ping to help screen for an army moving onto that fort, as you will control the outside of the fort without the enemy necessarily being able to see your army composition and scripting. Another advantage is that you end up severely limiting the mundane movement available to enemy mages, as they’ll need to break siege before they can move out of a sieged fort, something which can be especially risky if they don’t know what you could reinforce the siege with. Lastly, for Jomon specifically, having any-fort wall climbing assassins gives you the ability to more or less “Shoot Fish in a Barrel” by assassinating into a fort under siege, where the enemy cannot patrol you out.
Keen-eyed readers will note that this is another mistake I made with this initial assault. Many of Phlegra’s human Mages are actually incredibly weak without the support of their communions, and thus particularly susceptible to interdiction by assassination. While the Cyclops and Laestrygonians Phlegra has access to don’t really fear such things, these mages are the minority, and you can cripple Phlegra’s magic ability without even targeting them particularly.
Here we have another example of an alpha-strike, this time covering over a large number of forts, and more substantially disrupting income and army production. It’s important to note that in this example, several of the raid attempts were unsuccessful, which brings up a very important point in general. This is the idea of efficient investment.
In Dominions 5, one of the key strategic errors is investing too much or too little into whichever tactics or overall strategy you’re pursuing. Invest too much in an invasion, for example, and you’ll be aligning most of your fighting force usually in a specific, non-central, location and de-labbing mages who were keeping you competitive on research. Over-invest to counter a raid and you’ll be tying up forces chasing an enemy when they can be doing more productive things. In general, constantly moving resources on the map to do things that will not help recoup their value is a losing proposition, and only a substantial material/tempo advantage makes this beneficial in even the short term.
The flip side of this coin is underinvestment. Is that Commander + 20 ashigaru force enough to take out 11 Province Defense? Maybe not, and the Commander + Ashigaru took resources and commander points to make, as well as nearly 4 times the gold investment. In this case they’re essentially been thrown away for no benefit. So then the question becomes: how much do I need to invest in order to raid that province? 40 Ashigaru may well be enough to take that 11 PD, and the two 6 PD provinces behind it, and even though it’s barely twice the investment, the payoff is also massively higher. Even more seriously, bringing too little to an important fight, particularly when you have more resources available to invest, can be a critical failure, to the point of being game ending by making additional fights impossible to effectively take. This is the concept of being defeated piecemeal played out.
In a real game, it can be difficult to determine exactly how much you need to bring to accomplish a goal. The enemy will probably have tools safely in forts that are difficult to attack directly, or have Magic Phase or Ritual Spell capabilities to attack you if you initiate aggression. You won’t always be able to see enemy scripting without giving away your own intentions, and even if you can see someone’s scripting, that doesn’t mean they won’t introduce new magic due to either moving mages or increasing research. Even with as much information as you can have, you’d still need either the experience and judgment to predict a battle or strategy’s outcome, or the fortitude to test a battle extensively beforehand to have the strongest likelihood of success.
Late Game and Conclusion
The deeper into a game of Dominions you go, the more difficult it becomes to predict how a build will play out, how the diplomacy will have impacted game state, which research goals will have been prioritized, and what summons or independents have been co-opted into your national strategy. Matchups and build strategy will have become determined not by who you start next to, or the pool of nations you could face, but by who was successful and how strong you judge them to be. In short, there is a lot of uncertainty.
Instead of trying to exhaustively go over literally everything Jomon can do, I’ll instead go over Jomon’s key late-game research goals, why they’re important, and what kind of spells you might want to cast. I’ll also discuss some of Jomon’s limitations and what you can do to address these as the game goes on.
Late Game
Late Game is a nebulous term (much like mid-game) which lasts from the time people feel like the game is hard to play to the end of the game. Late Game Dominions 5 is usually characterized by increasingly ramping research hitting all the way up to level 8 or 9 in a school, with other schools coming up to level 7 before being pushed all the way as well. A sufficiently long Dominions game should see one or more of the major players complete research entirely, although this obviously isn’t necessary for a game to conclude. Jomon’s primary goals in this regard are Alteration 9, Enchantment 8, Evocation 8-9, and Construction 7.
- Alteration 9: Going from 7 to 9 grants you battlefield wide resistances in the form of Ground Army, Warriors of Niefelheim, and Warriors of Muspelheim. In addition you get Will of the Fates and Army of Lead/Army of Gold. Quickening and Liquify are strong additional spell choices for Ryujin, and the same mages who can cast Mass Protection, Creeping Doom, or Poison Cloud can also lay out Polymorph to mass transform enemy troops.
- Enchantment 8: Enchantment Levels 6-8 are all pretty high-value for Jomon, with Enchantment 9 also being strong given sufficient resources/mage paths. Enchantment 6 provides Arrow Fend, Relief, and either Heat From Hell or Grip of Winter if you’re able to shield yourself from the side effects. Ench 7 gives Mass Flight and ??Serpent’s Blessing??, making Foul Vapors safer to cast and removing a weakness to Earthquake. Enchantment 8 once again gives battlefield wide resistance spells like Frost Fend, Fire Fend, and Thunder Fend, as well as Mass Regeneration, which can help drastically improve survivability on the battlefield, especially when combined with the likes of Will of the Fates, Fog Warriors, and Army of Gold in Alteration. If you have the ability, some of the strongest spells in the game are at Enchantment 9 such as ??Gift of Nature’s Bounty and Arcane Nexus??, although both of these often draw a coalition.
- Evocation 7-9: Evocation is honestly an underrated School for Jomon. I’ll go over Evocation 7 since that wasn’t talked about earlier, but honestly there’re strong arguments to get most of the 7s before moving onto any particular School for level 9. Evocation 7 gives Fire Storm, Acid Storm, Storm of Thorns, Rain of Stones, Winds of Death??, and out of combat even Murdering Winter as options (Illwinter likes their weather related iconography I guess). Some of these are somewhat usable battlefield wipe spells, but in most cases you need a special setup to ensure you’re not also killing yourself in the process. Murdering Winter seriously punishes the enemy from walking at you in Cold Provinces, and can be a great way to set up for a fight the following turn or later on in the same turn. Evo 8 is mostly useful for Pillar of Fire, which makes all of your Fire magi more useful, although with proper setup you can also cast Maelstrom, a great way to boost gem income, especially to help the many Ryujin you have. Evocation 9 is even better, however, if you’re able to afford boosts in Fire or Water. Niefel Flames is a strong spell, but not one that’s very hard to cast for Jomon, and with a bit of prep work spells like Chain Lightning, Flame Storm, and even Flames From the Sky are possible. Flames From the Sky is the single scariest remote attack spell in the game, strong enough to devastate any human mage corps.
Importantly, these lists are not exhaustive, and there’s creative stuff Jomon can do with their summons and schools like Thaumaturgy or Conjuration. These are more common options, and give a rough idea about the kind of stuff Jomon wants to be casting, although if you’re looking closely you’ll not that a lot of these spells can actually be cast by Ryujin. Ryujin with water boosters can cast big Water magic spells like Niefel Flames or Liquify, Phoenix Power is enough to cast either Warriors of Muspelheim or Fire Fend, Earth Boots and Summon Earthpower in conjunction give enough of a boost for Army of Lead/Gold, and a Thistle Mace unlocks Serpent’s Blessing, Mass Regen, or Polymorph. About the only spells Ryujin can’t cast are Wailing Winds/Winds of Death, Relief (without 2 boosters), or Astral and Air spells. Why is castability by Ryujin so important?
Jomon’s human mages are easy targets in the Late Game. Remote spells will decimate their low HP and non-existent Protection, and guarding against these spells requires enormous gem investment in the form of gear or Domes. Flames From the Sky is great against squishy human mages right? Jomon is just as vulnerable to this as anyone else. Master Shugenja and Onmyo-ji also require gear to get higher map-move, and even with both of these in place are particularly vulnerable to Morale checks like Beckoning or Seduction out of combat, or Wailing Winds in Combat. In addition, missing just one weakness like not flying vs Earthquake, or not having PR vs Foul Vapors is devastating for a mage with only 9 HP, and even strong defensives like Mass Regen can struggle to overcome this gap. Ryujin, on the other hand, are always strong mages, invariably highly mobile, high HP, and come with build in immunity to Earthquake, as well as low level resistances to Fire, Cold, and Shock. They always have a water gem available for assassination battles, have multiple attacks in the case they are engaged in melee, and despite not having incredible Morale, are at least much better off than the Master Shugenja’s 8.
The longer the game goes, the less you should rely on human mages. This isn’t to say that they serve no purpose, they’re cheaper and more efficient than Ryujin are, and bringing some along to cast spammable spells while you leave the important battlefield-wide ones to your Ryujin is fine. Having extra mages to cast Maws of the Earth, Polymorph, Frozen Heart, Charm, or other spells which are more useful en masse is fine, and if some of them attrition in or outside of combat, you still have your core spells available.
Jomon’s troops also fall off somewhat over time, although less so than the mages. A two handed weapon with high attack skill and Weapons of Sharpness will always have some battlefield use, and with a Magic Weapons Bless both sacred variants will have some use well into the late game. Cheaper mages like Master Shugenja can still lead raid squads for a relatively low investment as well, and your more disposable human troops are fine in that role also. For major combat roles, however, Jomon should focus on disposable in-combat summoned chaff from spells like Creeping Doom and Howl, Elite recruits like Magic-Weapons Blessed Sacreds and Shark Warriors, and largely elemental immune summons like Mechanical Men, Wights, or even in-combat full-sized Elementals. Assassins like Ninjas can still be cost-effective as well. Low Mobility troops will still be an issue into the late game. Few of Jomon’s summon or recruitable options are liable to change this either, unfortunately.
Conclusion
We’ve gone over troops and mages, highlighting their strengths and weaknesses, and why certain builds are going to need certain scales to fit them. Ashigaru and Samurai Cavalry are primary expansion troops, and other infantry can be mixed in to help with the general melee. Then we walked through chronologically from Pretender design, then Expansion, transitioning into the first war, then mid-game. Hopefully this gives a good idea of not just what Jomon can do, but how Jomon should proceed from those first steps, adjusting to get to as strong of a position as possible. No Dominions guide can tell you exactly how to play, so focus towards larger strategic objectives like utilizing Ryujin mobility, and using magic to make-up for vulnerabilities with troops was also discussed. All of the summons were shown, and we explained why most of them are unfortunately only sometimes useful. Particular strategies, including the initial alpha-strike that Jomon can carry out were also discussed, as well as some of the end-game goals. Hopefully you now have a fuller picture of what a Jomon game looks like, and how fun it can be. And so:
Here we are, at the end. If you’ve never played Jomon, I hope this guide gave you inspiration to try something; I hope you’ll have fun trying something new. If you already love the nation, I hope you learned something–or got a new perspective–and you’re eager to get back out there and try it again. I’ve spent altogether too much time and effort on this guide doing tests, pulling from my memory and experience and past games. I’m still learning, and in another year, I might be dissatisfied with my own ideas.
I welcome that disagreement, I welcome learning something new myself, and if anybody has any feedback you’re welcome to get in touch on Discord and point it out to me. Know that even while I type this I’m trying out new, whacky builds that I’ve theorycrafted, and expansion-tested, but never tried in MP before. They may not be optimal, but it sure as heck is fun to try out!
If you take nothing else out of this, take the idea that you can have fun learning this game, and a nation in particular. I did. " FIN "
Appendix
A lot of information didn't make it all the way into the guide! I have a lot to say, after all, and cramming too much about pretenders or troops or particular summons too closely together can be distracting or lead to information overload. For that reason, at the end of the guide here, any extraneous information will be compiled into an Appendix, hopefully expanding on any questions you might have.
Troops
Ashigaru
Ashigaru
- Excellent cheap chaff unit.
- The Yari is an excellent weapon that can repel and deal high damage.
Back to Basic Troop Strategies.
Samurai


Samurai and Samurai
- Jomon's medium infantry.
- The Katana Samurai has high attack skill, while the Nagitana Samurai deals more damage.
- Almost twice as resource and rec-point intensive as the Ashigaru but not as good as Jomon's elite infantry.
- As a result rarely sees any use, since Jomon has better optionss.
Samurai Archer

Samurai Archer
- Expensive Samurais with longbows and katanas. More useful than regular samurais.
- An early offensive tool that can be buffed with Flaming Arrows and Wind Guide
- Can be used as counter-archers.
- The Hold and Fire command allows for more time for buffing.
Back to Basic Troop Strategies.
O-ban

O-ban
- Elite Samurai with better stats for an increase in cost.
- The increase in stats make them preferable to regular Samurai units.
Go-Hatamoto

Go-Hatamoto
- Elite Samurai armed with the No-Dachi greatsword.
- Functionally similar to O-Ban with slightly higher damage and length 2 weapons at a slight cost increase.
- The Bodyguard tag increases their morale when on Guard Commander and makes them more likely to join assassination battles.
Back to Basic Troop Strategies.
Aka-Oni Samurai

Aka-Oni Samurai
- Elite samurais with medium armor, exceptional attack skill and high defense.
- Their 16 attack skill allows them to hit reliably, even against defense-stacked sacreds.
- Difficult to amass. Comparatively high recruitment cost. Twice the gold cost of Ashigaru
Samurai Cavalry
Samurai Cavalry
- Jomon's only mounted unit.
- Much higher mapmove than Jomon's other troops.
- No hoof attack and only a light lance, but wields Katana.
- High recruitment point costs. Take Order if you plan on using Samurai Cavalry.
Back to Basic Troop Strategies.
Sohei

Sohei
- Cheap hard-hitting sacreds. Highest damage output of Jomon's land troops.
- Not strong enough to build a bless around, but has extra utility with a Magic Weapons bless.
Yamabushi

Yamabushi
- 17 attack skill allows them to hit any unit in the Late Age.
- Undisciplined makes Yamabushi difficult to buff or even bless.
- Being human, they are not feasible to build a strategy around, similar to the Sohei.
Back to Basic Troop Strategies.
Mages/Commanders
Ninja

Ninja
- Any-fort recruitable wall-scaling assassins.
- Can assist in expansion and be a general nuisance to the enemy.
- A prophetized ninja can help Jomon get underwater.
Basic Commanders


Gokenin & Mounted Gokenin
- Jomon's commander lineup.
- Gokenin are generally not worth it.
- Mounted Gokenin has a use because of their mapmove. Can be used for light thugging.
Hatamoto & Daimyo
- Hatamoto are standard 80-Ld commanders for one CP.
- Daimyo gives the best bonus to Morale and is especially suited for leading Ashigaru but costs 2 CP.
Kannushi

Kannushi
- Expensive mediocre priest with only 10 Ld and the risk of starting with old age.
 2010% gives limited utility compared to 1 and is not worth the higher gold and 2 CP cost. The slight 10% chance of a magic path is not enough to compensate for the increased cost.
Monk of the Fivefold Path

Monk of the Fivefold Path
- Jomon's cheapest mage with171100%.
- Their low upkeep makes them efficient researchers and forgers as well as temple builders.
- As a combat mage, the Monk is underwhelming but does get access to Jomon's national Holy crosspath spells.
Shugenja

Shugenja
- This191100% mage can be recruited in all forts as well as highlands and mountains.
- Their price does not match their combat utility, especially considering Jomon's access to Master Shugenja.
Master Shugenja
Master Shugenja
- This11132100%
100%
10% mage can be recruited in all forts as well as highlands and mountains. - The 2 CP cost makes Master Shugenja Jomon's most turn efficient combat mage.
- The double random makes for a large spread in magic access, but all have their uses and provide Jomon with a broad range of magical paths.
Onmyo-ji
Onmyo-ji
- This2132100%
100%
10% mage can be recruited in all forts. - The2 gives Onmyo-ji a lot of flexibility with Power of the Spheres
- TTheir ownly drawback is the 4 CP cost which makes it inefficient to recruit in the early game compared to Master Shugenja.
Underwater Recruits
Shrimp Soldier

- Jomon's only aquatic recruit.
- Relatively cheap with high strength, but ironically their weapon suffers a -1 penalty underwater.
- Good versus enemy nations with strong underwater troops.
- Magic resistance 8 is a potential liability.
Shark Warrior

- Amphibian underwater recruit.
- In many ways the strongest troop available to Jomon.
- Pairs well with Jomon's size 2 units.
- Very expensive and hard to amass though.
Crab General

- Primary amphibious leader.
- Only 40 Ld but inexpensive with good stats and high hp.
- The armor-piercing pincer attack is especially good vs. high-Protection enemies.
Overview
Ryujin
- This3152200%
10% sacred mage can only be recruited underwater. - Ryujin can shapeshift into a Ryujin dragon form gaining size and stats at the expense of equipment slots.
- The Ryujin is Jomon's nation defining mage.
- High mapmove and both normal and underwater flight gives Ryujin unprecedented mobility.
- The guaranteed X2 in Fire, Air, Earth or Nature means that Ryujin are your most reliable two-path mages, and each type of Ryujin brings something useful to any fight.
- The high mapmove, chassis and path access means that Ryujin make excellent thugs.
Detailed Analysis
Last, but definitely not least we have the Ryujin, in many ways Jomon’s most defining mage, and what sets it apart from everything else in the Late Age. Anybody familiar with Jomon was probably waiting for me to get to this one, so here we go.
Ryujin are the only mage recruit that Jomon has underwater, but they have a pile of traits that makes them powerful and well worth their 285 gold cost. Ryujin have 34 map-move, with the ability to fly both underwater and on land meaning they have essentially no barriers to their movement. Practically, this makes them amongst the most mobile of any recruit in the game. The 47 hp of the dragon form, in conjunction to built-in resistances to fire (5), shock (5), cold (5), and poison (15), make them difficult to kill with remote spells like Fires From Afar or Seeking Arrow (Mind Hunt can still be dangerous).
Ryujin are also universally strong Water mages, with every Ryujin possessing ![]() 2 with a built in Dragon Pearl item that grants +
2 with a built in Dragon Pearl item that grants +![]() 1 for a total of
1 for a total of ![]() 3 as well as 1 temporary water gem for in-combat use. In addition, their random paths guarantee another
3 as well as 1 temporary water gem for in-combat use. In addition, their random paths guarantee another ![]() 2200%
2200%![]()
![]()
![]()
![]() , which makes them the most reliable Elemental mages on the nation. Ryujin have strong stats, decent attack and defense, good hp and strength, solid morale and mr, with 10 natural protection making them high-prot as soon as they put on armor. Combine that with innate weapons like Venomous Fangs (which scales with strength and applies 35 damage Death Poison) and an area of effect damage Tail Sweep, and Ryujin are a very solid thug chassis. All Ryujin can use Liquid Body, Quicken Self, and Breath of Winter in their thug scripts as well, although these should be balanced around fatigue at end of script.
, which makes them the most reliable Elemental mages on the nation. Ryujin have strong stats, decent attack and defense, good hp and strength, solid morale and mr, with 10 natural protection making them high-prot as soon as they put on armor. Combine that with innate weapons like Venomous Fangs (which scales with strength and applies 35 damage Death Poison) and an area of effect damage Tail Sweep, and Ryujin are a very solid thug chassis. All Ryujin can use Liquid Body, Quicken Self, and Breath of Winter in their thug scripts as well, although these should be balanced around fatigue at end of script.
While the chassis itself is very strong, it’s also sacred, which allows it to take whatever bless your pretender also has. Ryujin don’t need a strong bless to be powerful and functional within a Jomon build, but it is an extra consideration that whatever you take will also effect them, and any bless that is settled on is usually taken for Ryujin as opposed to any of Jomon’s other sacred troops or summons. In addition, the temporary water gem and high Water magic in general allow Ryujin to be fearsome magi underwater, where they can summon a Water Elemental for free in any combat they’re a part of. This can help give Jomon an edge over their strong competitors once you’ve massed enough Ryujin.
Ryujin are important as well for forging and casting. With their insane map move they can often switch from research to front-line combat or raiding instantly, meaning that they can surprise an enemy force by jumping 3 or 4 provinces to drop, for example, Foul Vapors. As well, Ryujin can easily solo province defense or, with support buffs, become difficult-to-dislodge army thugs seeded in with your other troops. In terms of combat casting Ryujin are by far your most durable option, and they can spam out all the Elementals, big nature magic like Howl, Foul Vapors, or Mass Protection, important buffs like Arrow Fend, Quickening/Quickness, or just cast strong damage spells like Liquify, Bone Melter, Acid Storm, or Freezing Mists. They’re very versatile, very mobile, and in general just incredibly strong.
Ryujin do come with 2 major downsides, however. First is the Dragon Pearl itself, which while useful to aid in Water magic, also blocks one of your miscellaneous slots (the item is cursed), and can be picked up by friendly commanders in the case of a Ryujin dying, in theory blocking the slots of other mages. Second is their classification as magic beings, because of which Ryujin are particularly vulnerable to counter-thugs wielding Moon Blades.
It’s difficult to describe in detail just how impactful Ryujin are to Jomon. At practically every stage of the game after gaining access to them, you’ll be able to find a good use to put them to, although here’s the general thought-process behind how to use each variation:
Fire
![]() 2
2![]() 3 Fire Ryujin are in many ways the least straight-forward to use. They don’t have the same kind of self-buffing utility as the other 3 variants, so they end up being largely the worst raiders outside of specific circumstances (think Regen bless with Phoenix Pyre active). Despite this, they’re largely the best forgers since they’re able to make Rune Smashers and, eventually, a Staff of Elemental Mastery which can be used to boost up to high-level Elemental globals. Fire-randoms are also some of Jomon’s most reliable Fire mages in general, able to spam out Elementals, put up important battlefield spells like Fire Fend, and spam out fire damage spells like Incinerate. In addition, the
3 Fire Ryujin are in many ways the least straight-forward to use. They don’t have the same kind of self-buffing utility as the other 3 variants, so they end up being largely the worst raiders outside of specific circumstances (think Regen bless with Phoenix Pyre active). Despite this, they’re largely the best forgers since they’re able to make Rune Smashers and, eventually, a Staff of Elemental Mastery which can be used to boost up to high-level Elemental globals. Fire-randoms are also some of Jomon’s most reliable Fire mages in general, able to spam out Elementals, put up important battlefield spells like Fire Fend, and spam out fire damage spells like Incinerate. In addition, the ![]() 2
2![]() 3 crosspath opens them up to the Acid spells like Acid Rain and Acid Storm, the latter of which can be effective at cutting down low-protection enemies like Swarm bugs or Longdead.
3 crosspath opens them up to the Acid spells like Acid Rain and Acid Storm, the latter of which can be effective at cutting down low-protection enemies like Swarm bugs or Longdead.
Air
![]() 2
2![]() 3 Air variant Ryujin are vitally important as a mobile form of Air magic in the early mid-game. They’ll be crucial for spells like Arrow Fend, Wind Guide and Thunder Ward, although they’re not high-level enough to cast Storm, Fog Warriors, or Mass Flight. Despite this, they’re still useful as Air Elemental casters, and like all Ryujin are strong Water casters. Air Ryujin aren’t as strong of solo-thugs as the Earth or Nature variants, although with some form of sustain they can do ok by relying on Mirror Image and Mistform buffs. Those same buffs make them fearsome with external buff help, as they can take on the same buffs Earth and Nature Ryujin do (Mossbody, Regeneration, Ironskin, Enlarge, etc.) while still having Mistform, which can be difficult to deal with if counter-thugs are absent.
3 Air variant Ryujin are vitally important as a mobile form of Air magic in the early mid-game. They’ll be crucial for spells like Arrow Fend, Wind Guide and Thunder Ward, although they’re not high-level enough to cast Storm, Fog Warriors, or Mass Flight. Despite this, they’re still useful as Air Elemental casters, and like all Ryujin are strong Water casters. Air Ryujin aren’t as strong of solo-thugs as the Earth or Nature variants, although with some form of sustain they can do ok by relying on Mirror Image and Mistform buffs. Those same buffs make them fearsome with external buff help, as they can take on the same buffs Earth and Nature Ryujin do (Mossbody, Regeneration, Ironskin, Enlarge, etc.) while still having Mistform, which can be difficult to deal with if counter-thugs are absent.
Earth
![]() 3
3![]() 2 Earth Ryujin variants are in many ways the most straightforward of the Ryujin to use. They use prot-buffs and Summon Earthpower to be fairly reliable solo-raiders, and are a useful Earth mage to apply more in-combat buffs. As more complex counters come out, they tend to fall off as solo-thugs, but they’re useful in that role throughout the game. Unlike the Fire/Air versions, the only thing they really bring to combat magic that you don’t already have is their Water magic, as Master Shugenja are rather likely to end up as
2 Earth Ryujin variants are in many ways the most straightforward of the Ryujin to use. They use prot-buffs and Summon Earthpower to be fairly reliable solo-raiders, and are a useful Earth mage to apply more in-combat buffs. As more complex counters come out, they tend to fall off as solo-thugs, but they’re useful in that role throughout the game. Unlike the Fire/Air versions, the only thing they really bring to combat magic that you don’t already have is their Water magic, as Master Shugenja are rather likely to end up as ![]() 2 mages as well. Still, an overconfident or under-prepared enemy can be pretty easily rocked by an Earthquake or two, something Ryujin with their general tankiness and flying ability can pull off with much less risk than Jomon’s other mages.
2 mages as well. Still, an overconfident or under-prepared enemy can be pretty easily rocked by an Earthquake or two, something Ryujin with their general tankiness and flying ability can pull off with much less risk than Jomon’s other mages.
Nature
![]() 3
3![]() 2 Nature Ryujin are similar to Earth Ryujin in that they’re fairly competent raiders early via Mossbody, Personal Regeneration, and Enlarge, while their in-combat role is also somewhat taken up by Jomon’s other mages. Still, they’re more or less innately immune to Foul Vapors, and with their excellent mobility can surprise the enemy with it in unexpected places. As well, they’re more durable Howl casters (Howl is a 300 fatigue spell, it can be a bit dangerous for Master Shugenja to cast it), and their crosspath also allows them to cast Bone Melter. Unlike Master Shugenja, they can’t cast Strength of Gaia, so they’re actually not as strong of Nature mages themselves, but they still have plentiful uses.
2 Nature Ryujin are similar to Earth Ryujin in that they’re fairly competent raiders early via Mossbody, Personal Regeneration, and Enlarge, while their in-combat role is also somewhat taken up by Jomon’s other mages. Still, they’re more or less innately immune to Foul Vapors, and with their excellent mobility can surprise the enemy with it in unexpected places. As well, they’re more durable Howl casters (Howl is a 300 fatigue spell, it can be a bit dangerous for Master Shugenja to cast it), and their crosspath also allows them to cast Bone Melter. Unlike Master Shugenja, they can’t cast Strength of Gaia, so they’re actually not as strong of Nature mages themselves, but they still have plentiful uses.
Other Builds
While the exemplified builds above are typical of some of the “main” build ideas that I have for Jomon, it’s true that there are still a lot of other possibilities out there, some more serious than others. Instead of going in-depth for each of these, and making an already long guide even longer, I’ll just give some brief thoughts on a variety of builds that I think would be fun to play with.
Back to Pretenders and Builds section.
Dominion 4: Immobiles
Full Scales Fountain
Chassis: Imprisoned Oracle
Paths: ![]() 1
1![]() 4
4
Bless: Magic Weapons
Scales: ![]() 4
4![]() 3
3![]() 3
3![]() 0
0![]() 3
3![]() 3
3![]() 3
3
The idea here is more or less the same as the Monolith, only taken all the way to the extreme with scales. With temperature neutral, and every other scale maxed out positive, the Oracle offers little in the way of magic access or bless utility, but it does give quite a bit of money.
Back to end of Main Builds section.
Dominion 3: Titans
Celestial Carp

Chassis: Awake Celestial Carp
Paths: ![]() 2
2![]() 3
3
Bless:
Scales: ![]() 4
4![]() 3
3![]() 3
3![]() 3
3![]() 0
0![]() 2
2![]() 3
3
The Celestial Carp build is anemic bless wise, but otherwise is quite funny, and offers a rather unique way of expanding underwater. Unlike other pretenders, the Carp has Gift of Water Breathing, allowing it to bring non-amphibious troops underwater with it (for this purpose Samurai Cavalry are best), and while you maintain a hefty non-amphibious penalty, you’re still able to fight well enough to take some provinces.
Awake Kami of the Sun

Chassis: Awake Kami of the Sun
Paths: ![]() 7
7![]() 7
7
Bless: Awe, Fateweaving
Scales: ![]() 4
4![]() 1
1![]() 3
3![]() 3
3![]() 0
0![]() 2
2![]() 0
0
The Kami of the Sun can act as an awake expander through a particularly spicy method of blinding anybody who tries to attack here. Unfortunately, she’s more expensive and less effective than an Earth Snake, and also requires some gear to be forged before she can expand well. That being said, it’s not bad as a meme, and obviously she’ll scale better as a combatant with full slots than an Earth Snake will.
Dormant Celestial General

Chassis: Dormant Celestial General
Paths: ![]() 2
2![]() 1
1![]() 2
2![]() 2
2![]() 2
2
Bless:
Scales: ![]() 5
5![]() 3
3![]() 3
3![]() 3
3![]() 0
0![]() 2
2![]() 3
3
The Celestial General isn’t designed to help with expansion, but is instead there to give a sizable post-expansion power spike. With useful paths for forging and even more useful for Thug duty or battle magic, the Celestial General can act as an early SC with comparatively little gear, while maintaining the integrity of your scales. All SCs are vulnerable to specific counters, including counter-thugs, but the Celestial General is also capable of magic phase movement due to his air paths, which allows him to take fights selectively. The ![]() 2 and
2 and ![]() 1 allow him to cast Personal Regen, Mossbody, and Foul Vapors, which can help him survive and clear the battlefield in an SC role.
1 allow him to cast Personal Regen, Mossbody, and Foul Vapors, which can help him survive and clear the battlefield in an SC role.
Awake Demilich Hellbless

Chassis: Awake Demilich
Paths: ![]() 3
3![]() 3
3![]() 3
3![]() 3
3![]() 5
5![]() 5
5![]() 3
3![]() 3
3
Bless: Attack +2, Swiftness, Defense +2, Stength +4, Spirit Sight, Magic Weapons, Undying x4, HP +1, PR +10
Scales: ![]() 9
9![]() 3
3![]() 0
0![]() 0
0![]() 3
3![]() 3
3![]() 3
3
Let’s not mince words here: this is a meme build. It’s designed around stuffing as many stats as possible onto the Yamabushi sacred, while also researching buff spells as quickly as possible to layer on top as well. As such, you sacrifice expansion ability and long-term economy to buff a sacred that isn’t all that good in the first place.
The “proper” way to play this build is to transition from expansion into an early war ASAP and to put together an “unbeatable” army composed of Yamabushi screened by a small wall of other troops to give time for mages to buff the sacreds, looking something like this:
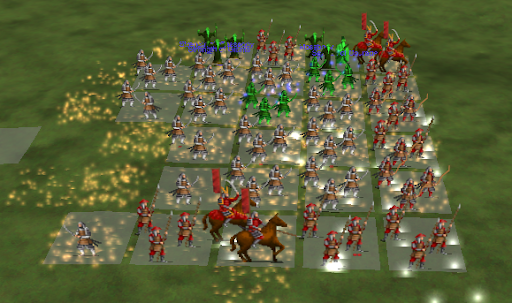
When all is said and done, the build isn’t all that great, the formation leaves you pretty vulnerable and is pretty easy to distract, and Yamabushi will still be eminently killable even with all their buffs. But it’s very funny.
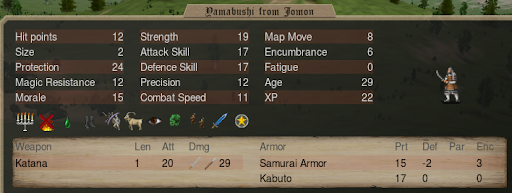
Back to end of Main Builds section.
Dominion 2: Monsters
Awake Celestial Dragon

Chassis: Awake Celestial Dragon
Paths: ![]() 3
3![]() 2
2![]() 4
4![]() 2
2
Bless: SR +15, Reinvig x2, Magic Weapons, Low Light Vision, PR +15
Scales: ![]() 4
4![]() 1
1![]() 2
2![]() 3
3![]() 0
0![]() 2
2![]() 0
0
The Celestial Dragon is an expander who requires research to expand, which is why it’s much worse than the Earth Snake. As one might also notice, the scales are worse because to be as strong of an expander as possible, you have to add paths to it. That being said, once you have added the paths it has exceptional paths in its Celestial Bureaucrat (human) form, which can help with controlling globals later, as well as excellent mobility. All in all, a pretty crummy build, but a fun one, and it’s still ok later on.
Awake Ghost King

Chassis: Awake Ghost King
Paths: ![]() 1
1![]() 3
3![]() 1
1![]() 3
3![]() 4
4![]() 2
2
Bless: Undying x4, Half Dead
Scales: ![]() 4
4![]() 2
2![]() 3
3![]() 3
3![]() 3
3![]() 3
3![]() 3
3
The Awake Ghost King is also an awake expander mixed with an awake researcher. For him you’ll go up Alteration after stopping by Construction 2. If you want to you can drop scales to take Growth neutral, although this will hinder your expansion, and the overall goal for the build is intense early aggression. The Ghost King can also expand underwater for you, and has useful paths for combat magic and summoning later in the game. Don’t try to use him without armor, however, or you’ll be quite sad. If you want to, you can give up on order entirely, drop a point of Air and Earth magic, and swing back up towards Growth 3 as well, which will force you into using Ashigaru to expand but also preserve your scaling later in the game.
Dominion 1: Rainbow
The Dominion 1 Pretenders, known as Humans, or “Rainbow” Pretenders since new paths are so cheap on them, will often function virtually identically to the Awake Researcher build I mention much earlier in the guide. If you want, you can sacrifice scales to take a crazy bless, similar to the Demilich build above, or you can go Dormant or Imprisoned for even stronger scales, or you can settle on a compromise where you go Dormant or Imprisoned but take a stronger bless. These pretenders are really flexible, although in my opinion Jomon benefits most from taking a build which increases its strength in the early game. Just know that in terms of function, these Pretenders are basically identical to a Great Sage or Onmyo Hakase.
Back to end of Main Builds section.
Summons
Jomon is a nation with a large list of National Spells available to it, mostly unique Japanese-themed mythological summons. Some of these summonses end up being a trap, and some of them end up giving solid utility. Jomon has no shortage of other places to spend its gems, with ample uses in forging and battle magic, so there’s a lot of competition for use. It’s because of this that many of these summonses end up feeling kind of useless, either because of redundant magic paths or weakness outside of home provinces or both. Others are over-costed or come too late to be as worthwhile, but we’ll go through them all briefly to show which should or shouldn’t be created.
All of Jomon’s summons end up coming from Conjuration (and indeed, all of the non-combat national spells that Jomon has access to are in Conjuration, and they’re all summons!), ranging from Conjuration 1 with at least one at every level up to Conjuration 8. They have summons available for all of the gem types except Blood, which means that Jomon has a way to convert almost every gem type into some form of summoning. We’ll progress through them from the lowest to the highest level, as follows:
Early Game Troops
| Summon Kappa | School: Conjuration 1 | Path: | Cost: 3 | Effect: Kappa x3 |
| Summon Okami | School: Conjuration 3 | Path: | Cost: 6 | Effect: Okami x10+ |
| Ambush of Tigers | School: Conjuration 3 | Path: | Cost: 10 | Effect: Tiger x10+ |

Summon Kappa at Conjuration 1 requires the use of a Water mage and water gems, both of which Jomon has no real way to guarantee early in the game, when the spell would be most useful as a means to get underwater. If you do happen to pick up a Water magic random Master Shugenja and have 10-15 water gems from either sites or an event, however, then it’s a fairly useful way to break yourself underwater. It can also be a means to bulk up a party led by Ryutaro (a Jomon hero with water-breathing) or a Celestial Carp. Later in the game, Kappa are less useful and you should be spending water gems on other things.

Okami are a Wolf-like summon (size 3, similar to Cu Sidhe, Dire Wolves, and Barghests) with Stealth, Magic Power, and Bodyguard, heftily elevating them their Dire Wolf brethren, although unlike Cu Sidhe they are not Sacred. Despite this, they move quickly and you get a decent quantity per cast, which means that if you want additional flankers in an army they’re quick and easy to add. Unfortunately, like most animals they struggle to be competitive into the game, although their use as Bodyguards is not to be underestimated (Jomon does have other competent Bodyguards, however).

Tigers are a regional Summon shared with nations like Patala, but are less efficient to summon, harder to summon, and while having 2 attacks, functionally worse than Okami in every other way (outside of Drain). Tigers should rarely be used unless you’re desperate.
Trash Oni Summons
| Summon Ko-Oni | School: Conjuration 1 | Path: | Cost: 7 | Effect: Ko-Oni x5 +1/2 |
| Summon Ao-Oni | School: Conjuration 2 | Path: | Cost: 10 | Effect: Ao-Oni x5 +1/2 |
| Summon Aka-Oni | School: Conjuration 3 | Path: | Cost: 10 | Effect: Aka-Oni x5 +1/2 |
| Summon Oni | School: Conjuration 4 | Path: | Cost: 12 | Effect: Oni x5 +1/2 |
| Summon Kuro-Oni | School: Conjuration 5 | Path: | Cost: 10 | Effect: Kuro-Oni x4 |


Ko-Oni are small size 1 Japanese demons who have ok combat stats, but are pretty poor summon despite being relatively easy to cast spell. Jomon, in particular, struggles to cast this due to their lack of death gem income or Death mages early on, but at Conjuration 1 and Death 1 to cast, it’s not exactly a massive threshold. By the time Jomon does have easy access to the spell, it’s no longer really worth casting (if it ever was). Ko-Oni themselves are hardly worth the death gems the spell requires.
All of the Oni troop summons are relatively hard to cast, somewhat expensive for what you get, and often not worth it to cast regardless. These Oni spells include Summon Ao-Oni, Summon Aka-Oni, Summon Oni, and Summon Kuro-Oni. While the Oni get progressively stronger, they’re still relatively easy to kill, even with the size 3 Kuro-Oni. Usually, you have better uses for your gems, although if you’re floating a lot and are in desperate need of heavy hitters they can still be used in a pinch.
Additionally, all of the Oni possess Chaos Power, and for the troops especially they take severe penalties if you do have Order scales instead of Turmoil.
Tengu Summons
| Summon Karasu Tengus | School: Conjuration 2 | Path: | Cost: 3 | Effect: Karasu Tengu x3 +1/2 |
| Summon Konoha Tengus | School: Conjuration 3 | Path: | Cost: 5 | Effect: Konoha Tengu x5 +1/2 |
| Contact Dai Tengu | School: Conjuration 5 | Path: | Cost: 55 | Effect: Dai Tengu + Tengu Warrior x10 + Karasu Tengu x15 |


Karasu and Konoha Tengus are both relatively high-statted, Katana wielding Storm-Flying sacreds with poor armor and the ability to throw one volley of lightning at the opponent. With the low protection, but the ability to fly in Storms, Tengu are quite likely to kill themselves by jumping right into the middle of an enemy formation, or by jumping onto an enemy, then being shot by friendly archers. Karasu Tengu comes 1 research level earlier and has superior combat ability, but also only comes 3 per summon, while Konoha Tengu scales a bit quicker with 5 per cast. Tengu is a fantastic way to scale a strong bless into the mid-game, but it’s hard to overcome the main liability of survivability. For that reason, they’re mainly disposable weapons, used to target enemies at the rear of a formation or to surprise an opponent unready for a flying assault.


Contact Dai Tengu is the most expensive national spell that Jomon has available to it, and you get quite a bit from it as well. In addition to 15 Karasu Tengu, you also get 10 Tengu Warriors, who are essentially armored versions of Konoha Tengu, and thus much more likely to survive a fight, especially with the mid-game buffs applied. Sadly, they still don’t wear helmets, although they’re still much more survivable. The biggest draw, however, for the spell is the access to Dai Tengu, which has ![]() 3
3![]() 1
1![]() 1
1![]() 2. This allows them to cast Teaching Sign, and become
2. This allows them to cast Teaching Sign, and become ![]() 4 combat casters. Essentially, this is Jomon’s easiest way to get higher-level Air magic (aside from via pretender), and so despite the extra cost the 25 troops tack onto the spell, you will cast it at least once in most Jomon games.
4 combat casters. Essentially, this is Jomon’s easiest way to get higher-level Air magic (aside from via pretender), and so despite the extra cost the 25 troops tack onto the spell, you will cast it at least once in most Jomon games.
Nature Mage Summons
| Contact Bakeneko | School: Conjuration 3 | Path: | Cost: 8 | Effect: Bakeneko / Bakeneko |
| Contact Jigami | School: Conjuration 4 | Path: | Cost: 10 | Effect: Jigami |
| Contact Mujina | School: Conjuration 5 | Path: | Cost: 21 | Effect: Mujina / Mujina |
| Contact Tanuki | School: Conjuration 5 | Path: | Cost: 26 | Effect: Tanuki |
| Contact Kitsune | School: Conjuration 6 | Path: | Cost: 30 | Effect: Kitsune / Kitsune |


Contact Bakeneko gives you access to a cheap Death mage, as Bakenekos have a 50/50 chance between being a Death or Fire mage. Aside from being a somewhat cheap way to boost research (especially in Magic scales), Bakeneko are also therefore useful as site-searchers and forgers, and will eventually break you into death by finding you enough death income to empower into it. In addition, they have very high stealth value and good mapmove, which allows them to act as reasonable scouts. They’re quite vulnerable in combat, however, and should avoid fighting the enemy.

Jigami are cheap to summon ![]() 2 magi, with extra supply bonus and Summer Power 50. In theory, with their additionally being Sacred and Ethereal, they should be able to thug during the Summer months, although they’re basically never used for such. This is another way to turn nature gems into research (especially useful in magic scales, again), which Jomon has a lot of. For real, there will be 4 more nature gem Mage summons. Jigami are useful if you ever desperately need to turn
2 magi, with extra supply bonus and Summer Power 50. In theory, with their additionally being Sacred and Ethereal, they should be able to thug during the Summer months, although they’re basically never used for such. This is another way to turn nature gems into research (especially useful in magic scales, again), which Jomon has a lot of. For real, there will be 4 more nature gem Mage summons. Jigami are useful if you ever desperately need to turn ![]() 1 into
1 into ![]() 2, and are pretty easy and cheap to get, but if you already have plenty of Nature magic, there’s no great need to summon them.
2, and are pretty easy and cheap to get, but if you already have plenty of Nature magic, there’s no great need to summon them.


Summoning a magical shape-shifting assassin badger, Contact Mujina is possible the most hardcore of all of Jomon’s spells. For a mage assassin, 21 actually isn’t that expensive, and it’s relatively easy for Jomon to cast as well. ![]() 2
2![]() 1
1![]() 150%
150%![]()
![]() are also fairly feasible to use for thugging, and with magic power Mujina will actually have pretty solid stats for melee as well. The main issue with this is that they have low HP, which makes them vulnerable in melee. Because of this, their main use remains similar to Dryads as mostly mage assassins.
are also fairly feasible to use for thugging, and with magic power Mujina will actually have pretty solid stats for melee as well. The main issue with this is that they have low HP, which makes them vulnerable in melee. Because of this, their main use remains similar to Dryads as mostly mage assassins.


Apparently Magical raccoon-dogs are less likely to assassinate you than magical badgers, as Tanuki are not assassins, although they do still have ![]() 2
2![]() 1
1![]() 2100%
2100%![]()
![]()
![]()
![]()
50%![]()
![]()
![]()
![]() paths. They also have a small variety of randoms. They have a 100% chance of F/W/E/N, with an additional 50% random of the same. Sadly, this means that the majority of the time they’ll be essentially the same as a Master Shugenja, albeit with a higher chance for
paths. They also have a small variety of randoms. They have a 100% chance of F/W/E/N, with an additional 50% random of the same. Sadly, this means that the majority of the time they’ll be essentially the same as a Master Shugenja, albeit with a higher chance for ![]() 3, and some chance at
3, and some chance at ![]() 4. Still, this summon should sadly rarely be cast, as it’s just too similar to what you already have available.
4. Still, this summon should sadly rarely be cast, as it’s just too similar to what you already have available.


Kitsune are the final Nature summon in Jomon’s lineup, and also the most expensive. Kitsune will always have Nature 3 paths, but in addition have a random chance at quite a few other paths ( ![]() 250%
250%![]()
![]()
![]()
![]()
50%![]()
![]()
![]()
![]()
50%![]()
![]()
![]()
![]()
25%![]()
![]()
![]()
![]() ). In theory, then, Kitsune can help Jomon do all sorts of things, but in practice you’re very unlikely to hit some kind of high-level magic combination that would actually be important. The most likely useful crosspath would be Nature 3 Astral 1, which helps to make the Moonvine Bracelet, which can be useful for boosting a Kitsune or other Nature 3 mage into Mother Oak casting territory. Besides their magical prowess, Kitsune are also highly stealthy and spies, so in theory they can steal the graphs of any other players if you want them to. Despite being generally strong, Kitsune don’t really offer much that Jomon doesn’t already have. If you’ve been missing base Nature 3 for some reason, Kitsune can help you reach that, and if you’re interested in contesting Mother Oak, Kitsune can also help there, but otherwise they’re unlikely to be worth the cost.
). In theory, then, Kitsune can help Jomon do all sorts of things, but in practice you’re very unlikely to hit some kind of high-level magic combination that would actually be important. The most likely useful crosspath would be Nature 3 Astral 1, which helps to make the Moonvine Bracelet, which can be useful for boosting a Kitsune or other Nature 3 mage into Mother Oak casting territory. Besides their magical prowess, Kitsune are also highly stealthy and spies, so in theory they can steal the graphs of any other players if you want them to. Despite being generally strong, Kitsune don’t really offer much that Jomon doesn’t already have. If you’ve been missing base Nature 3 for some reason, Kitsune can help you reach that, and if you’re interested in contesting Mother Oak, Kitsune can also help there, but otherwise they’re unlikely to be worth the cost.
Death Summons
| Ghost General | School: Conjuration 4 | Path: | Cost: 10 | Effect: Shura |
| Summon Gozu Mezu | School: Conjuration 6 | Path: | Cost: 7 | Effect: Ox-head x1 + Horse-face x1 |
| Summon Oni General | School: Conjuration 6 | Path: | Cost: 20 | Effect: Oni Shugo |
| Summon Dai Oni | School: Conjuration 8 | Path: | Cost: 45 | Effect: Dai Oni |

Ghost General summons a Shura commander, a ghostly Japanese-themed version of a Bane with better mundane leadership. It also has better stats, a Fear aura, and Ethereal, but there is, of course, a tradeoff. Aside from the Salt Vulnerability being a ghost incurs, it’s also a level of Magic and Research higher to cast than a Bane and 3 gems more expensive. Despite this, if you have the death gems to spare you can use them as tanky leaders or cheap thugs.
![]()
![]()
Gozu Mezu are Ox or Horse-headed size 4 demons with solid stat-lines and hard-hitting 2-handed magic weapons. They’re a bit expensive, and not sacred, but they’re a viable option if you want to get hard-hitting magic weapons onto the field to deal with a particular thug. Their role is somewhat similar to Wights, although Summon Gozu Mezu is available much later, but is more gem efficient.

This spell summons an Oni Shugo, identical to the EA Yomi Commander. Breaking into Death on Jomon is primarily to gain access to this Mage, although you’d do it eventually anyways just to use all of your resources properly. Oni Shugo all have Death 2 base, but can also get an A/F/E path. These are all potentially useful for combat magic, forging, or thugging. Most important is the Death 2 Air 1 Oni Shugo, as these are able to cast Wailing Winds, one of the most powerful combat spells in the game. Otherwise, Oni Shugo can forge Shademail Haubergeons, Skulls of Fire, or just Skull Staffs. They can cast Winds of Death or Banefire with a Skull Staff as well, although things like Life after Death or Darkness, which both might be situationally useful, would be harder to come by. In addition, Oni Shugo are just a bit too low level to be able to summon Jomon’s strongest national summon, the Dai Oni. Speaking of Dai Oni…

The last, most difficult to cast, and most powerful of Jomon’s national summons is the Dai Oni. It sits all the way at Conjuration 8, and requires a Death 4 caster with a Fire crosspath to summon. Not only that, it’s also somewhat expensive at 45 death gems, although not prohibitively so. Jomon summons the same Dai Oni that Yomi gets, which are powerful Death, Fire, and Earth Mages. Dai Oni are also always able to summon more of themselves, and a Death random Dai Oni can forge itself up to Death 6, which can cast Well of Misery, the Conjuration 8 Global Enchantment that gives 20 death gems per turn. Dai Oni are the only real Super Combatant Chassis the Jomon has as a national option, and they have incredible stats and paths for it, bolstered by Jomon’s excellent ability to forge gear and provide point-buffs. In truth, with astral buffs like Body Ethereal available from Jomon’s national mages, Dai Oni from Jomon are probably the strongest of any of the Japanese line of nations, in the late game.
Dai Oni are perfectly capable of casting any of the spells that Oni Shugo can, and then some. They’re also able to bless themselves, and able to put up things like Rain of Stones or Earthquake, both of which are situational, but useful for hitting unprotected mages from an enemy. Dai Oni are just generally the strongest chassis Jomon will have available, even if they do come at Conjuration 8.
Unfortunately, the fact that Dai Oni are available so far into the game also makes them often impractical to use. By the time you have access to them, most nations left have amassed enough research and magical resources to deal with them, whether that be through counter-thugs wielding Holy Scourges, Water mages advancing and casting Frozen Heart, Blood mages casting Leech, or Astral communions spamming Soul Slay, there are a wide variety of efficient counters that a Dai Oni would need to be protected from, limiting their usefulness in the Supercombatant role. Despite this, Dai Oni are still powerful casters, and may well be worth investing into.
Earth-type Summons
| Summon Ujigami | School: Conjuration 5 | Path: | Cost: 8 | Effect: Ujigami |
| Summon Kenzoku | School: Conjuration 6 | Path: | Cost: 9 | Effect: Kenzoku |
| Contact Tatsu | School: Conjuration 6 | Path: | Cost: 19 | Effect: Tatsu |

Summon Ujigami and Summon Kenzoku give access to similar but slightly different Humanoid magic beings. Ujigami are functionally ![]() 1 priests, with 120 mundane and 80 magic Leadership, as well as Inspirational 1 and Fortune Teller 5. They’re Sacred, Ethereal, and wear armor, meaning they're much tankier than a lot of other leaders, and can even be used as a light thug if necessary. With morale items stacked on, Ujigami are also capable of giving Jomon’s troops a whopping +7 to Morale.
1 priests, with 120 mundane and 80 magic Leadership, as well as Inspirational 1 and Fortune Teller 5. They’re Sacred, Ethereal, and wear armor, meaning they're much tankier than a lot of other leaders, and can even be used as a light thug if necessary. With morale items stacked on, Ujigami are also capable of giving Jomon’s troops a whopping +7 to Morale.

In contrast, Kenzoku are also Ethereal, Sacred, Magic-Being commanders bedecked with armor, and also have 80 mundane and 80 magical Leadership. However, they lack Inspirational or Fortune Teller, don’t have a Holy path, and instead trade that off for better combat ability. With Awe 2, a magic weapon, and overall better combat stats, Kenzoku are actually a fairly solid chassis for a light thug or counter-thug, although they can always double as solid leaders as well.

Tatsu are similar to Ryujin, except worse in essentially every way. Instead of the W3 guaranteed on Ryujin, Tatsu have only a level 2 Path in F/A/W/E/N, and Tatsu are also confined to only a Dragon form, and are not Sacred. Tatsu are a fine chassis overall, and in theory could be used as an elemental caster or raider pretty effectively, but at the end of the day they’re gem expensive and worse than a Ryujin would be for a similar role. If for some reason gaining Ryujin numbers is hard, Tatsu are an acceptable alternative.
Terrain Restricted Summons
| Contact Mori-no-kami | School: Conjuration 5 | Path: | Cost: 26 | Effect: Mori-no-kami / Mori-no-kami |
| Contact Nushi | School: Conjuration 5 | Path: | Cost: 25 | Effect: Nushi / Swamp Serpent |
| Contact Kaijin | School: Conjuration 5 | Path: | Cost: 25 | Effect: Kaijin |
| Contact Yama-no-kami | School: Conjuration 7 | Path: | Cost: 28 | Effect: Yama-no-kami |


Contact Mori-no-kami is the first of 4 terrain restricted spells which summons a Mage who grows weaker when leaving either their home province or their terrain type. For the Mori-no-kami leaving a forest drastically reduces their viability as a Summon, as they drop from a ![]() 3
3![]() 1, easily capable of casting the vast majority of combat Nature spells, down to a
1, easily capable of casting the vast majority of combat Nature spells, down to a ![]() 2 mage with drastically reduced physical stats as well. They become redundant and a liability on the battlefield outside of forests, in other words.
2 mage with drastically reduced physical stats as well. They become redundant and a liability on the battlefield outside of forests, in other words.


The Nushi is a shape-shifting Swamp summon similar to a Naiad. Like the Naiad, the Nushi is a solid Water and Nature mage, and also has Homesickness. Unlike the Naiad, the Nushi has only Nature 2 paths, with their 6th path actually being Death. This is actually an important distinction because it allows them to summon Kokythiads, a Water 3 Death 3 mage. This actually breaks Jomon into fairly high Death access using purely water gems, and if you need a way to summon Oni commanders (which will be discussed shortly) but you don’t have death gems to empower, empowering a Kokythiad is actually a really solid option. Nushi themselves are hard to use in a combat role because of their large 20% Homesickness penalty.

Kaijin can only be summoned underwater, and like the Nushi take 25 water gems to summon, but they are quite powerful beneath the waves. With Water 3, Earth 1, and Nature 2 magic paths, Kaijin have excellent paths for UW combat, or self-buffing. They also start with a length 4 magic weapon and a magic net (which is intrinsic and kept when geared), as well as being Ethereal and Sacred. In theory, they could be pretty potent thugs, similar to Lars, however they lose 1 level of magic access in each of their paths when on land. This has the unfortunate side effect of completely removing their Earth path, which isn’t recoverable even with Earth Boots. Without access to Earth buffs like Ironskin, Temper Flesh, and Summon Earthpower, combined with needing gems for Personal Regeneration or Enlarge, Kaijin are much worse in a solo-thug role on land. Ryujin are expensive and can be slow to get rolling underwater, and Kaijin exist at the same research level as the big Elemental spells, so they’re available at the same time as the strongest UW combat spell. If you’re floating water gems and just need an injection of water magi to spend them effectively in combat, Kaijin can be a useful way to multiply your W3 access, although Ryujin are generally better than Kaijin in most respects.

Yama-no-Kami are the strongest, but also hardest to summon of the terrain-specific Jomon summons. We’ve actually jumped a level of research (which will be doubled back on later) to include this one, but they’re also the most useful of the lot thus far. Yama-no-kami are only available in Mountains and Highlands and require an Earth 4 mage to summon. Despite this, what you get is actually quite strong. Yama-no-kami have Air 2, Earth 3, Nature 2 paths, as well as nearly 30 HP, Regeneration, Ethereal, and Sacred status. They passively summon Wolves in dominion, and summon more at the start of every battle. It’s a strong chassis with good stats and good paths. Unfortunately, similar to the other terrain specific summons, Yama-no-kami are weaker outside of their home province. They end up losing a level of each of their magic paths, which reduces them down to Air 1, Earth 2, and Nature 1, similar paths to a Master Shugenja. Despite the chassis still being solid, it’s probably not worthwhile to use an Earth 4 mage turn and 28 earth gems to summon them, unless for a very specific purpose.
Conclusion on Summons:
Jomon’s summons, by and large, are situational and supplemental more than strategy defining. Most of them offer little more than what Jomon already has available, or are limited too much by terrain and difficulties summoning to be useful reliably. It’s worth pointing out that in several of the builds the Death/Fire crosspath isn’t even available to give access to the Oni commander summons, making them often difficult for Jomon to make, despite being in many ways the most useful of the lot. The only other Summon which reliably gives Jomon the biggest magic boost, the Dai Tengu, is also the most expensive, again limiting the usefulness. Tengu troops are useful, and as a flying sacred are very distinct from the rest of Jomon’s lineup, but they are vulnerable and therefore difficult to use repeatedly. All-in-all, Jomon’s summons do add something to their lineup. You’ll never run out of Nature mages, you’ll always have a way to spend gems if you really want to, you can summon all many of stealthy mages to run around raiding if it strikes your fancy, but at the end of the day you won’t have so many gems that you can rely on your summon to carry you. Jomon still needs to find a suitable mid-game transition to hitting their power spikes, and it’s at that point that Jomon really blossoms as a nation.