Naaira’s Expansion Guide
Author: Naaira

Expansion is a fundamental and often-discussed topic amongst Dominions players, yet few actual guides exist. This is not a guide for the pros, the true masters of the multiverse, the expansermancers.
Other guides
Not-Lola has written this guide to expansion. It is definitely worth reading.
Rather, it is a tribute to mediocrity, to the enthusiastic amateurs who know somewhere deep down inside that they can become better at expanding.
Put on your expansion shoes, tighten that corset a notch and be prepared to learn a thing or two about expansion. Without further ado. Welcome to the first ever season of:

Your very first expanse lessons
What am I testing?
- You are testing what scales and bless you need to feel comfortable expanding. If you are not using a bless you want to find the level of order and productivity that allows you to produce enough units to get your expansion going.
- You are testing if your bless is viable if you chose a bless that is meant to improve your expansion; or what units to recruit if you go for scales expansion.
- You are testing the order in which to recruit your commanders and units. If you are doing a bless strategy for expansion you need holy commanders to bless your troops.
- You are testing which independents your expansion units will fare well against and which ones will ruin your day and crush your dreams.
- If you went with an awake expander you want to know how well it performs.
If you want to become the best expanser you need to practice. Whenever you play a new nation I suggest you set up a test game to test expansion. Even if you are an experienced player, different scales setups will affect the number of units you can make and this makes it worthwhile to do a simple expansion test. I suggest you do the following steps:
- Create your pretender beforehand: Use the Tools & Manuals menu to Create a Pretender God. This allows you to easily restart if you want to do another expansion test.
- Create the game: Create a new game and choose a map. If you have the option choose the map you will be playing on in the game. Set up the game with you vs one normal AI. Pick your nation and then pick your pretender. If you forget to pick your nation you will get a random assigned to you. When that happens it is easier to just force-quit Dominions (Alt-F4 in Windows) and start over the process. Remember to test with the same Independents' strength as in the game you are playing (usually 5).
- Start testing: Do expansion testing. Add 6 PD to all provinces you conquer, and build forts when you have enough money while still recruiting at full capacity in your capital. Once you reach turn 12, i.e. when it becomes spring again, count the number of provinces you have managed to conquer.
- Repeat: Create more tests games until you feel comfortable expanding with your nation of choice. If you adjust your pretender design, do a new test to see if you get a different province count.
If you are testing expansion as a disciples you should make both your Disciple and the Pretender God using the appropriate options in the Tools & Manuals menu. When launching the game you want to tick the Disciples game box and make sure both you and the Pretender nation are selected as human, and that the right nations and pretender and disciple are picked.. Once inside the game immediately set the Pretender nation to AI and proceed with your Disciples expansion test.

Finding the right expanse partner
In order to pick the right approach to expansion, you will have to analyse your nation’s lineup of basic units. You want to accurately identify your best unit(s) for expansion and practice until you feel comfortable with that unit. Look at your nation’s unit lineup. Do you have access to units with…
… higher-than-average protection?
Units with high protection will be able to expand into low-damage indies like militia and heavy infantry.
… high defense (16+) or cheap ranged units that can be amassed?
Those will help you expand versus units with low protection and high-damage attacks like Barbarians and Wolf Tribe.
… lances?
This can be mounted units, centaurs or flying units. Lances give a big alpha strike on contact and will be able to expand into most indie units after you reach critical mass.
… javelins?
Enough javelins on Fire closest will be able to take on a lot of indie unit types.
… length 3+ weapons and above average (12+) attack?
These units can repel many types of indies and will take less casualties as a consequence.
… high combat movement or flying?
Units with high movement or flying can jump into the back and hit archers and commanders.
… berserker or mindless?
Berserker makes a unit unbreakable and more durable after taking damage which means that your will not rout even if their commander is dead. Mindless are unbreakable and will fight on as long as a commander is alive to lead them.
… special defenses?
E.g. Glamour can negate hits. Awe may prevent indies from attacking the unit. Ethereal makes the unit harder to hit with normal weapons.
… special attacks and effects?
Fear auras may rout the indies. Chill and Heat auras may make the indie units pass out from exhaustion.
… cheap throwaway units?
Cheap units that are easy to mass like Markatas or Xibalban Warriors can be used as a screen that draws away crossbow fire or take that heavy cavalry lance charge, taking attrition so that your more expensive units do not.
… sacreds worth a bless?
The viability of sacreds depend on nation and bless chosen and will not be discussed in this guide.
… no obvious unit to expand with?
You can always go for an awake expander. Usually it is one of the pretender chassis that start with dominion 2.
Taorec’s All Nations Guide
One good beginner advice is to check Taorec’s All Nations Guide for tips on what units to use during expansion. Alternatively you can check the guide section of Illwiki to see if someone has written a guide for your nation of choice.
Late Age is more difficult
Note that independent units differ between the Ages. Notably, crossbows and heavy cavalry become more common in the Late Age which means that expansion becomes harder compared to previous ages.
National weaknesses
Many nations have units with certain weaknesses. The most common example is a lack of helmets and shields to protect against archery fire. Be mindful of the challenges this will give you during expansion.
Some words on Awake Expanders
Sometimes you need some extra OUMPH!! for your expansion. Maybe you are playing a nation that relies on fighting an early war. Maybe you need a big scary monster to deter your opponents away from attacking you. Maybe you just cannot get enough provinces early on to feel comfortable with your game. Whatever the reason you might want to consider an awake expander.
To function as an expander your pretender god needs two things:
- Enough protection to not die to independents. Usually this means high natural protection or regeneration. Recuperation is a big plus to deal with afflictions. Similarly, Immortality makes a failed expansion less costly.
- Some way to make the independents rout. Either by killing them with attacks, trample or damaging auras, or by having a Fear aura to make them rout.
Awake expanders are usually a Dom 2 chassis - aka. a Monster. Many of these pretender chassis need only a few tweaks to reliably expand into most independent provinces. It is possible to use some Dom 3 chassis - aka. a Titan. Usually this means either getting some critical research or forging some gear before sending it out though.
- Alteration 2 gives an
 1+ pretender access to Stoneskin to natural protection 15. Alteration boosts that further to NatProt 20 with Ironskin.
 - Enchantment 2 gives a
 2+ pretender access to Personal Regeneration
 - Depending on your pretender's gear slots and the starting site of your capital you might forge Construction 0 gear to protect your pretender like Blacksteel Plate (1, 5
 ) to boost protection, or Enchanted Pike (
 1, 5
1, 5 ) to give access to repel for a pretender with high attack.
The Earthsnek

The Earth Serpent is infamous for being a good, but very expensive, option for expansion. While it brings no path diversity it does bring a few other things to the table:
- A
 Fear aura to rout indies.
 - It begins with NatProt 20 and2. Once you boost its Earth path to 3 or higher you get this as a bonus to your NatProt. So it can easily reach 25 prot unbuffed.
- It has
 Recuperation that lets it heal afflictions
 - It is
 Amphibious so can expand underwater
If you don't have friends, you can always buy some
Sometimes you have a lot of gold piling up and you need some extra OUMPH!!. Don't worry, just press "b" and look at all the new friends just waiting to join your cause.
Mercenaries can be a good and inexpensive way of speeding up your expansion for nations that are recruitment-capped but still have gold to spend. It is also a way for land-locked nations to go underwater if the right mercenaries show up. To buy a mercenary do the following three steps:
- Press "b"
- Go to the Mod Inspector and search for the mercenary bands currently available by writing their names under the Merc tab.
- Click on the province you want the mercenaries to appear in and place a reasonable bid on the mercenary bands you want.
The mercenaries differ a lot in strength. Don't expect Bindar's Mighty Markatas to carve a path through Heavy Cavalry - but maybe those monkeys can polster those lances nicely before the Heavy Cavalry hit your main line?
Eyeing the competition: Independents
![]()
![]()
Having rigorously practiced with your expanse partner now is the time to eye up the competition. As always, how you handle each type will depend on what units you have available to you. Remember: If you kill all commanders the independents will rout. Here is a list of common enemies and some suggestions on how to deal with them.
Seek help!
If you encounter a type not discussed here please use the Mod Inspector to look them up. I also advice you to read Taorec's tips on expansion in his All Nations Guide. .
Militia, Light Infantry
Heavy Infantry, Archer,
Light Cavalry, All Tribes
(except Horse, Wolf
and Bone Tribe)
This is your standard independents and the weakest type you will encounter . Heavy Infantry is better than militia but worse than most nations' infantry options. Archers can prove a slight problem to nations with no helmets. The various Tribes are lightly armored with low damage attacks.
- Bring enough of your own troops. 20-40 can be handled by a smaller expansions party while 50-100 will often need a larger party from you.
- Place your troops in the back on Hold & Attack Closest. This way the independents will split up and you can overwhelm each group in turn.
- If you have cavalry units or other fast units you can script a group to Hold and Attack Rear to target the enemy commander. Make sure to position them further back than your regular troops to hopefully draw the independents towards your main blob of troops.
Longdead, Soulless,
Ghouls
Undead are usually low-quality troops that will be easy to handle for most troops. Just beware of the Longdead Horsemen and their charge.
- Use your prophet to banish them.
- Use units with slashing or blunt weapons against Longdead. Use chaff to take the charge of Longdead Horsemen
Wolf Tribe
Wolf Tribe are dualwielders with two low-damage piercing attacks and very little armor. They can massacre units that depend on defense to survive.
- Use archers or javelins to rout them before they reach your frontline.
- Use high-protection units that can withstand the flurry of dagger blows.
Heavy Cavalry, Knights,
Cataphracts, Jade Amazons,
Horse Tribe Cavalry
Pegasus Riders
The cavalry units have medium to high protection, high defense, and they carry lances that gives them a significant damage bonus on their first strike. After the first strike they deal significantly less damage. Horse Tribe and Pegasus Riders have both bows and light lances but are not as armored as the other types. They also like to stand still and shoot.
- Bring hard-hitting high-attack units that can deal damage through their high protection. This is especially true for Knights that can prove a serious challenge for many regular units.
- Bring lots of units to surround them and harass down their defense. Once a unit's defense is low your units will begin to crit and will eventually make it past the high protection.
- Recruit cheap easy-to-mass infantry (also called Chaff to take the initial charge. Place your chaff in the center and try to time it so that the units that will do the killing arrives right after your chaff has taken the charge.
- Lots of javelins or crossbows on Hold & Fire closest can sometimes rout the cavalry before they reach your front line.
- Use spells like Earth Meld or units with nets to stop them in their charge and reduce their defense to zero.
- Against Horse Tribe and Pegasus Riders reduce the time under fire and try to hit them from the side with a squad on the sideline on Attack Rear.
Barbarians, Lizardmen,
Bone Tribe, Cavemen,
Cynocephalians
All these units have low protection and hit like trucks! Lizard Shamans often cast Curse which will cripple any Awake Expander for the rest of the game. Cavemen and Cynocephalians fight in caves which will give a penalty of -3 to attack and defense skills to units with no darkvision or spirit sight.
- Use ranged attacks to rout these low-armored troops before they connect. A sufficient number of archers, slingers or javelin troops will do the trick.
- A sufficient number of hgh defense units (16+) will work as well. What does not hit you does not hurt.
- Do not send your pretender god or expensive mage commander into a Lizardman province.
Crossbows
Crossbows shoot armor-piercing and piercing bolts that will reduce the protection of your troops by 60%. More common in the Late Age, these troops can deal significant damage to your expansion party
- Hit them fast with cavalry or other units with high combat movement to kill them before they deal too much damage. Script to Attack Archers. Cavalry on Attack Rear may kill the commanders and rout the crossbows in the process.
- Units with shields and helmets can advance and kill them. Script to Attack Archers
- Make sure to use multiple squads so that at least one squad makes it to the crossbows without being tied up by other units along the way.
Elephants, Troglodytes
The units do trampling damage, 16-20 armor-piercing damage (-50% prot)! These independents are especially damage to smaller densely-packed units or units that rely on Glamour for protection.
- Bring units that are too large to be trampled (4-6 size).
- Shoots them with arrows or bring magic like Sleep, Paralyze, Charm Animal, False Feathers or Bonds of Fire. Body Ethereal can negate trampling damage.
Zotz
Shitty flyers in caves. Just remember to position your commander in the middle of your troops or they might accidentally kill him and rout your expansion party.
Blowpipes
Armed with blowpipes these units deal extra poison damage if they deal damage. Use high protection units or units with shields and helmets to avoid taking poison damage. If you have units with Poison Resistance use those (obviously).
Underwater Independents
In general underwater expansion functions like regular expansion with a few exceptions. Slashing and blunt weapons have a penalty underwater so use piercing instead. Ranged weapons do not work except for nets and Spectral weapons (such as Therodos' Spectral Archers). Weapons and armor made of iron will degrade underwater so be mindful of what you send beneath the waves. Bronze works fine.
Mermen, Tritons, Ichtyids
Your standard underwater independents that should be dealt with
Mermen, Tritons,
Ichtyids, Amber Clan Triton
Your standard underwater independents. Ichtyids with nets can break your formation and lower the defense of your troops. Low damage and protection make them easy to deal with. Just make sure you bring enough troops.
Triton Guard, Amber Clan Guard
Independents with high protection. Make sure you bring enough killing power.
Shark Tribe
The undisputed menaces of the sea. High attack density and high damage attacks mean these will be a danger to most expansion parties underwater. Berserker means that you will have to kill them before they kill you.
Atlantians
Atlantians have poison barbs which may poison you when you hit them. Make sure to not hit them with range 0 weapons to avoid getting poisoned. Bring troops with poison protection.
Stepping on your partner's toes
Get hot with hotkeys!
Basic orders
a - Attack
h - Hold and Attack
f - Fire
j - Hold and Fire
e - Fire and keep distance
c - Cast
d - Advance and Cast
g - Guard
r - Retreat
Targeting
C - Closest
R - Rear
A - Archers
V - Cavalry
M - Monsters
N - AI decides
Misc
x - Repeat last order
Ctrl 1-9 - Save script
1-9 - Paste script
When expanding, here are some of the common mistakes that players tend to make:
- Using the wrong units: Sometimes you need to bring a sword to a fistfight - sometimes you need a bow instead. Knowing which of your units to use against different independent types is probably the most important decision you can make.
- Using too few units: Depending on which unit you expand with you will discover that certain breakpoints exist for the number of troops you should bring. If you bring too few you will lose a lot more than if you bring slightly more than you need.
- Using too many units: There is such a thing as too many units in your expansion party. The basic question you should ask yourself is: Could I have taken two provinces instead of one with this amount of units?
- Unscripted squads: By not scripting you hand over your faith to the Dominions AI, and if there is one thing you should never put your faith in, it is the Dominions AI. Learn those hotkeys so you quickly script your units for action!
- Too few or fragile commanders: Think of your commander as your weakest link - if you lose your commander you most often lose the fight. If you are using fragile commander types bring enough, or protect them with sturdy bodyguards.
- Unscripted commanders: Nothing is worse than a commander who decides to play Rambo and take on the Barbarian horde all by himself. Often you want a basic script of Hold x 2 or x3 (thanks melficebelmont), Stay Behind Troops saved to Ctrl + 1 and make sure you script your basic commanders with that before a fight.
- Unblessed sacreds: If you expand with sacreds make sure you bring enough holy commanders to bless your sacreds. Depending on your bless and sacreds, an unblessed sacred may be more likely to die, incurring unnecessary casualties and potentially losing you the fight. When blessing with priests with
 1 you almost always want your sacreds scripted to Hold and attack to give the priest time to bless them. You also want to be mindful of Bless' low range of ten squares, so place your priests close to your sacreds.
 - Using squads with <5 units: Any squad with less than five units takes heavy morale penalties. Never use less than 5 units, unless you are using elite units lead by an elite commander. In that case set the elite units to bodyguard the commander and script the commander to attack (or buff and attack).
Blood on the dance floor - Staking Claims and Backfilling
While doing singleplayer expansion tests is all fine and dandy. What really matters is how many provinces you get in multiplayer. Who cares if you can get 25 provinces in singleplayer if you only get 12 in multiplayer!
When you load up turn 2 after having done your standard recruitment on turn 1, take a good look at your cap circle:
- What indies can your starting army take on comfortably? What will your next expansion party be able to handle?
- Are you resource restrained? Then you might want to prioritize provinces with high resources and clearing your cap ring as fast as possible.
- Do you have slow-moving units that can only move one province at a time? Then you want to leave indies in your cap circle for future expansion parties to claim on their way out.
Then zoom out a bit and take a look at the bigger map:
- Are there any farmlands nearby? Those will likely be heavily contested because of the gold income.
- Does your nation have special benefits from certain kinds of terrain in your vicinity? E.g. Pangaea likes forest provinces.
- Are there provinces you *need* to take in order to guarantee access to Throne provinces?
- What natural barriers do the map have? Rivers, mountains and underwater provinces may limit your ability to move on the battle map.
Based on what your cap cirle looks like and what direction you want to head towards, pick your first target.
 Eriu has started with three farmlands within close range.
 Here the barriers have been marked with red.
Chokepoints & Backfilling
When you expand in multiplayer you have two goals:
- To get as many provinces as possible and
- To limit how many provinces your opponent gets.
Some provinces will be more valuable than others based on how they grant access or limits access to other provinces. We can call those provinces Chokepoints. Sometimes it is more valuable to take control of chokepoints than claiming a province with your expansion party every turn.
Taking provinces that you have cornered off by conquering key chokepoints is called Backfilling
![]() Taking the forest and then the farmland effectively guarantees four province of expansion.
Taking the forest and then the farmland effectively guarantees four province of expansion.
Expansion paths & Reinforcements
As noted before your expansion path will differ a lot based on what nation you are and the barriers and features of the map you are playing on. It will also differ based on what independents you can comfortably tackle in the early game.
In the ideal scenario you want to leave independent provinces for your new expansion parties to expand into. This is easier to do if your units have high mapmove. If that is not the case you might want to wait with claiming provinces in your cap circle so that future expansion parties can grab them on the way out.
You will often find yourself in a situation when one or more of your expansion parties have taken heavy attrition - or will do so given its expansion options. In that case it is a good idea to combine expansion parties for difficult provinces and then split them up again afterwards.
 Some sample expansion paths. Obviously the paths may differ a lot based on what happens along the way
Positioning and Scripting
It can be worthwhile to experiment with how to script and position your units. The right script can dramatically cut down on expansion losses and make your expansion parties last longer.
As a general rule of thumb you want the following to be true:
- Archers and crossbows should be placed behind a line of sturdy infantry to protect them from melee combat.
- In general you want your highest protection units as your frontline to get less attrition except when fighting hardhitting independents like Heavy Cavalry. Then you might want a screen instead with your high protection units right behind them.
- You want your fast cavalry on the flank on Hold and Attack Rear. Hopefully they will run behind the enemy lines and take out any commanders.
- You want your commander to not run ahead and die. Script them to Hold x 4, Stay Behind Troops for their own protection.
Spellcasting non-mages
Lurch shares this useful tip: Instead of scripting Hold x 4, Stay Behind Troops you can script non-mages to Cast Spells by using the c hotkey - even if that option is missing in the UI as it is for all commanders with no magic paths. By doing this you make sure they remain in the same spot throughout the fight without ever moving forward. This can be used to set up stationary commanders with bodyguards around your mages later on in the game.
Your troops' positioning and scripting should differ depending on what you are up against. For example:
- Against a group of Heavy Cavalry and Heavy Infantry you might want to place your army all the way to the back to split apart the fast cavalry from the slow infantry. Your troops should be scripted to Hold and…
- Against crossbows and infantry you might want to be as far forward as possible with most of your troops to quickly engage the crossbows. You want your troops to immediately Attack
- Against Zotz you want to make sure your commanders are in the middle of your troops and your troops on Hold and…
The point is that you should be checking your expansion army before each fight and determine if you need to reposition your troops and change their scripts.
That Profitable Prophet
Prophetizing one of your starting commanders can give your initial expansion party a lot of extra firepower. All prophets are at least ![]() 3 and can Smite your enemies. The name and effect of that smite will differ depending on what the highest path is on your pretender god.
3 and can Smite your enemies. The name and effect of that smite will differ depending on what the highest path is on your pretender god.
A standard script for your prophet would be Divine Blessing, Smite x4, Cast Spells or Smite x5, Cast Spells if you brought no sacreds with you as the prophet is always blessed.
Make sure to take into account the range of your Smite. E.g. Word of Stone and Watery Death both have range 25 for instance, so your prophet might not be in range if they remain on the backline. In that case script Advance and Cast Spells.
Rename your prophet!
Timing when you make contact
One important aspect of combat in Dominions is how units choose their target. A unit will prefer to attack the unit immediately in front of them if possible. This means that units that attack someone in the back will take a lot less hits and thus less risk of dying. What this means is that you want your high-damage glass cannons to flank the enemy to not take as many hits.
You accomplish this by making sure that your central line makes contact right before or at the same time as your flanking units. Experiment how to position your units until you get the timing right.
In Rovsea's example guide to expansion with Jomon he has found this position to work. The cavalry in the back makes contact at the same time that the infantry engages the enemy.

Screening
Every now and then you come up against independents that you know will cause you attrition. In those cases it may be a good idea to use a screen. A screen is a group of cheap units that you use as your frontline to take the initial charge. Usually this is combined with using your regular units as flanking units.
- When using screens remember that your army may automatically rout once it loses a lot of its total HP, either from attrition or because your screening units ran away. Your screening units should never make up 50%+ of your total HP. You might also want to place them in several groups.
Advanced tips: Expanding with Unusual Units
Once you have a few games under your belt you might want to try your hand with some of the more finicky nations that require more finesse when expanding. Here are some examples of some unusual expansion strategies that might peak your interest.
Expanding with Flyers
A sizable number of nations have access to units with Flying. These range from some of the best units in the game (like Ragha's Zhayedans or EA Arcoscephale's Wind Riders) to some of the worst (like Xibalban Warriors). One of the big advantages when using flyers is their ability to fly into the backline. In many independent provinces that is where the commanders are located, and once they are dead the independents will rout.
If your flying expanders can survive archer or crossbow fire you can script them to "Hold and Attack rear". This will often have the effect of dividing the independent troops as faster units get ahead of their slower allies. Just remember to not leave your own commander all alone to take that heavy cavalry charge. To protect your commanders you can either make them jump in with your troops if they can fly (although that can be risky), or you can use bodyguards or a screen of non-flyers to protect them.
If your flying units melt to arrows (I'm looking at you Xibalba), you might want to use a sacrificial group on "Attack closest" with your larger group on "Hold and Attack rear". This is especially valuable when playing EA or LA Xibalba with a sacred offensive bless. The sacrificial group of cheap Zotz will decrease attrition on your sacreds significantly.
Expanding with Tramplers
Units with Trample such as Elephants and Chariots can be used for expansion. If your nation has a trampler available, you might want to consider expanding with a trampler under two conditions:
- You went for great income scales instead of a strong bless for expansion.
- Your other options for expansion take a long time to get out (2-3 turns per expansion party).
Usually Tramplers have a high upfront gold cost. Just look at this War Elephant - 100 gold a piece! If you lose an expansion party of four elephants that is a big setback. Thus you want to test, test, test to make sure you know exactly what your elephants can handle and how to set them up prior to each battle.
Kalkyrie made this short guide on how to expand with Elephants to get you started. Expanding with elephants is generally:
- One brave militia on the very front line, with Attack Closest.
- Four or so elephants on the flank, about 4-6 'steps' back. Also on Attack Closest. With 4-5 more militia in the same group, to buff their morale.
- The brave soul on the front line gets attacked by the whole enemy army, and dies just as your elephants hit the enemy army.
- Next province, move one of the militia in the elephant group to the front line.
Maerlande shares these tips:
- I often use very slow heavy infantry with your best morale in the elephant squads. That way they stay way behind.
- Be sure to put commanders out of the retreat path of elephants. Top or bottom corner. Or if elephants on flank then middle.
In a video with Dartimos Zan points out that it best to have elephants hit from the flank or rear if possible, while the enemy is occupied with attacking other units. Since units prefer to attack units in front of them, a flanking elephant will take less hits while it tramples away.
Lucid demonstrates how to expand with elephants in this video. Similarly Dartimos and Saquenay discuss how to expand with elephants in this video.
Roman Expansion
Roman expansion refers the use of the two gladiator units, the Gladiator and the Retiarius. EA Ermor, Sceleria and MA and LA Pythium get access to these unique units. The gladiator units are unique for three reasons:
- They only cost 1 resource point so they can be amassed very early as long as you have gold and recruitment points available.
- They have above average stats for a human unit and high damage attacks in the form of a trident and a net or a two-attack flail.
- They disappear after a fight where they either took a hit or succesfully hit an enemy unit.
Besides giving excellent protection against early rush, the gladiator units can be used to add much needed killing power against tough independents such as Heavy Cavalry, which the Retiarii with their nets are very well suited to deal with.
Against weak independents the gladiators are placed in the backfield on Hold and Attack with five on Guard Commander. Your regular troops are placed in the front on Attack (or Fire in case of javelin infantry). The idea is to kill off the independents before the gladiators make contact.
Against strong independents as many gladiators as you think are needed can be placed up front to participate in the fight. Either place them in front of your regular troops or to the side. The idea is to let the gladiators take the attrition while also guaranteeing the win due to being hardhitting troops.
Assassination Expansion
Some nations have assassins that may help you expand, like Marignon's Assassin, Vaettiheim's Dimvaetti and Ctis' Empoisoner. Assassination expansion works in the following way:
- You move your assassin to a province controlled by independents
- Your assassin kills off all commanders during a couple of turns (if all goes well)
- Once all independent commanders are dead you attack the province. The troops will rout at the beginning of combat since they lack a commander to lead them.
Assassination expansion is an effective way of dealing with hard-to-kill provinces like a lot of Heavy Cavalry or Crossbows. It is a slow process and should only be considered as a complement to regular expansion. However, it is also potentially a big trap! Let us look at why:
- Assassination expansion is much slower than regular expansion, often taking several turns. Ideally you want to ping each province you are trying to assassin to know the exact number of commanders in the province so you know when you are finished.
- If you are unlucky your assassin may die during assassination meaning you will have to bring in another assassin to finish the job.
- If you try to get a province near a neighbour, they could swoop in as you kill off the last commander, getting the province for free. For this reason, it is often best to 'backfill' provinces with assassins.
With all these objections in min there are several nations with access to assassins where their cap recruitment is throttle by something other than gold. In that case assassins can be an effective additional expansion party. Marignon and Vaettiheim are examples of nations that might consider complementing regular expansion with assassins.
Lurch adds this piece of advice:
As for assassin expansion, there's a way of speeding up the process between killing commanders and taking the province, if you're willing to ping it the same turn with the cheapest possible unit you can muster (indy scout or commander). Since assassinations take place before the battle, if you're lucky you can kill all the commanders right as the lone commander moves in to attack it.
Script Hold x2-3, Retreat. Hopefully that gives time enough for the indies to vacate the battlefield, or if their commander is still alive, time for your commander to book it before dying.
Obviously if the province contains both fast and slow units, it's unlikely you can script it so that you're out of dodge before a cavalry charges (if assassinations failed) but long enough to wait out a squad of heavy infantry (if you succeeded).
Thug expansion
Some nations can use Thugs to assist their expansion. Thugs are mages who are capable of killing smaller armies by themselves - or in this case independents. A select few thugs can expand with a heavy bless, while others will need a combination of research and cheap gear. In many cases a properly set up thug can clear indie provinces that your regular army would struggle with. When used in this way thugs can be a nice supplement to your expansion.
Rule of thumb: If you want to use thugs for expansion they need to be online by turn 6 at the latest to stay relevant.
In order to be useful in expansion your thug needs to be able to do two things:
- Survive the independents in a province.
- Be able to rout them.
For survival you need to make sure that your thug has access to enough layers of defence. Good defensive tools include high protection, high defence skill, Awe, Glamour, etc. The more defence you can stack on a thug the better its chance of survival.
For routing the independents your thug will either need to kill the independents before they chew through your thug's defensive layers, disable them with Heat or Chill auras and then finish them off, or make them rout with a Fear aura.
![]()
Thug example:
Yomi's Dai Oni
Requirements:
A heavy bless.
E.g. Regeneration, Awe
Gear:
Not needed.
Script:
1-2 selfbuffs like Skeletal Body / Air Shield / Ironskin, Bless, Attack Rear
Why it works:
The fear aura from the Dai Oni eventually routs the indies if it stays alive long enough
![]()
Thug example:
Na'ba's Malikah
Requirements:
Construction 2, Alteration 3+,
Awake research pretender
Gear:
Enchanted Pike, Burning Pearl,
body armor like Blacksteel Plate
Script:
Ironskin, Mistform, (Temper Flesh/Personal Luck/Bless) Attack Rear
Why it works:
High prot with Ironskin, repel with high attack, Mistform and Glamour to negate hits. Can handle most indies but not Barbarians or Wolf Tribe
Commander Sniping
HPmunchcraft has made this video demonstrating how to use commander sniping with Caelum. He has also covered how to use the technique with MA Man, one of the more difficult nations to expand with using the starting army.
One advanced technique that can improve your expansion is to try to make the independents split up in a way that isolates the indie commanders and opens up for a quick kill. After all, the only thing you really need to kill in a province is the commanders.
One way of accomplishing this is to use archer bait squads on fire and keep distance placed to the front in the top or bottom. Opposite that in the back corner you place the squad that is supposed to kill the commander. The archer squads can be made up of a single archer, so five archers in five squads under a single commander.
The technique exploits the fact that the AI picks between available squads when picking a target without considering how many units are in the squad. This will often cause a big portion of the enemy forces to chase your archers leaving the commanders isolated for a flank kill.
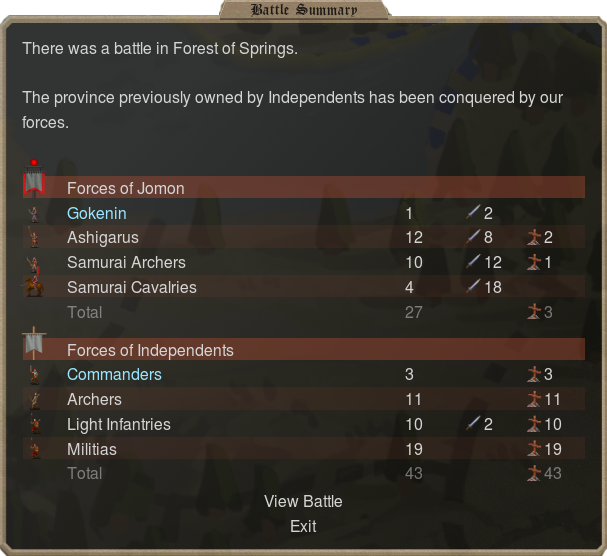
Example: Expansion with Jomon
This is a guide to expansion with Jomon written by Rovsea.
After trying quite a bit of stuff, I have come to the conclusion that recruiting Samurai Cavalry is probably the best way to expand using Jomon’s starting army. Ashigaru spam seems like it might work: their prot is not great but it is ok; their stats for a militia unit are actually quite good, and at 5 recruitment points you are probably not going to be eventually recruitment point locked like you are for a lot of their other choices. I have also tested normal samurai. Unfortunately, both of those are just as vulnerable as Samurai Cavalry to things like archers, javelins, and crossbows, except they also die even faster in melee, so they attrition out a bit too rapidly for me to endorse them.
For expanding into non-heavy cavalry normal marching indie provinces, I have a very specific setup that I would advocate for. This is marching into the third province I am expanding into, after successfully killing two others. If you will notice I have only lost a few dudes so far.

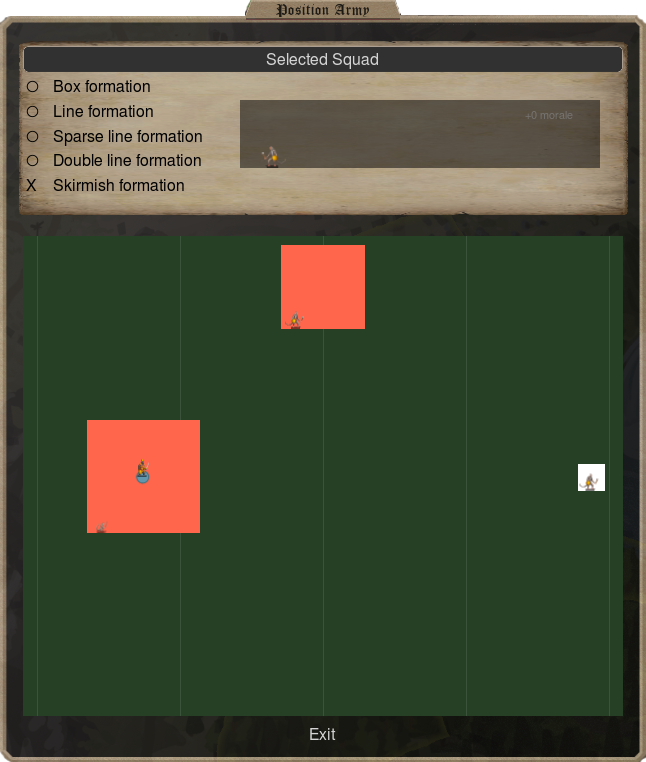
Positioning
The positioning is arguably the most important part because you want your cavalry and your infantry to be engaging the enemy as close to simultaneously as possible to reduce casualties. The scales you take are also important, as samurai cavalry are heavily scale dependent; if you take less productivity than I did here, say anything under prod 2, then you are probably only going to be able to afford three samurai cavalry, which should still work ok, but you will slow down faster eventually; if you dump productivity entirely, then you are probably not playing Jomon right, or have some other, non-troop based expansion strategy presumably.
Anyways, to get a more precise idea of where to place the units, this is how I usually would position them. The cavalry are all the way in the back and cornered so that it is not easy to get around them to the general. The infantry are all blobbed together for a couple of reasons. Having the archers on fire is probably a mistake, as ashigaru are liable to rout all by themselves in such small numbers. Samurai archers are decent in melee, if pricey for that role (but you did not have to buy the starting army), and it preserves your morale since you only have a 60 leadership starting commander. You want your infantry positioned right where they are, a step forward can be OK but it is possible you will block some of your cavalry coming in on the charge. You want the infantry a half step behind to prevent this, but still able to enter combat on the same turn if possible. It should look like this, or very similar. You can see all the cavalry get their attacks off first, which means they were slightly before the infantry. The big impact of the lance charge can rout the enemy quickly.


And the end result is that while we do take some light casualties, it is a successful expansion. The casualties in the previous two combats were just four dudes as well, so after three expansions as Jomon you still have a viable expanding army. You do want to avoid difficult provinces as you would with many starting armies, namely heavy cavalry or large Barbarian provinces.
My starting army in the test game I am running actually expanded just fine into six different indie provinces before joining up with a secondary expansion party and continuing to expand. The above shows that even after attritioning a little bit, the starting army can still expand - even into provinces much larger in numbers than itself. As long as you have around ten infantry to soak up damage and cavalry to lance the first indie squad, you have a decent shot.

The starting army is still going strong.
Heavy cavalry
It is possible to expand into heavy cavalry, but it is a lot trickier. As you can see this time the samurai cavalry took attrition as well, and you have to be careful about lining up your cavalry with the indie cavalry, because ashigaru will melt if they touch a lance charge. I would advise pinging anything that looks like a large heavy cavalry province with a scout if possible, and making sure that if you cannot scout it you have a good number of cavalry positioned in front of your infantry to meet the enemy lances head on.
If you know where the enemy cavalry will be, you can use the same positioning as before, with the samurai cavalry lined up with the indie heavy cav, this time with both squads on attack closest instead of hold and attack (you can also do attack cavalry to make sure they target properly).
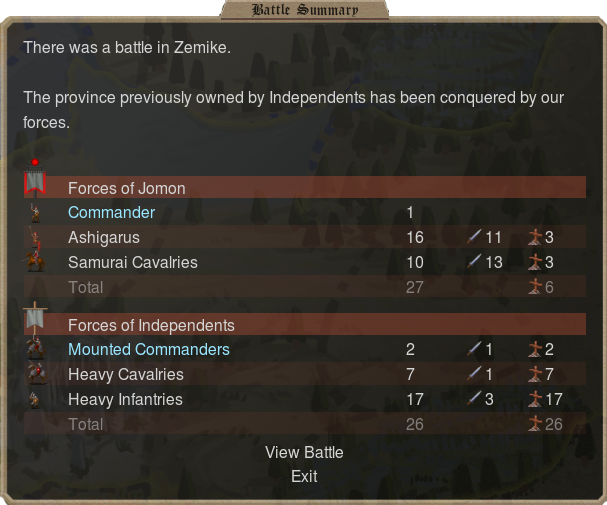
A succesful expansion into Heavy Cavalry

This is what happens when you do not line up properly, and there is a lot of enemy heavy cavalry
Conclusion
Something to keep in mind, expansion is going to be pretty different for Jomon depending on if they take an awake expander or not; with the awake expander it will, obviously, be a lot better. Expanders also let you take hard provinces with the pretender while you take less risky provinces with normal troops. Overall, I would still recommend taking an expander unless your plan is to just go for full scales or something similar, at which point I am not really certain which is better. Jomon really likes getting access to Ryujin.
As it is, with no expander I am looking at just under 20 provinces at turn 12, which while not great, is still decent. You are going to have enough gold to put up multiple forts if you take scales, and if you took an awake expander you are looking at even better expansion numbers so your extra gold will come from the extra land, and you will still be able to put up a few extra forts.